Yes, I remember too that about splicing attempts,, Not easy task. But good hydrodynamic line slide is better than free shaft.Thanks Tomi,
Will look into this
Years back I actually experimented with splicing thin dyneema and made some splicing tools for the purpose. I think it was for shooting line, too but I think at the time the issue I ran into was that the supposedly best dyneema for shooting line is prestretched quited hard in the machines and then has a PVC coating applied. The idea is that we want a stiff dyneema as the soft braid tangles so easily. But it makes it very hard to splice, I found it impossible in the thinner sizes if my memory serves me.
The soft braid is generally much easier to splice. Not to mention, the braid doesn't have a protective sleeve which the stiff dyneema does. Anyhow, I think it could be worth revisiting the idea


Guest viewing limit reached
- You have reached the maximum number of guest views allowed
- Please register below to remove this limitation
- Already a member? Click here to login
-
Welcome to the DeeperBlue.com Forums, the largest online community dedicated to Freediving, Scuba Diving and Spearfishing. To gain full access to the DeeperBlue.com Forums you must register for a free account. As a registered member you will be able to:
- Join over 47,943+ fellow diving enthusiasts from around the world on this forum
- Participate in and browse from over 531,990+ posts.
- Communicate privately with other divers from around the world.
- Post your own photos or view from 7,455+ user submitted images.
- All this and much more...
You can gain access to all this absolutely free when you register for an account, so sign up today!
You are using an out of date browser. It may not display this or other websites correctly.
You should upgrade or use an alternative browser.
You should upgrade or use an alternative browser.
GeckoSub Mirage Evo - And Adventures in 3D Printing Speargun Parts
- Thread starter Diving Gecko
- Start date


17-4PH We Are Not Friends...
I tried machining a slider today. Not easy, 17-4PH in the "annealed" state is a bit gummy. When I machined a trigger sear out of hardened 440C, it went much easier. Also, cutting hardened 17-4PH (shafts) on the lathe is not as bad as this was. I actually think cutting it hardened is easier. Also, my machine has a high speed spindle with very little torque when it's not spinning fast and steel prefers slow spinning tools.
Anyhow, here we go:
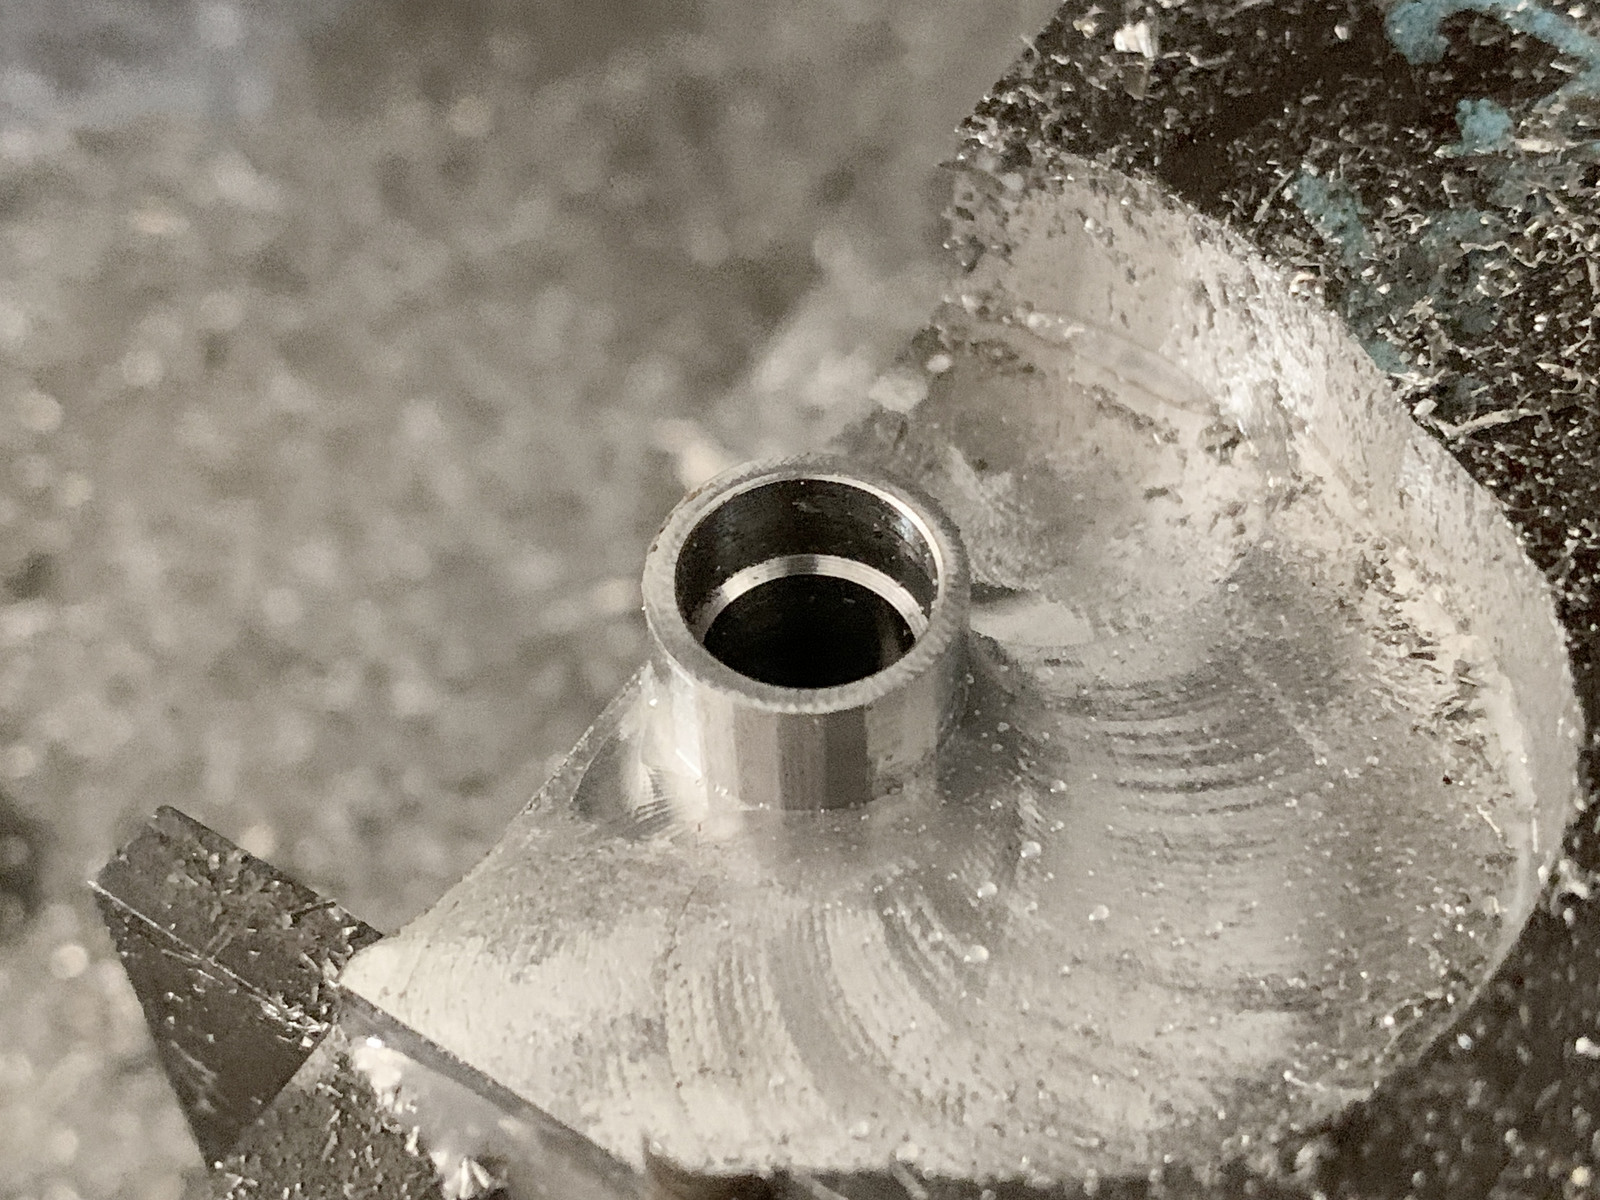
I made a programming mistake. The intention was good, to helically cut a slot (adaptive machining) around the part instead of just a classic slot which would have been really hard on the endmill. But the boundary I had set for how wide it could do this was set incorrectly. So, I gave it waaaay too wide a slot which is why I wasted this much material and time, haha.
Anyhow, the most important was that the inside bores of the slide came out pretty nice and on size and I managed to really massage the chamfer tool super close to the inside wall to cut that chamfer on the little flange between the two inner bores for the hydro braking. (This would have been easier on the lathe, actually).
I left the last 0.1mm of stock at the bottom:
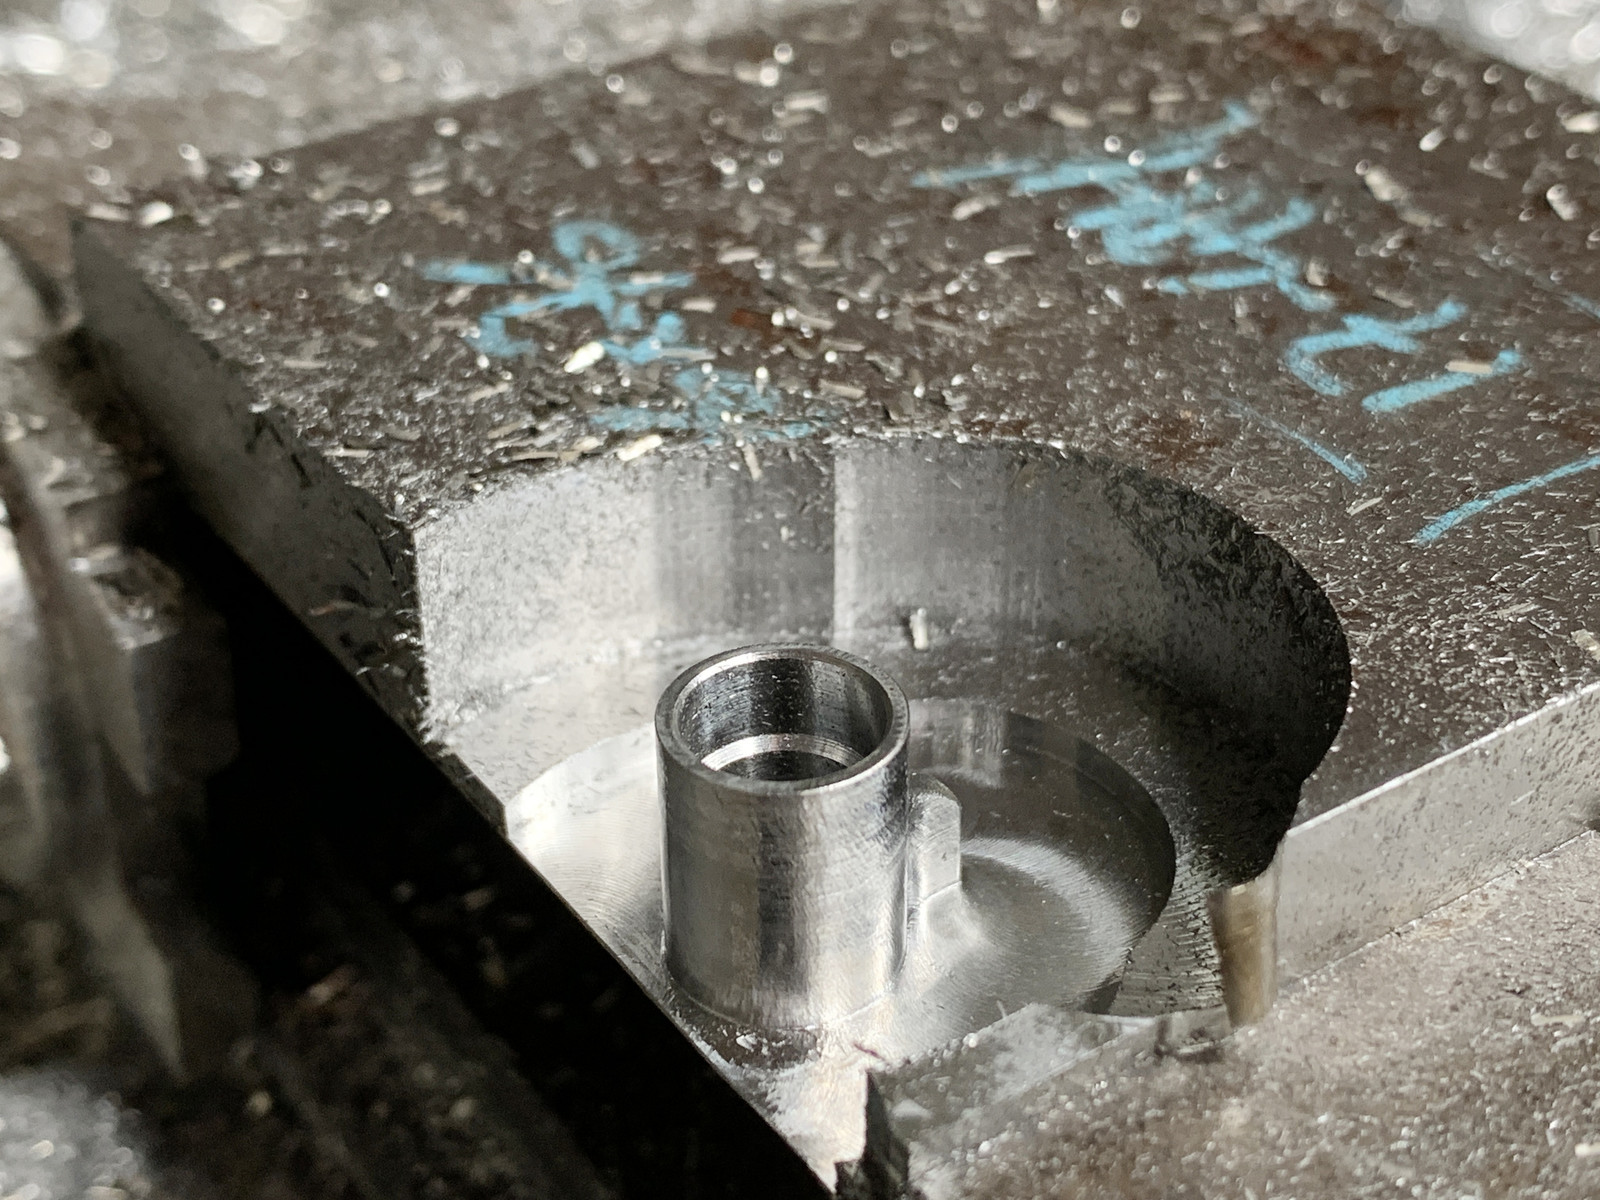
Also, in the above pic, you can see how the deeper slot around the slider is way narrower than it is further up. Still x1.5 times wider than the cutting tool so it has an easier time getting the chips out of the slot, but not as crazy wide as the top part where I hadn't caught my error, yet.
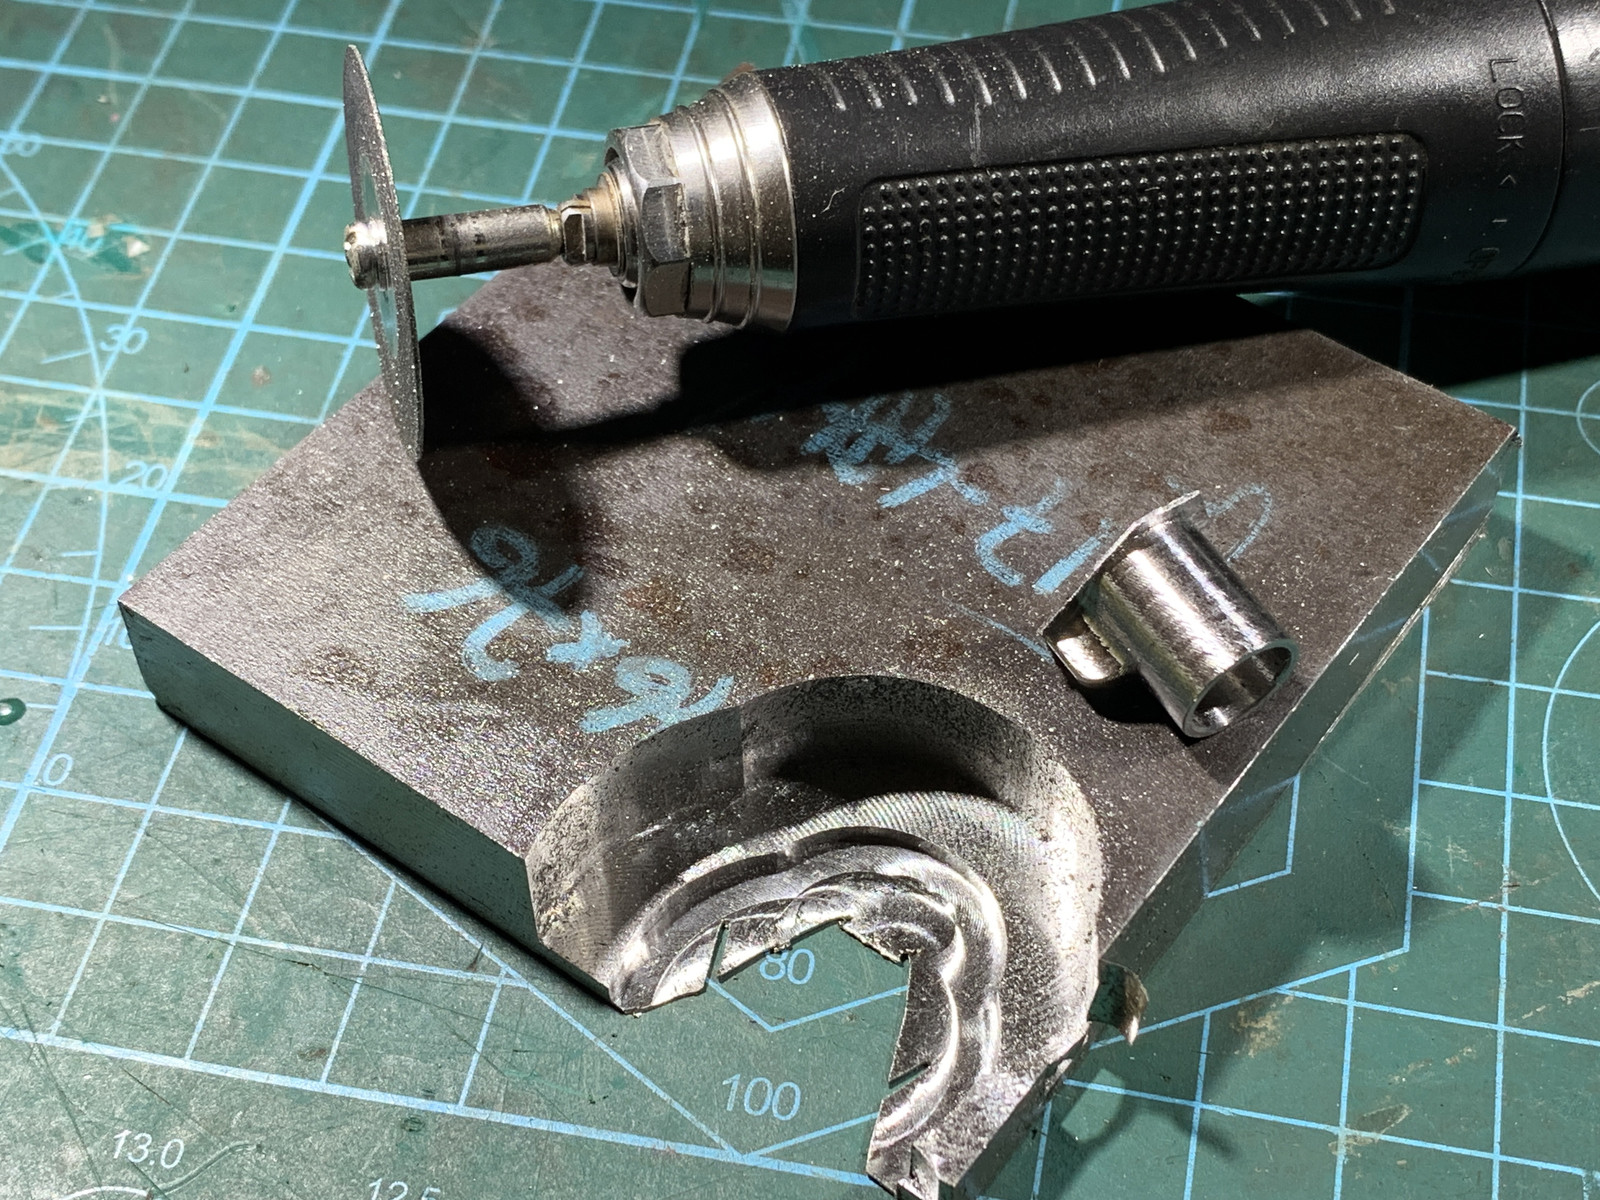
I parted off the slider manually from that last bit of stock with my little grinder:
And then whipped up a little mandrel so I could hold the slider better whilst I worked with the grinder and some other bits to get rid of the lip and round off the front part of the line lug:
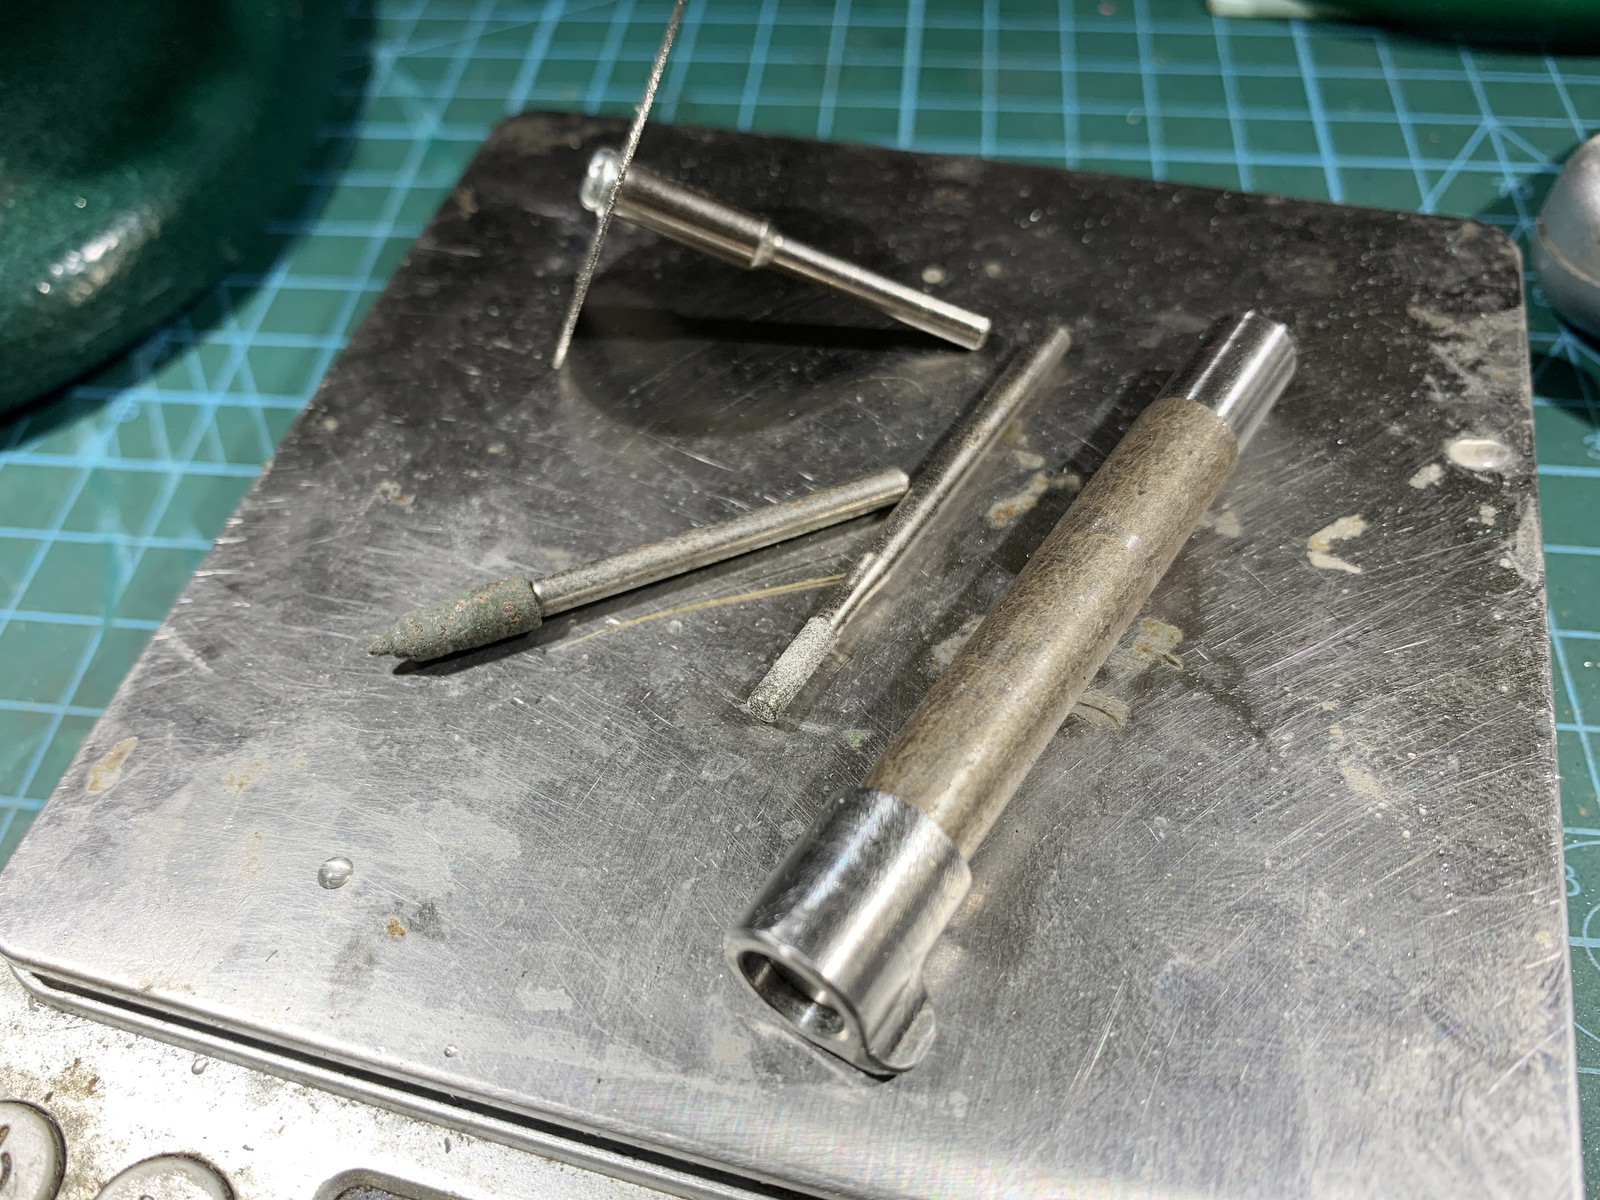
The mandrel, despite just being a press-fit and not an expanding one, worked fine to hold the slider in the lathe so I could chamfer the inside front - which I couldn't reach on the CNC. (Actually, I could have - but I forgot I finally have some inside chamfer tools to reach the bottom edge of holes...)
All that's left to do is drill a cross hole in the lug and round off the edges of that hole and then this slider should be good to go:
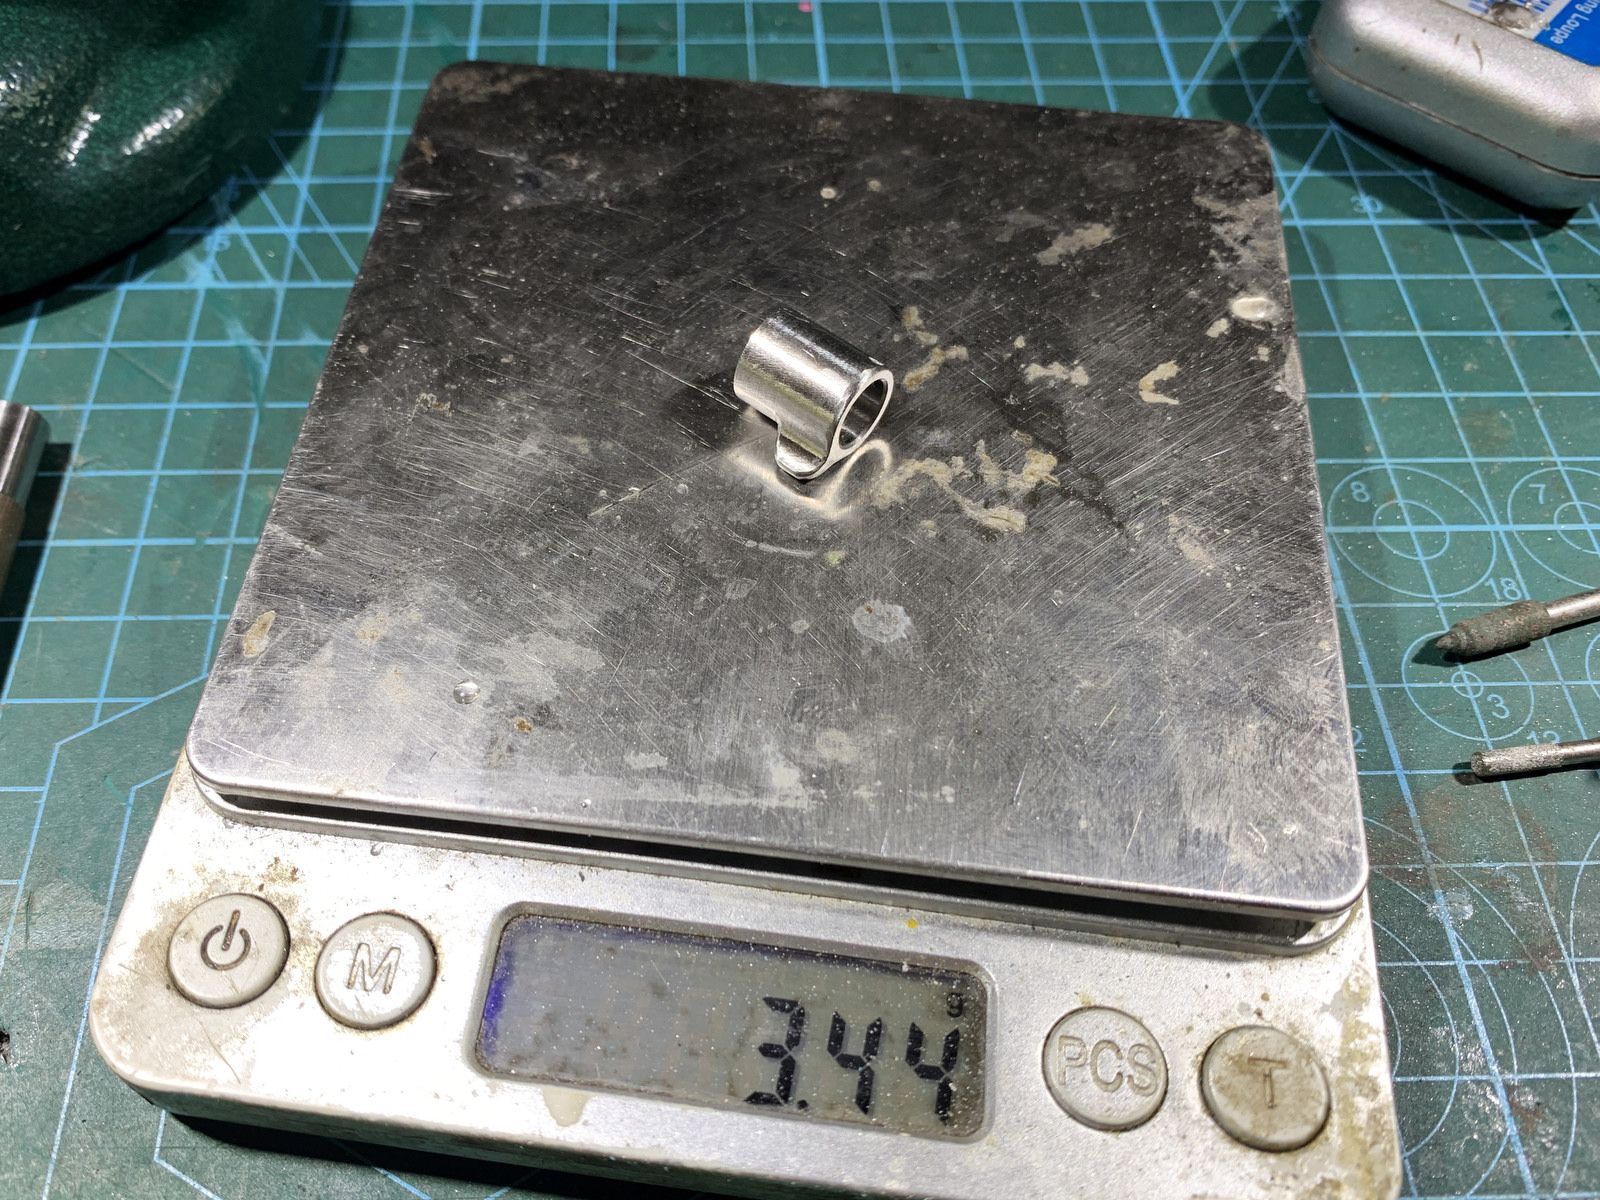
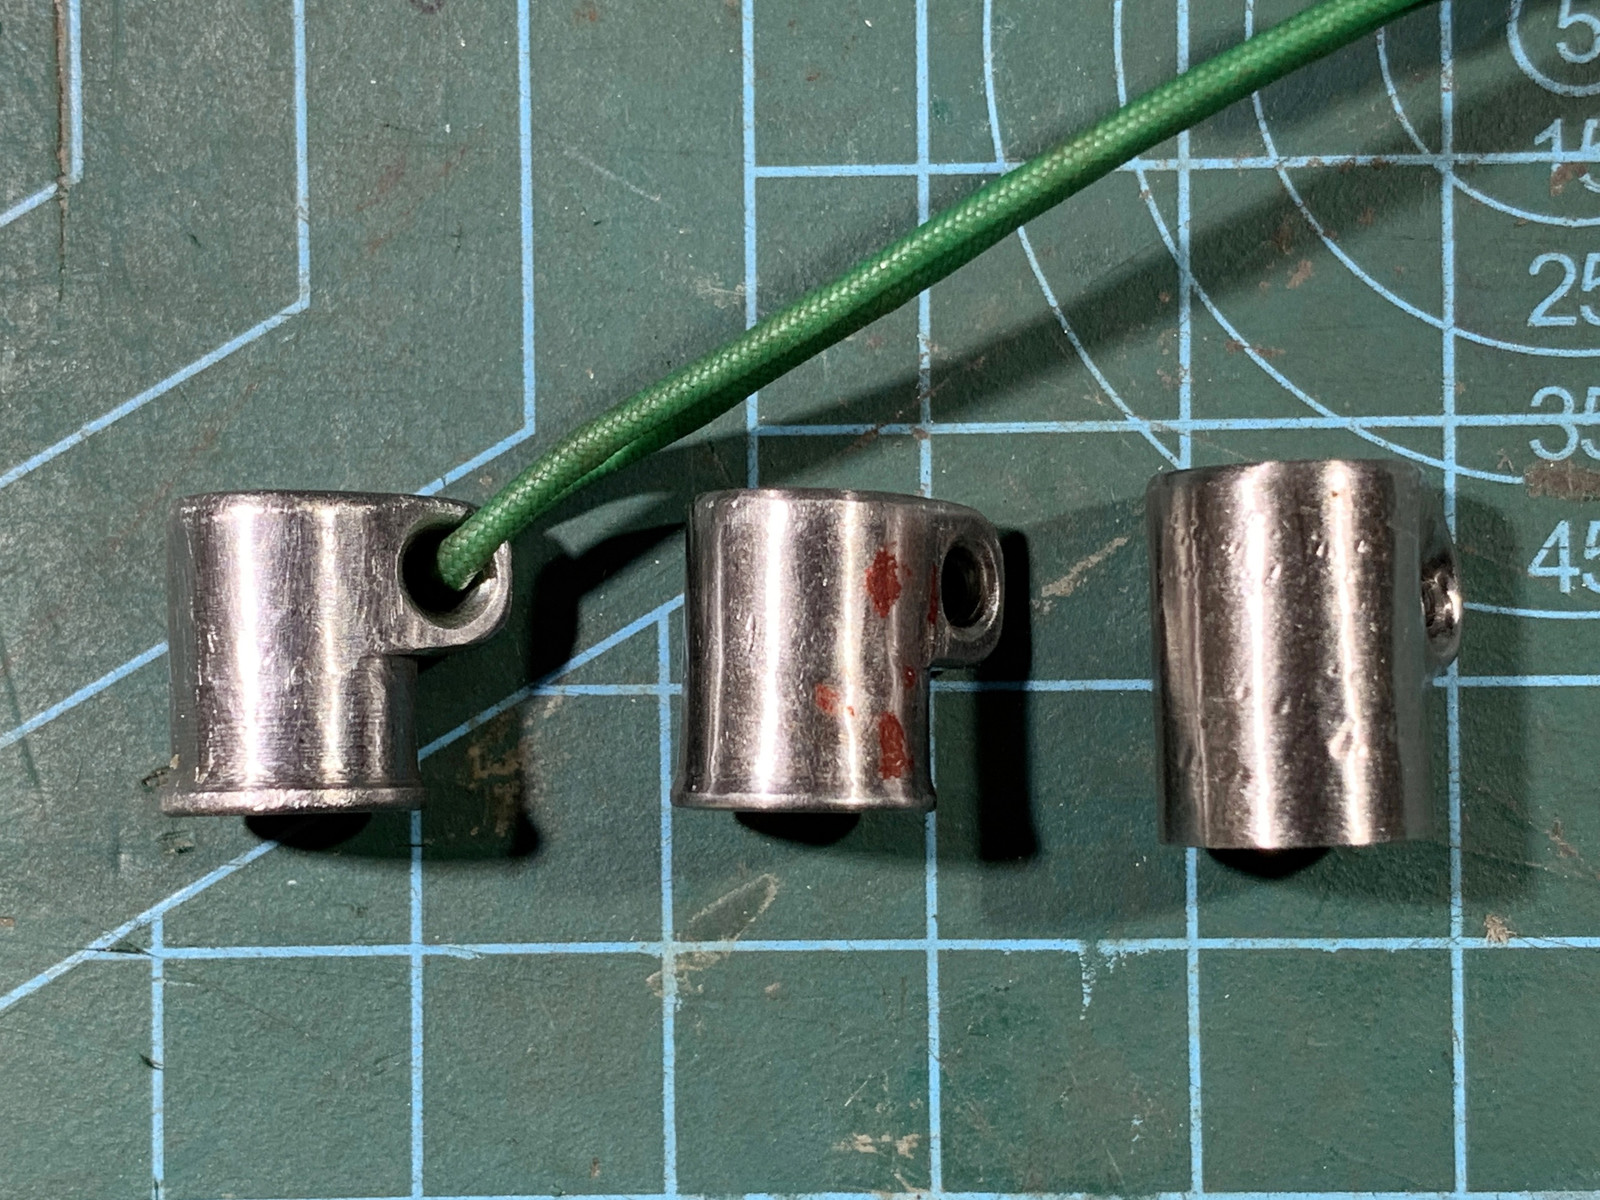
It's a little heavy. Dima's sliders are 1g lighter. But in the case of the 7mm slider, it needs to have an OD of 10mm to work with the muzzle to center the shaft - and if I could index it precisely on the mill for a second op, I could reduce the front part of the OD and lose that excessive 1g. For reference, you can see how Dima did that in the two sliders to the left:
Here's a pic of the inside bores:
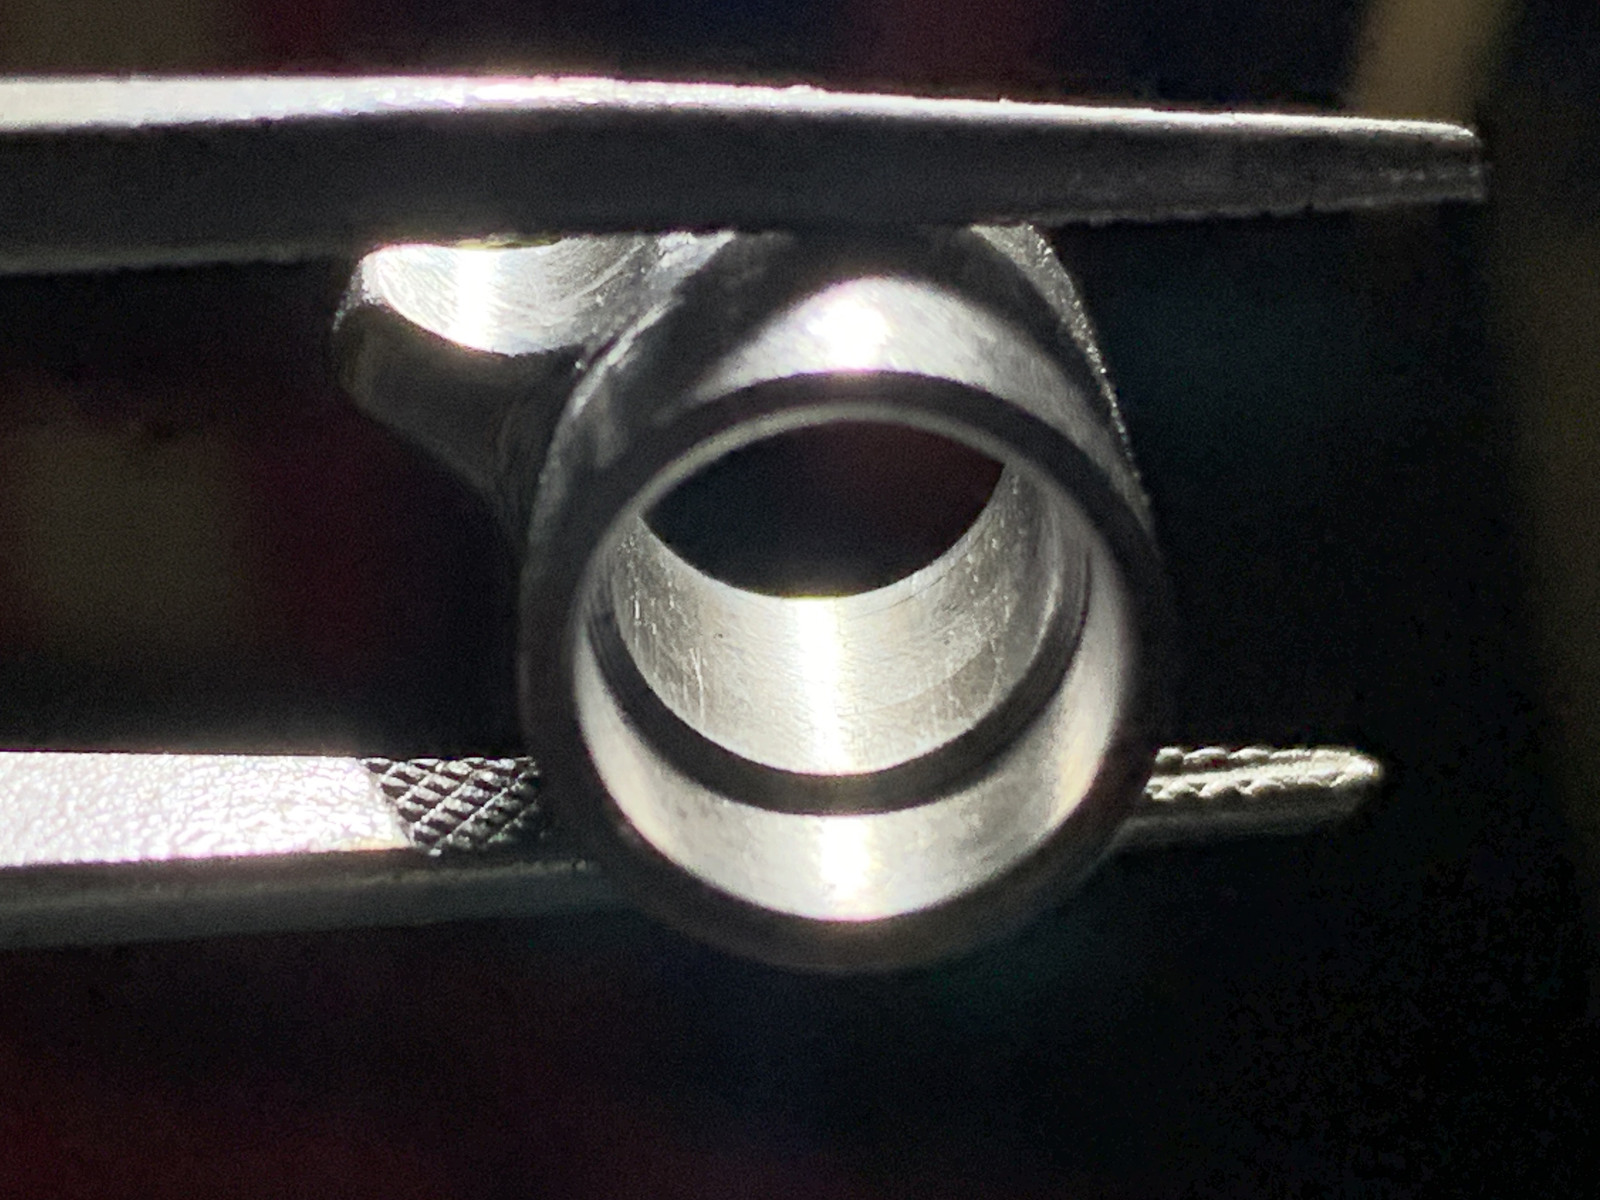
Honestly that's not bad. It's not perfect but I think it's fine. The tiny scratches are probably from having tested it up and down a few shafts dry.
But overall, it's not nice cutting 17-4PH and the chips are like splinters, the dig right into your skin. But I can do it if I really have to. Though I think it makes more sense to buy some rod, it would be easier to program the CAD and not have to do so much slotting. And then if I get a heat treating oven I could try to harden smaller pieces of it before machining it.
Before I get that far, I will try my luck with some 2205. It's another stainless steel that should be good with impacts and have pretty good properties without needing heat treating. And I may have some titanium somewhere, too I could try.
I tried machining a slider today. Not easy, 17-4PH in the "annealed" state is a bit gummy. When I machined a trigger sear out of hardened 440C, it went much easier. Also, cutting hardened 17-4PH (shafts) on the lathe is not as bad as this was. I actually think cutting it hardened is easier. Also, my machine has a high speed spindle with very little torque when it's not spinning fast and steel prefers slow spinning tools.
Anyhow, here we go:
I made a programming mistake. The intention was good, to helically cut a slot (adaptive machining) around the part instead of just a classic slot which would have been really hard on the endmill. But the boundary I had set for how wide it could do this was set incorrectly. So, I gave it waaaay too wide a slot which is why I wasted this much material and time, haha.
Anyhow, the most important was that the inside bores of the slide came out pretty nice and on size and I managed to really massage the chamfer tool super close to the inside wall to cut that chamfer on the little flange between the two inner bores for the hydro braking. (This would have been easier on the lathe, actually).
I left the last 0.1mm of stock at the bottom:
Also, in the above pic, you can see how the deeper slot around the slider is way narrower than it is further up. Still x1.5 times wider than the cutting tool so it has an easier time getting the chips out of the slot, but not as crazy wide as the top part where I hadn't caught my error, yet.
I parted off the slider manually from that last bit of stock with my little grinder:
And then whipped up a little mandrel so I could hold the slider better whilst I worked with the grinder and some other bits to get rid of the lip and round off the front part of the line lug:
The mandrel, despite just being a press-fit and not an expanding one, worked fine to hold the slider in the lathe so I could chamfer the inside front - which I couldn't reach on the CNC. (Actually, I could have - but I forgot I finally have some inside chamfer tools to reach the bottom edge of holes...)
All that's left to do is drill a cross hole in the lug and round off the edges of that hole and then this slider should be good to go:
It's a little heavy. Dima's sliders are 1g lighter. But in the case of the 7mm slider, it needs to have an OD of 10mm to work with the muzzle to center the shaft - and if I could index it precisely on the mill for a second op, I could reduce the front part of the OD and lose that excessive 1g. For reference, you can see how Dima did that in the two sliders to the left:
Here's a pic of the inside bores:
Honestly that's not bad. It's not perfect but I think it's fine. The tiny scratches are probably from having tested it up and down a few shafts dry.
But overall, it's not nice cutting 17-4PH and the chips are like splinters, the dig right into your skin. But I can do it if I really have to. Though I think it makes more sense to buy some rod, it would be easier to program the CAD and not have to do so much slotting. And then if I get a heat treating oven I could try to harden smaller pieces of it before machining it.
Before I get that far, I will try my luck with some 2205. It's another stainless steel that should be good with impacts and have pretty good properties without needing heat treating. And I may have some titanium somewhere, too I could try.
Last edited:

I Lied To You - And Other Bits & Bobs
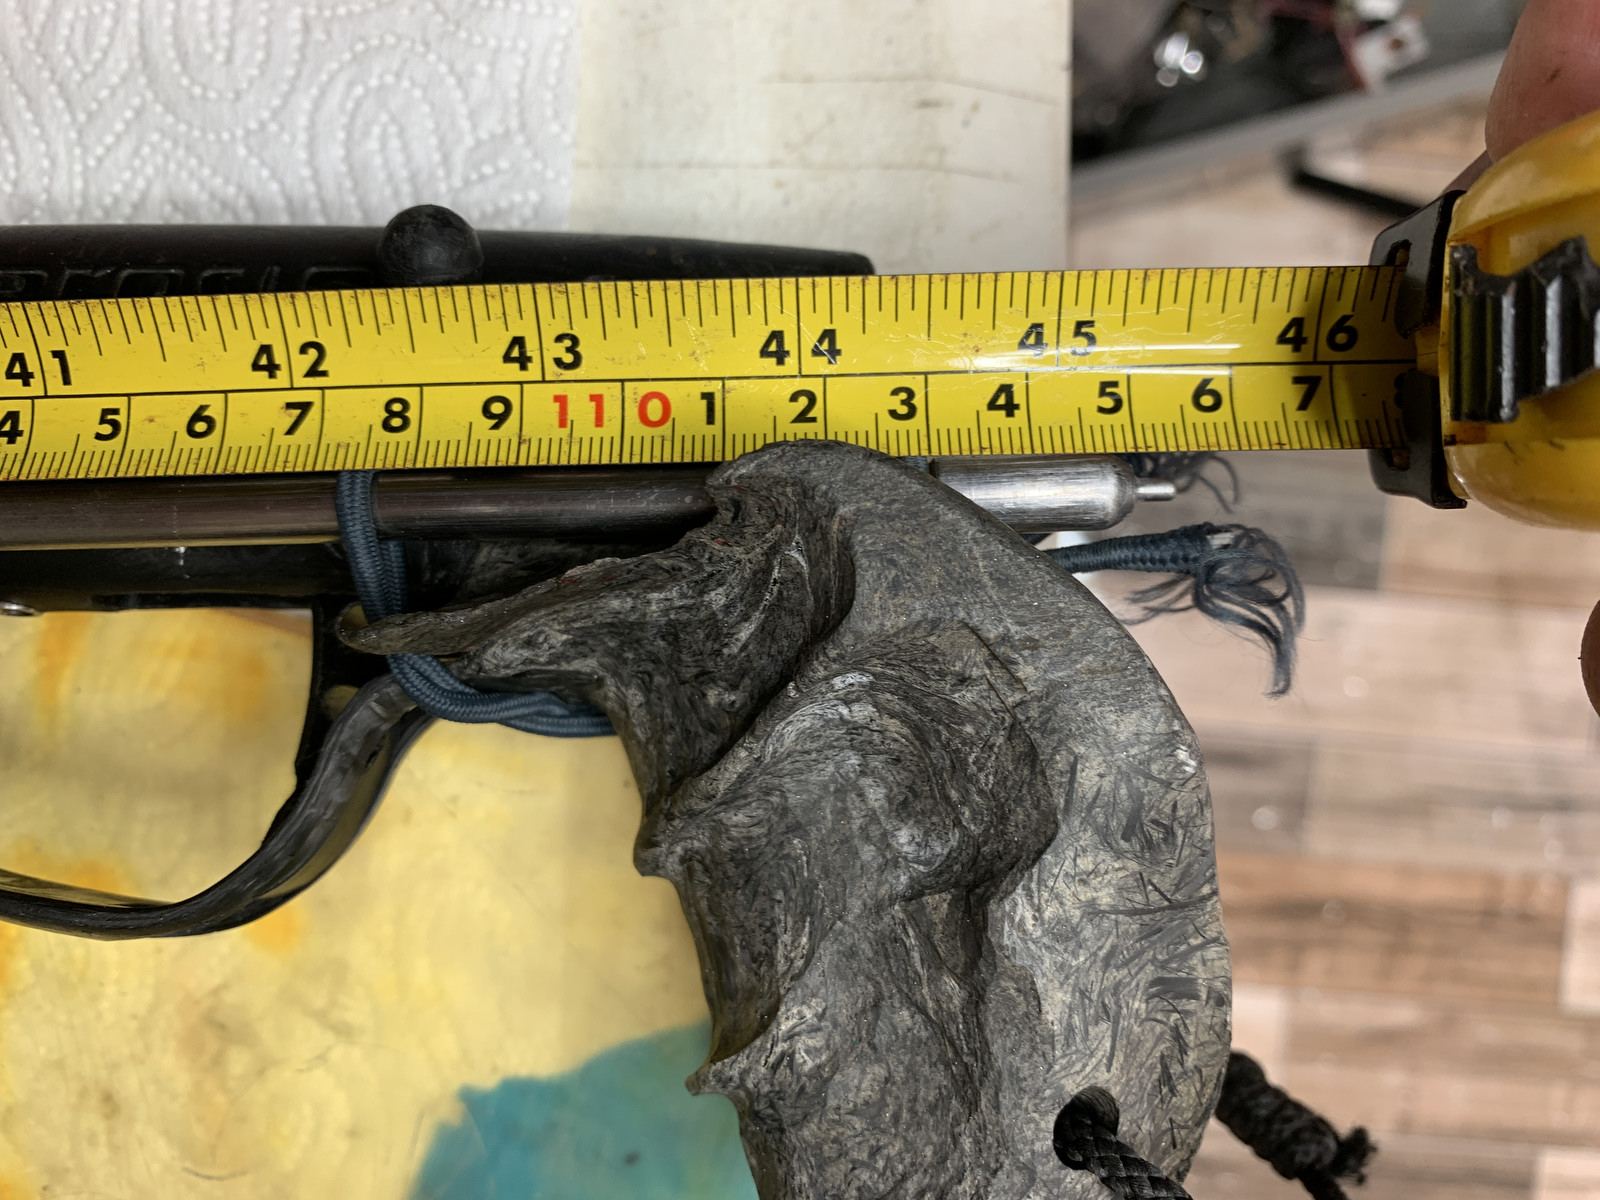
Turns out the shaft I have been shooting is 115cm, not 105cm. Apologies. It could be shortened a bit which I always used to do but since I have the buoyancy and power for it, I will probably let it be as it is:
Also, I will be making a new nose cone. The one I have is fine, but I think I want an integral line hook and I have a lighter design now. And if I want to try +7mm shafts in this gun, I can't use the current nose cone.
My idea was to have some alu stick out for the line hook and just bend it forward. I think/hope the alu can take one bend just fine. But I printed some test pieces to check it out:
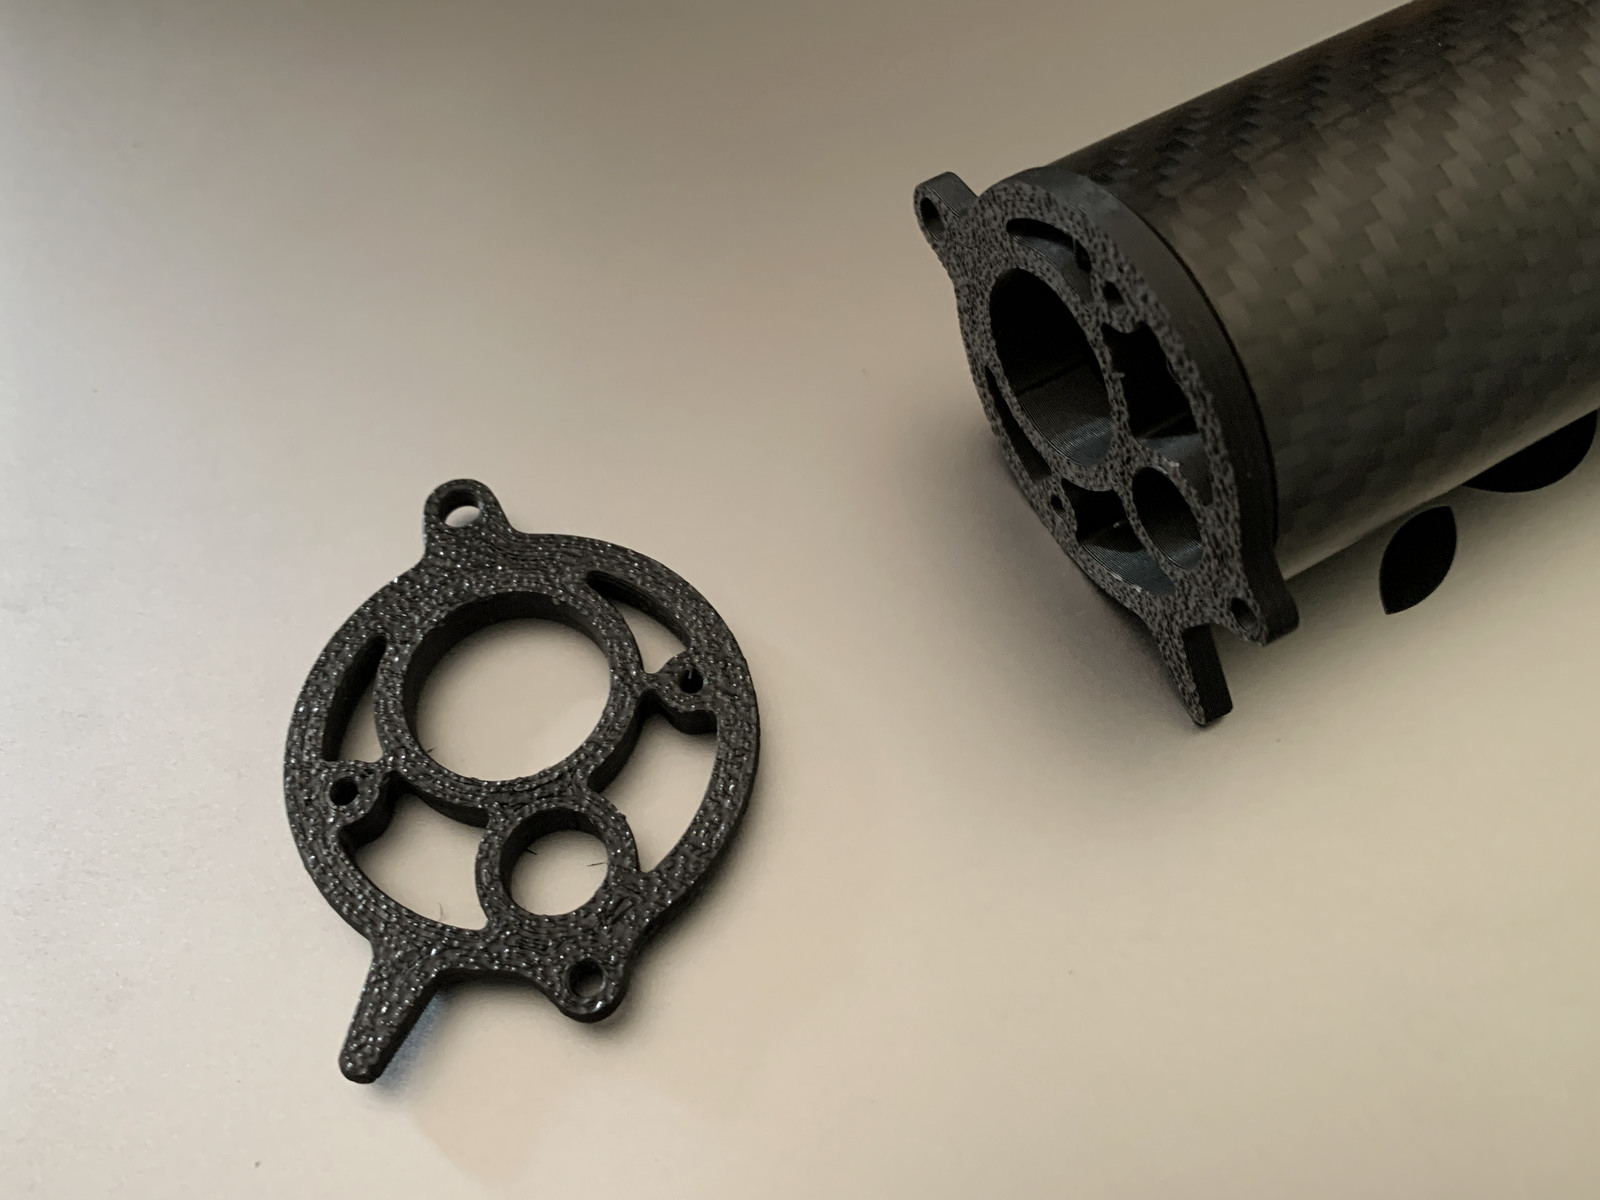
PLA bends very easily with a bit of heat and I think I need to extend the "appendix" by a mm or two. The bend always takes up more material than I expect. But it's nice to finally have a fast and precise 3D printer for these type of quick mockups.
Also, as some of you know, I have been using fiber optic sights for many years, but since I don't have a long nose cone anylonger I have been gluing them onto the front part of the reservoir. It's ok'ish but it's right where I like to grab the reservoir when disassembling the gun.
I noticed that Duccio and Calibro 12 both have been using very short pieces of fiber optic stuck through a little stainless ring and then burned on each end to mushroom the fiber to keep it in place. Here's an example from Calibro:
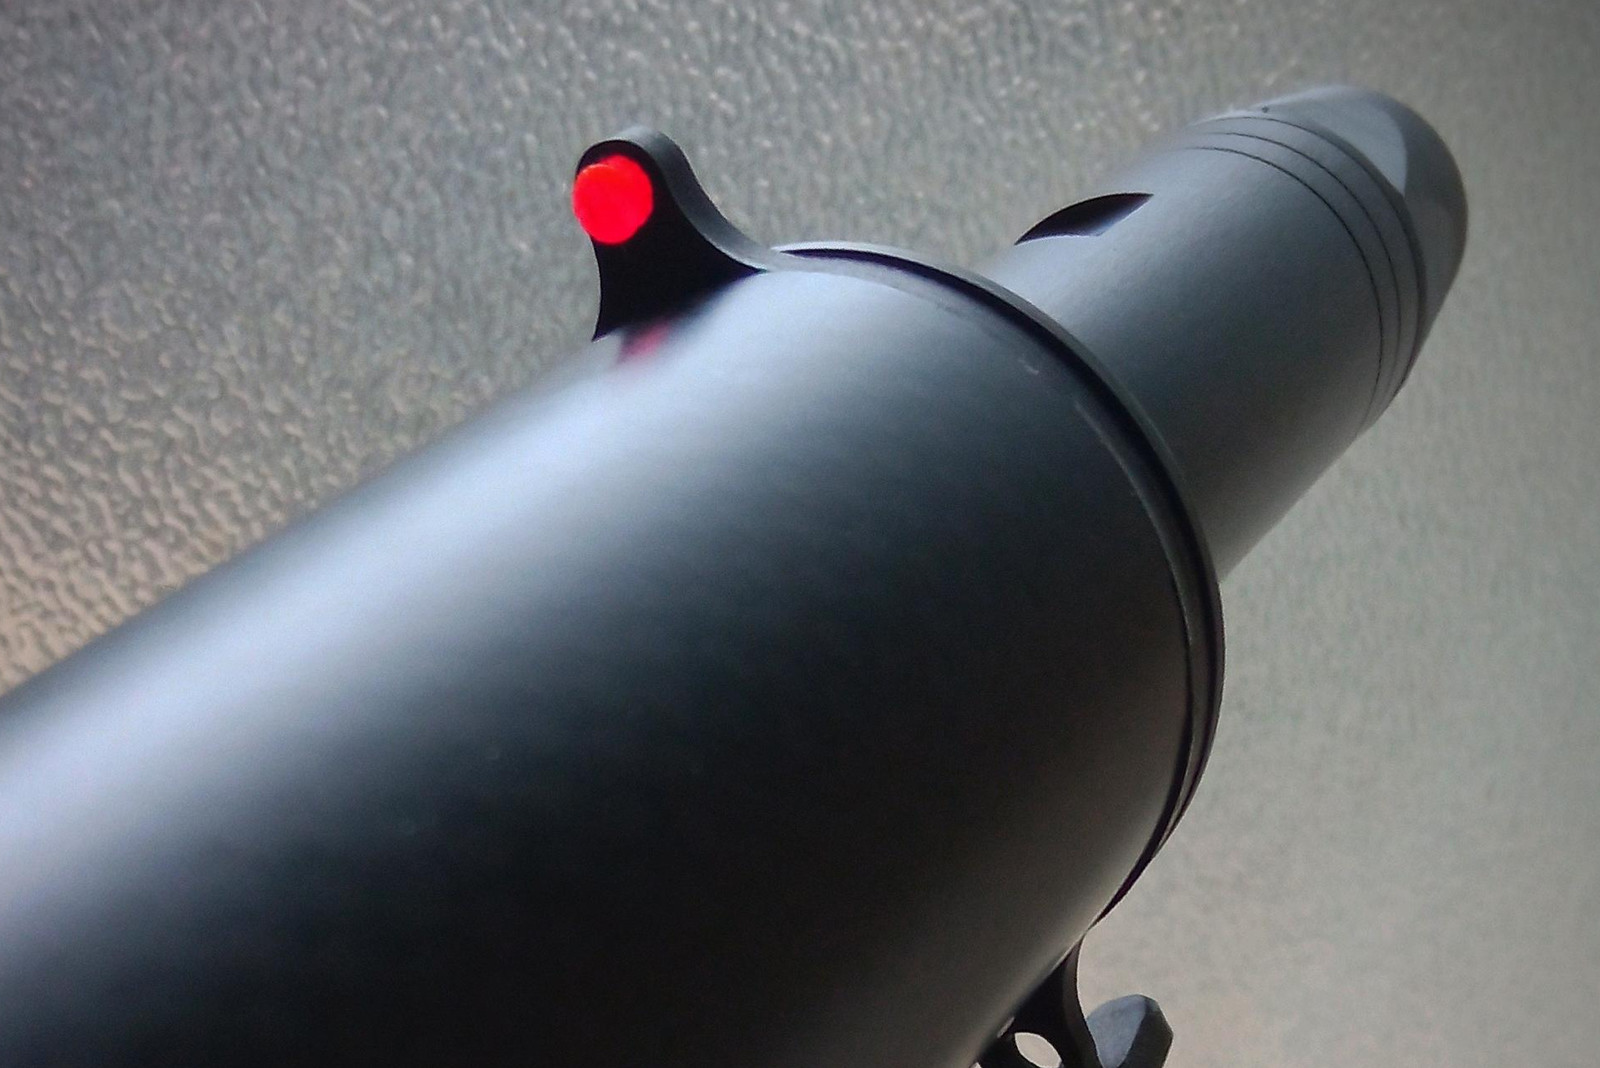
I tried it on my test nose cone, too:
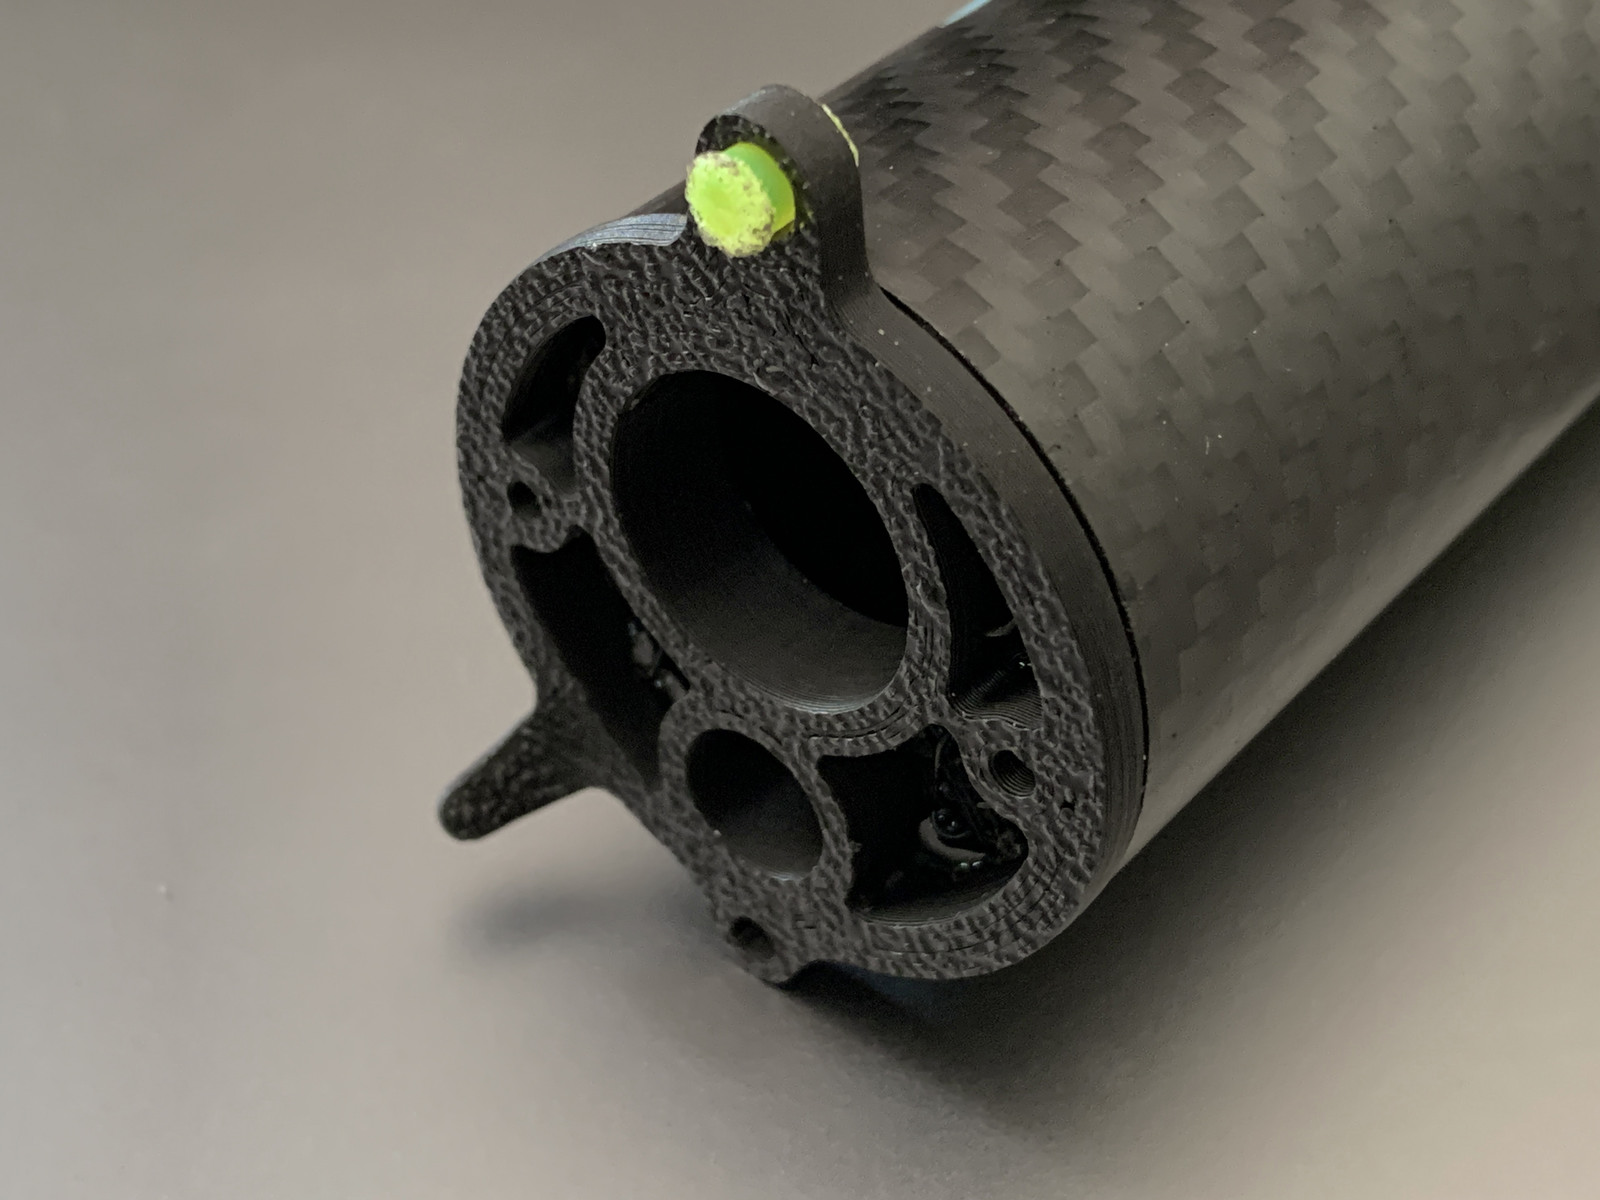
I have tried burning the rod in the past and never had any luck. Same today. It goes completely matt, sometimes even bubbles and that ruins the light transfer. Doesn't matter if I use low or high heat.
Also, as I understand it, the longer the fiber optic piece is the more light it "captures" and transfers to the ends, so having sights this short, unless you are shallow or in super clear water, I personally think starts to defeat the purpose.
For now, I think I will stick with my longer pieces. Maybe the Italians have some better fiber rod than I do. Maybe theirs respond to heat better or maybe they sand and polish the end of it after burning. No idea.
But I think I may just try having nothing in the sight hole. So, basically an old scool iron sight.
Imagine the white patch on the wall is a fish...:
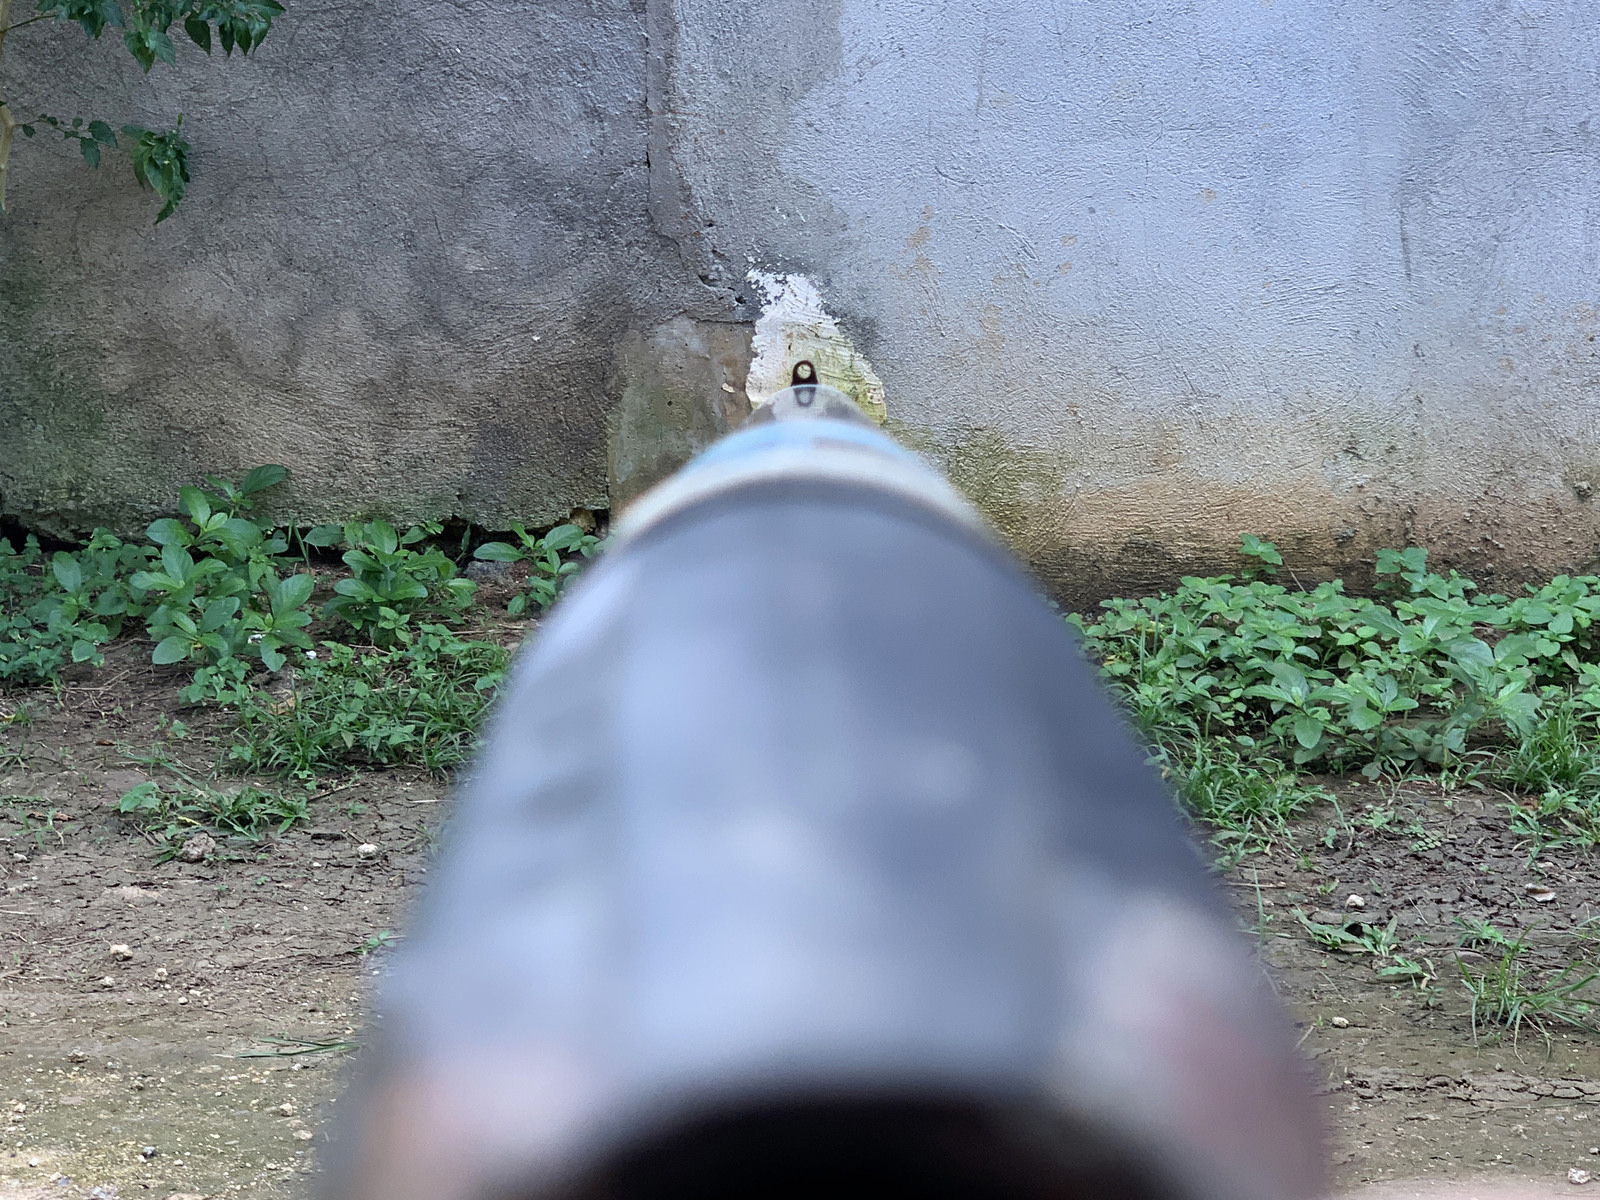
I think it could work really well. Maybe the hole diameter should be a bit bigger - I will print a few different sizes and shoot some more imaginary wall fish...
Turns out the shaft I have been shooting is 115cm, not 105cm. Apologies. It could be shortened a bit which I always used to do but since I have the buoyancy and power for it, I will probably let it be as it is:
Also, I will be making a new nose cone. The one I have is fine, but I think I want an integral line hook and I have a lighter design now. And if I want to try +7mm shafts in this gun, I can't use the current nose cone.
My idea was to have some alu stick out for the line hook and just bend it forward. I think/hope the alu can take one bend just fine. But I printed some test pieces to check it out:
PLA bends very easily with a bit of heat and I think I need to extend the "appendix" by a mm or two. The bend always takes up more material than I expect. But it's nice to finally have a fast and precise 3D printer for these type of quick mockups.
Also, as some of you know, I have been using fiber optic sights for many years, but since I don't have a long nose cone anylonger I have been gluing them onto the front part of the reservoir. It's ok'ish but it's right where I like to grab the reservoir when disassembling the gun.
I noticed that Duccio and Calibro 12 both have been using very short pieces of fiber optic stuck through a little stainless ring and then burned on each end to mushroom the fiber to keep it in place. Here's an example from Calibro:
I tried it on my test nose cone, too:
I have tried burning the rod in the past and never had any luck. Same today. It goes completely matt, sometimes even bubbles and that ruins the light transfer. Doesn't matter if I use low or high heat.
Also, as I understand it, the longer the fiber optic piece is the more light it "captures" and transfers to the ends, so having sights this short, unless you are shallow or in super clear water, I personally think starts to defeat the purpose.
For now, I think I will stick with my longer pieces. Maybe the Italians have some better fiber rod than I do. Maybe theirs respond to heat better or maybe they sand and polish the end of it after burning. No idea.
But I think I may just try having nothing in the sight hole. So, basically an old scool iron sight.
Imagine the white patch on the wall is a fish...:
I think it could work really well. Maybe the hole diameter should be a bit bigger - I will print a few different sizes and shoot some more imaginary wall fish...
Last edited:



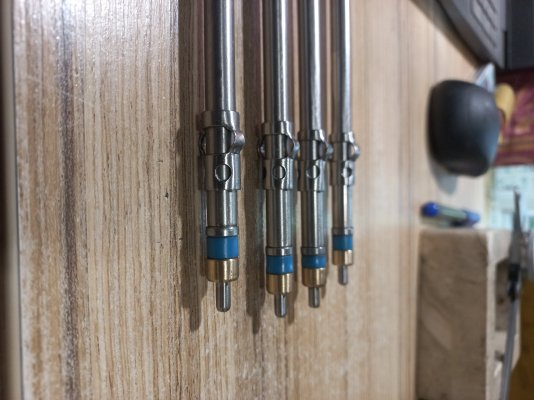
Thanks Zahar.
Always good to see more options. I am already a believer in the reduced tang end - the part that inserts into the piston. I guess the advantage is that it leaves more material/wall thickness in the piston's front which helps to make the piston stand up to the impacts better?
But so far, I don't thank I need the PU dampener - if what's what the blue part is.
I may not be correct in the following, but I feel like I remember seeing some PU tangs in the past that did not have a metal ring in front of the PU? From memory, the slider would hit the PU directly. I always felt like there was a bigger risk of the slider jamming on those. Is this why you added the metal ring?
As for your slider, those do look very interesting and very light. And they may possibly be easier to machine as they also don't need the line lug. But I will admit I am better at letting the CNC do the work than doing work by hand. So, I would honestly be worried that I couldn't get the bends done without making the rest of the slider bind on the shaft.
The slider I made is a replica of some that I have had on 7, 7.5 and 8mm shafts up to 38bar (mostly at 33bar) on a 13mm piston gun. And I never ever had one of those jam or break. Nor have I had to change one yet because of wear. Supposedly, they work by hydro braking.
Also, there are only two parts - slider and tang. As such, the design is less complicated and I don't have to start sourcing and testing more materials like the PU.
The bottom line is that I have so many other projects and parts I want to make that I have to learn that it's ok not to want to change everything - and these parts work very well already
.
Last edited:
Yes, I had something similar in mind though inside the circle. Less risk of it getting tangled or bent. That said, maybe just the open hole is fine enough and having less obstruction of the sight picture might be preferable? I will print a few options and see what works best for me.Maybe something like this could help? It's always easier to focus at where a cross or X falls instead of detecting what kind of area a circle is distinguishing from its surrounds
Update
I printed these today but wont get to mount and test them until I am back in the workshop:
Three of them just have increasingly larger apertures whereas the last two have some alignment aid added.
My gut feeling is it's going to be a balance between making the sight small enough that it doesn't start blocking the view and still large enough that I can actually easily see its features as well as being sturdy enough to survive being dropped on boats, rocks, etc.
Update 2
My artistic skills are quite impressive, I know...
This is a "5m shot" but the perspective is too compressed and makes it look much closer. But when doing it in person you can actually learn a bit. But it becomes hard to explain as it really has to do with feel and preference. E.g. I don't think I like the one with the post in the middle, which I thought I would. But it's almost like it begs for attention and would not let me look elsewhere. I know it sounds weird or possibly even like an advantage but it felt too restrictive somehow, like it gave me forced tunnel vision.
The one with the two small pointy horizontal pegs was quite good though. It left more of an image inside the circle and felt like it allowed me to look around a bit more whilst still having more visual sight aid than the purely round options. Less obtrusive than the post, but still helpful once I decided to lock in on the target.
I think the smart thing to do would be to 3D print some more options but make them so that I can somehow stick them on the gun and try them in the pool or ocean. Then I don't risk machining a whole new bulkhead with a sight I am not yet fully sure would even work for me.
Last edited:
Pressure Test No. 2 - 180bar And Still No Boom...!
A few days ago, I got my latest small batch of tubes:
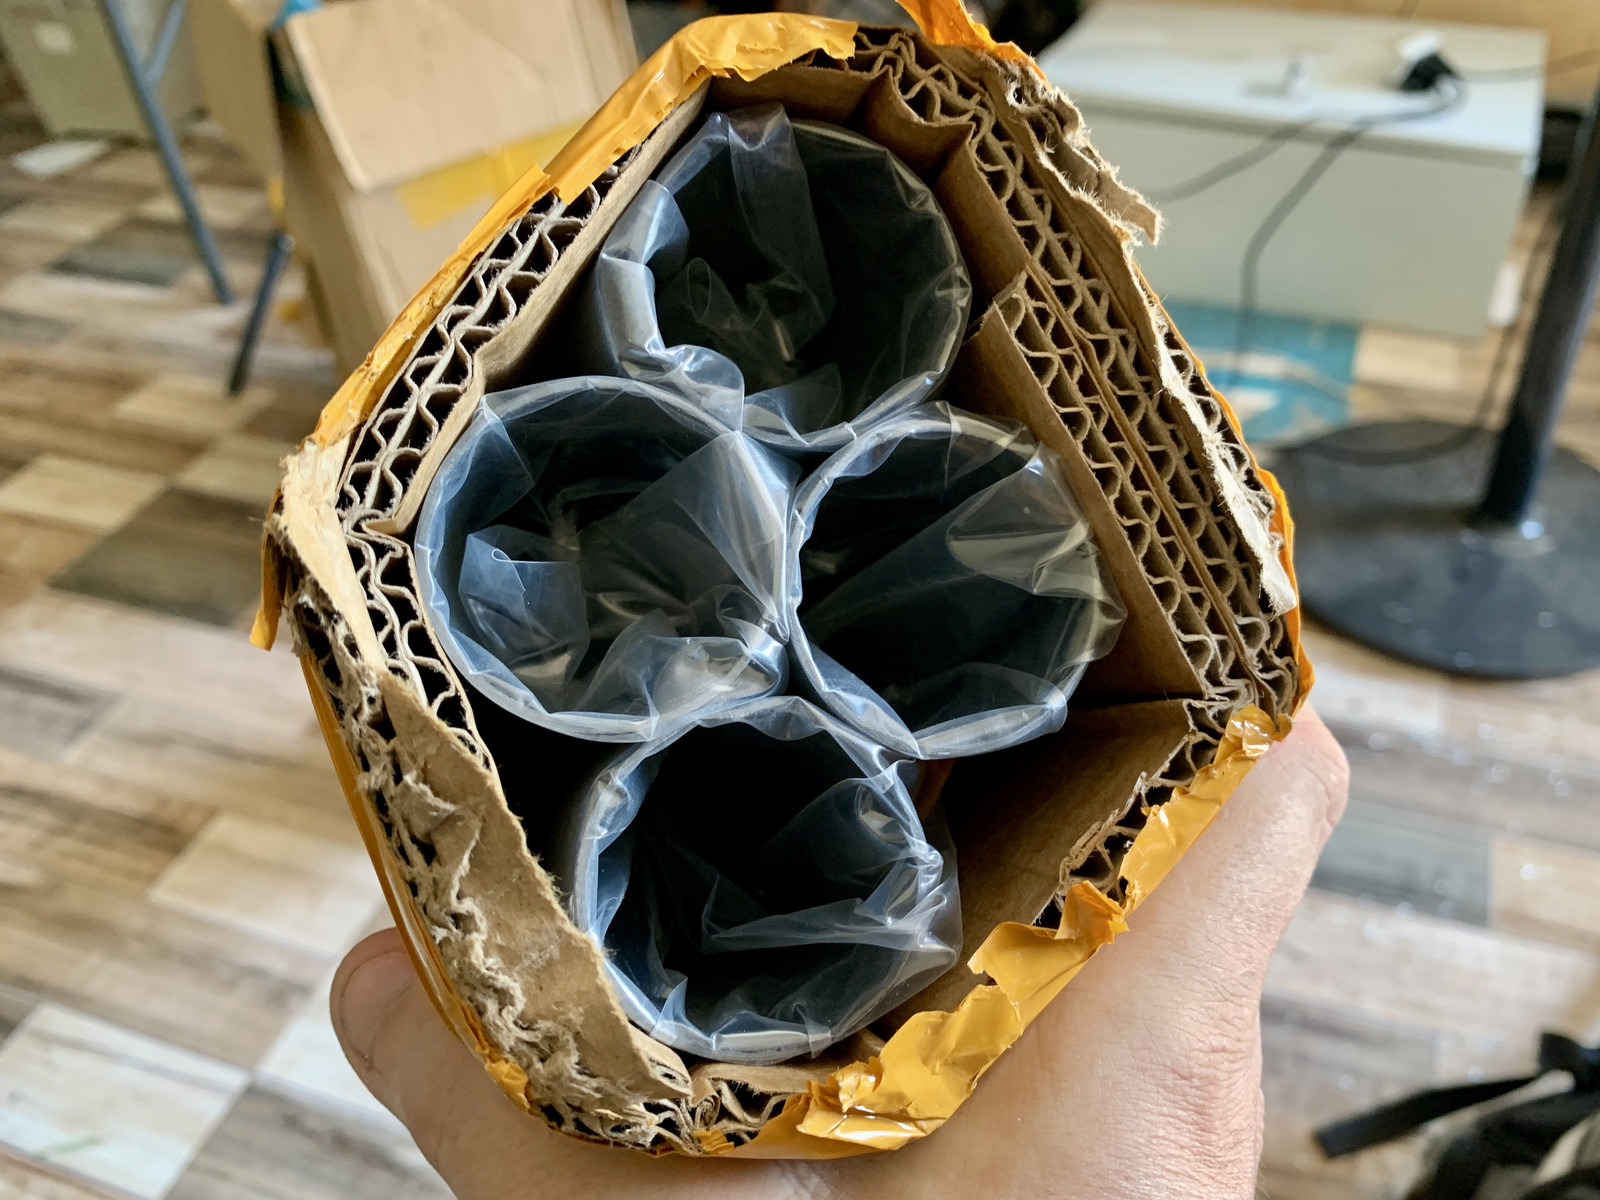 And since I want to have some peace of mind, I once again tried - and failed - at blowing one of them up...
I didn't take many pics but will share some screenshots but I made a new "barrel" whilst using the end caps from last time - though modified a bit:
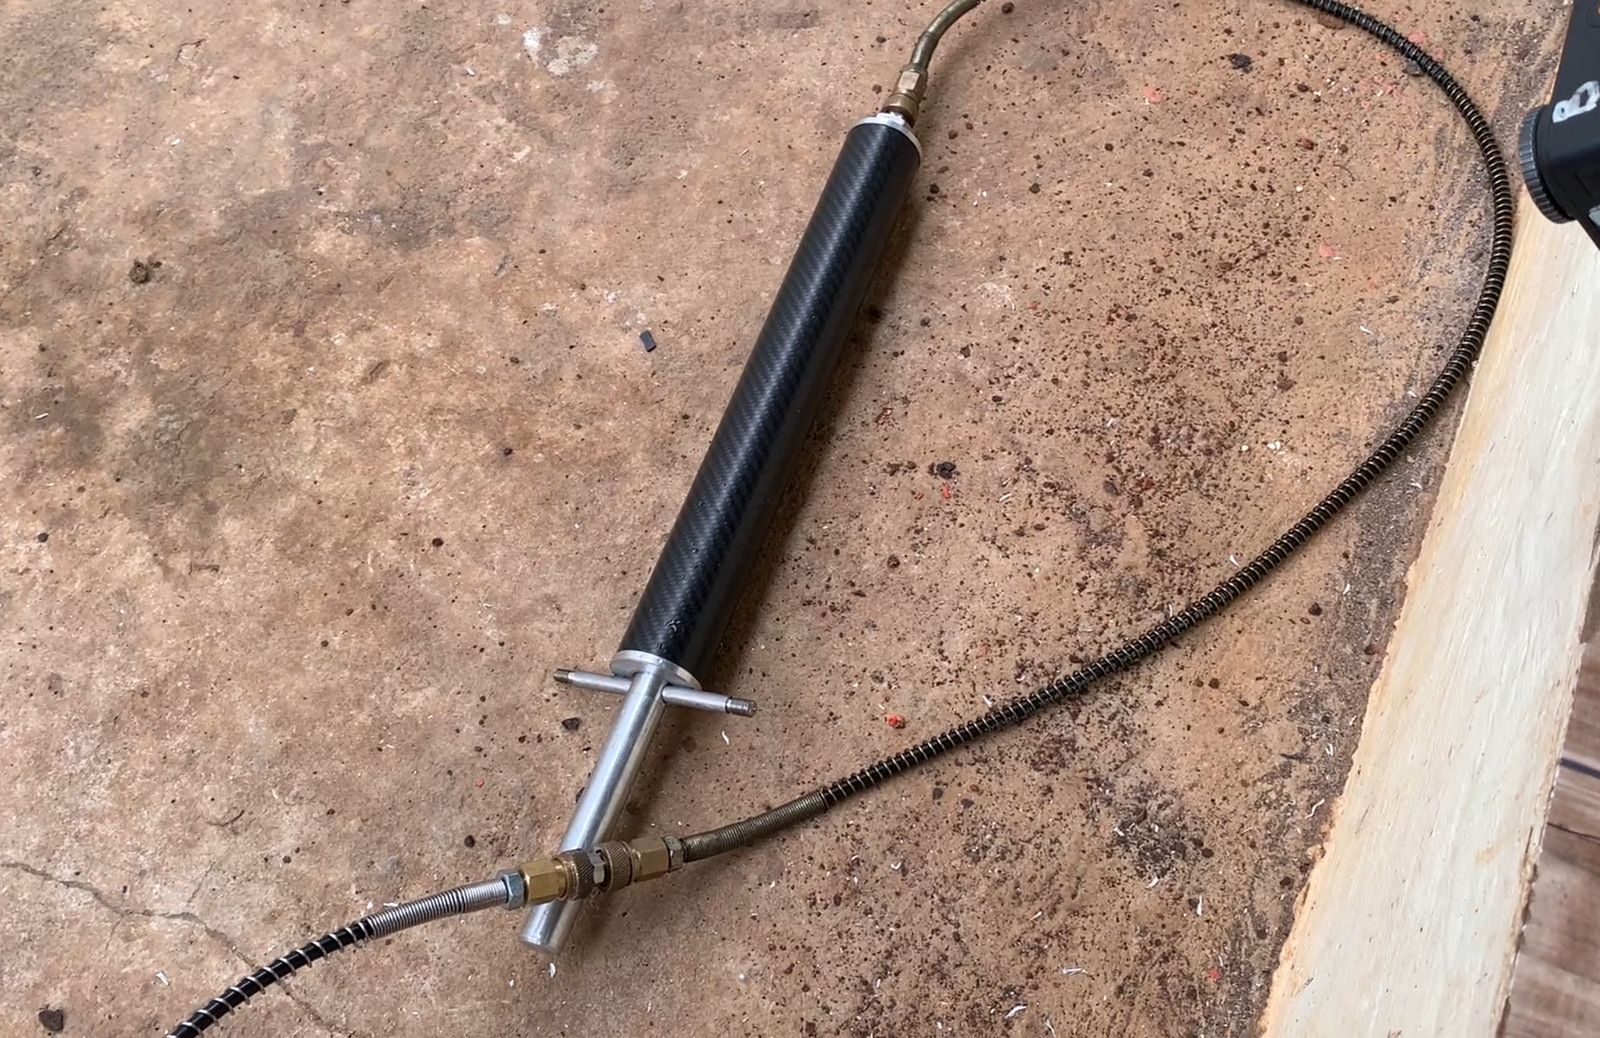
This time the test piece is longer which supposedly is a more proper way to pressure test tubes.
Also, I am not using the typical Mares inlet valve because last time, I blew the adapter out of it around 180bar and the threads weren't too happy afterwards. Granted, that was for the Salvimar "clone" of them which out of alu, so it's a bit softer than the Mares ones which I think are plated copper.
Instead, I am now using the small quick connect types that the PCP peeps use. They are often called Foster connectors. Anyhow, I used my new PCP handpump but before we got that far I filled most of the system with water.
The tube is chock full, the extension hose is too. Only the piece of hose from the pump to the extension doesn't have water in it.
It only took 7-8 strokes to get to +100bar so there really couldn't have been much air volume left in the system.
And drum roll, the test peaked at around 180 bar:
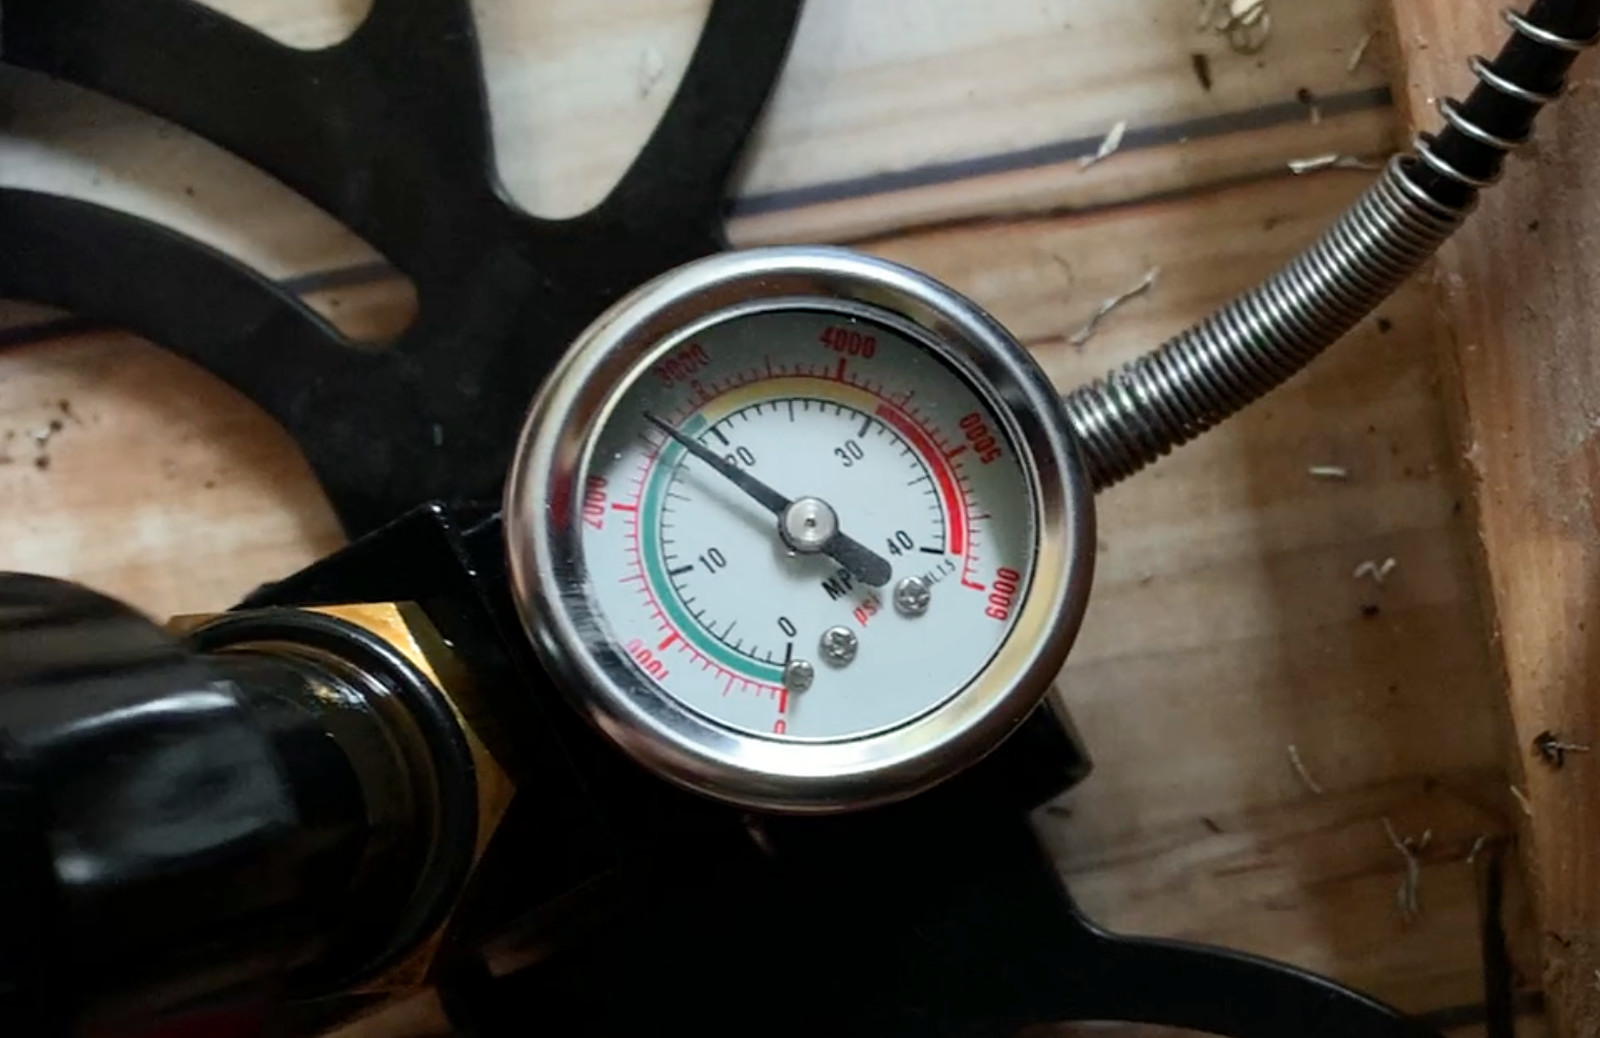
But once again, I failed and didn't manage to blow up the tube. I think I got some water in the pump and hydro-locked it right at that peak pressure because after that, I couldn't retract the pump fully.
(It would probably be prudent to take it apart and let it dry out tomorrow.)
But 180bar is peace of mind enough for me.
ALSO, in case anyone wants to replicate tests like these - please do fill everything with water! The force on the end caps was close to 2 tons. If something lets go, you want the least amount of compressed air in the system.
Here's the indentation left behind by the 7mm transverse pin (a piece of shaft) that I used to keep one end cap in place...:
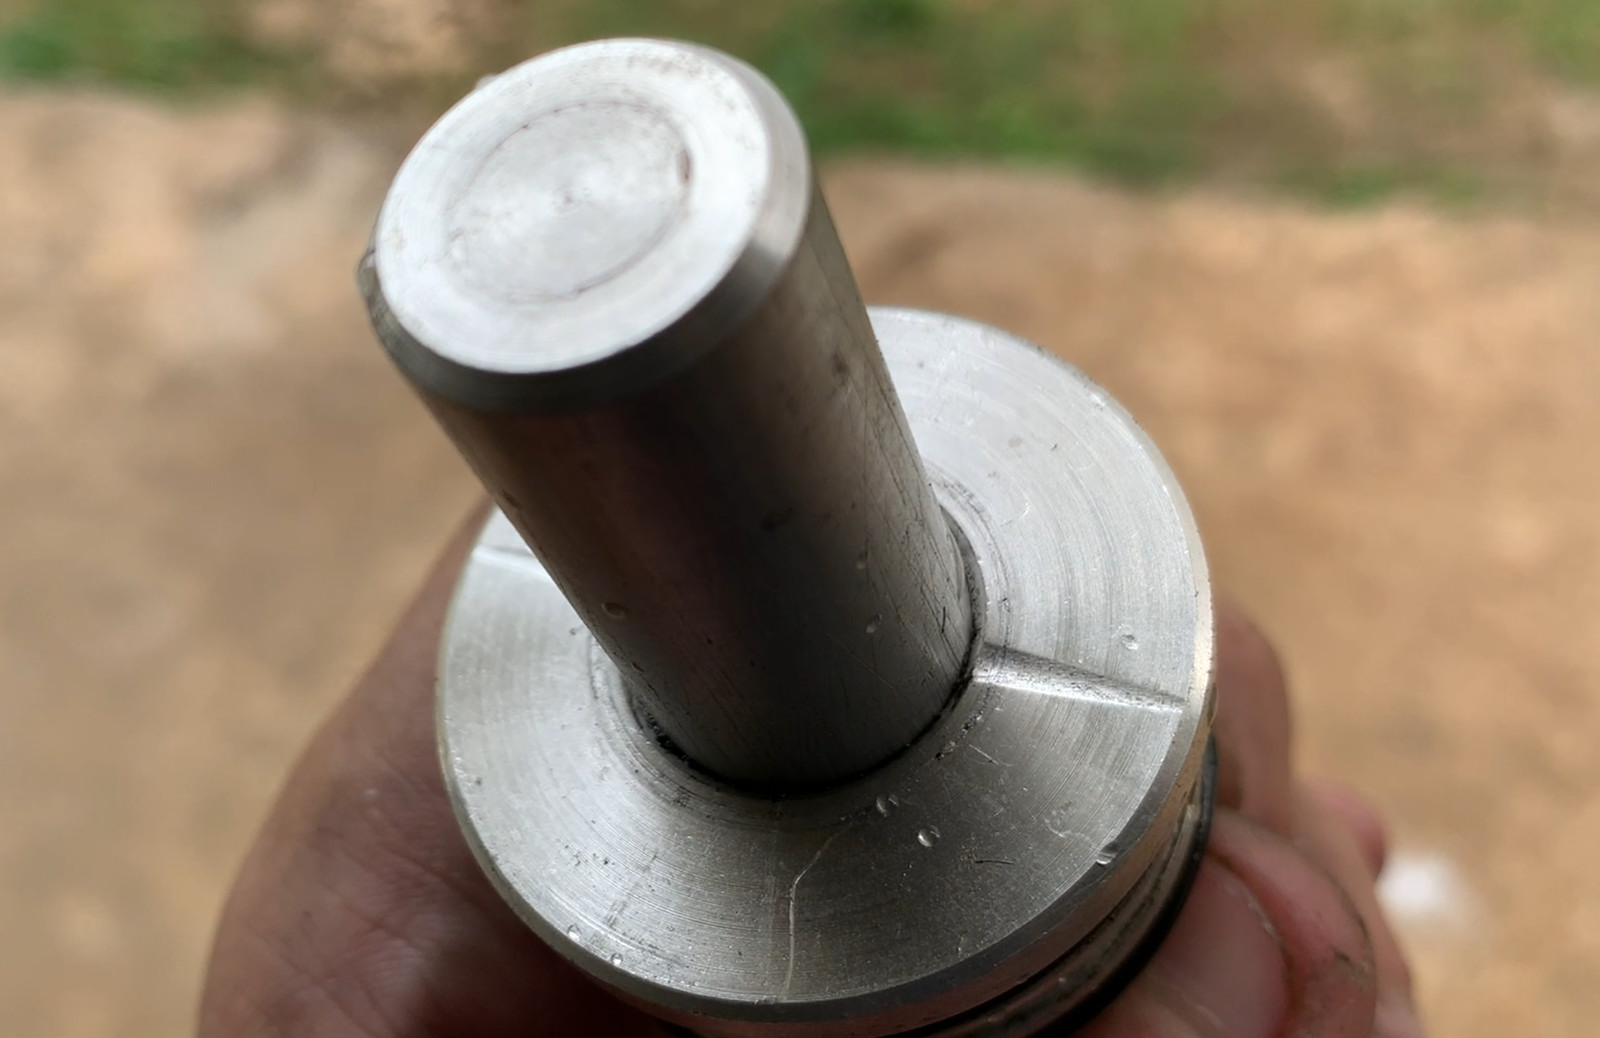
And the threads on the other end had taken some punishment, too. It took a lot more effort to get the nut off after the test than putting it on. I could hand thread it on, not so when getting it back off...
I asked Gemini about the theoretical strength of tubes like these and it estimated the burst pressure to be about 600bar which, if true, is kinda nuts. Also, if true, I could never have blown then up. Not with a scuba tank nor this hand pump. But it also means I probably won't be nervous about ordering even the no-name stuff in the future. That said, I do think it's prudent to order enough to test an off-cut and it's something I should have done years back.
Finally, I am no longer going to think it's weird that someone like Salvimar never published any tests or specs on the Dark Side tubes. It seems, even the most generic tubes are very strong.
There's a video here if you can live with some dirty feet:
Update
Also, one more thing, on this test piece I only resin coated one end. The other end was left as it came from the factory - though I did sand it lightly with 800 and 1500 grit, just to knock down any possible edges. And it turns out, even the uncoated end holds air. At least from what I could tell at 40bar just now over a few minutes (no bubbles).
I did coat both ends of the tube for the Mirage as when I looked at the surface, it was still a bit too rough for my taste. But maybe that was unneeded and maybe the tubes were actually just about good enough in terms of wall finish.
Honestly, I think it depends a bit on luck. I think a few of the pinholes/voids are large enough to cause a slow leak - so it depends on where they are located in the tube in relation to the o-rings.
But also, I had room to add a layer of coat without having to sand away at the laminate first as for the first time ever, the ID of the tubes was oversized by about 0.1mm.
A few days ago, I got my latest small batch of tubes:
I didn't take many pics but will share some screenshots but I made a new "barrel" whilst using the end caps from last time - though modified a bit:
This time the test piece is longer which supposedly is a more proper way to pressure test tubes.
Also, I am not using the typical Mares inlet valve because last time, I blew the adapter out of it around 180bar and the threads weren't too happy afterwards. Granted, that was for the Salvimar "clone" of them which out of alu, so it's a bit softer than the Mares ones which I think are plated copper.
Instead, I am now using the small quick connect types that the PCP peeps use. They are often called Foster connectors. Anyhow, I used my new PCP handpump but before we got that far I filled most of the system with water.
The tube is chock full, the extension hose is too. Only the piece of hose from the pump to the extension doesn't have water in it.
It only took 7-8 strokes to get to +100bar so there really couldn't have been much air volume left in the system.
And drum roll, the test peaked at around 180 bar:
But once again, I failed and didn't manage to blow up the tube. I think I got some water in the pump and hydro-locked it right at that peak pressure because after that, I couldn't retract the pump fully.
(It would probably be prudent to take it apart and let it dry out tomorrow.)
But 180bar is peace of mind enough for me.
ALSO, in case anyone wants to replicate tests like these - please do fill everything with water! The force on the end caps was close to 2 tons. If something lets go, you want the least amount of compressed air in the system.
Here's the indentation left behind by the 7mm transverse pin (a piece of shaft) that I used to keep one end cap in place...:
And the threads on the other end had taken some punishment, too. It took a lot more effort to get the nut off after the test than putting it on. I could hand thread it on, not so when getting it back off...
I asked Gemini about the theoretical strength of tubes like these and it estimated the burst pressure to be about 600bar which, if true, is kinda nuts. Also, if true, I could never have blown then up. Not with a scuba tank nor this hand pump. But it also means I probably won't be nervous about ordering even the no-name stuff in the future. That said, I do think it's prudent to order enough to test an off-cut and it's something I should have done years back.
Finally, I am no longer going to think it's weird that someone like Salvimar never published any tests or specs on the Dark Side tubes. It seems, even the most generic tubes are very strong.
There's a video here if you can live with some dirty feet:
Update
Also, one more thing, on this test piece I only resin coated one end. The other end was left as it came from the factory - though I did sand it lightly with 800 and 1500 grit, just to knock down any possible edges. And it turns out, even the uncoated end holds air. At least from what I could tell at 40bar just now over a few minutes (no bubbles).
I did coat both ends of the tube for the Mirage as when I looked at the surface, it was still a bit too rough for my taste. But maybe that was unneeded and maybe the tubes were actually just about good enough in terms of wall finish.
Honestly, I think it depends a bit on luck. I think a few of the pinholes/voids are large enough to cause a slow leak - so it depends on where they are located in the tube in relation to the o-rings.
But also, I had room to add a layer of coat without having to sand away at the laminate first as for the first time ever, the ID of the tubes was oversized by about 0.1mm.
Last edited:
Grade 5 Titanium - You Are My Friend!
A few days ago, I tried machining sliders out of 17-4PH and it wasn't much fun. I feel like I still have a chip stuck in my throat. Not kidding you. Why I would swallow one, I don't know.
Anyways, I have ordered some titanium rod - also because with rod, it's overall easier and faster to machine as I can get into the part from all around it instead of having to slot around the part in a plate. But then I realized, I should look in my drawer where I keep small rod and see what I found:
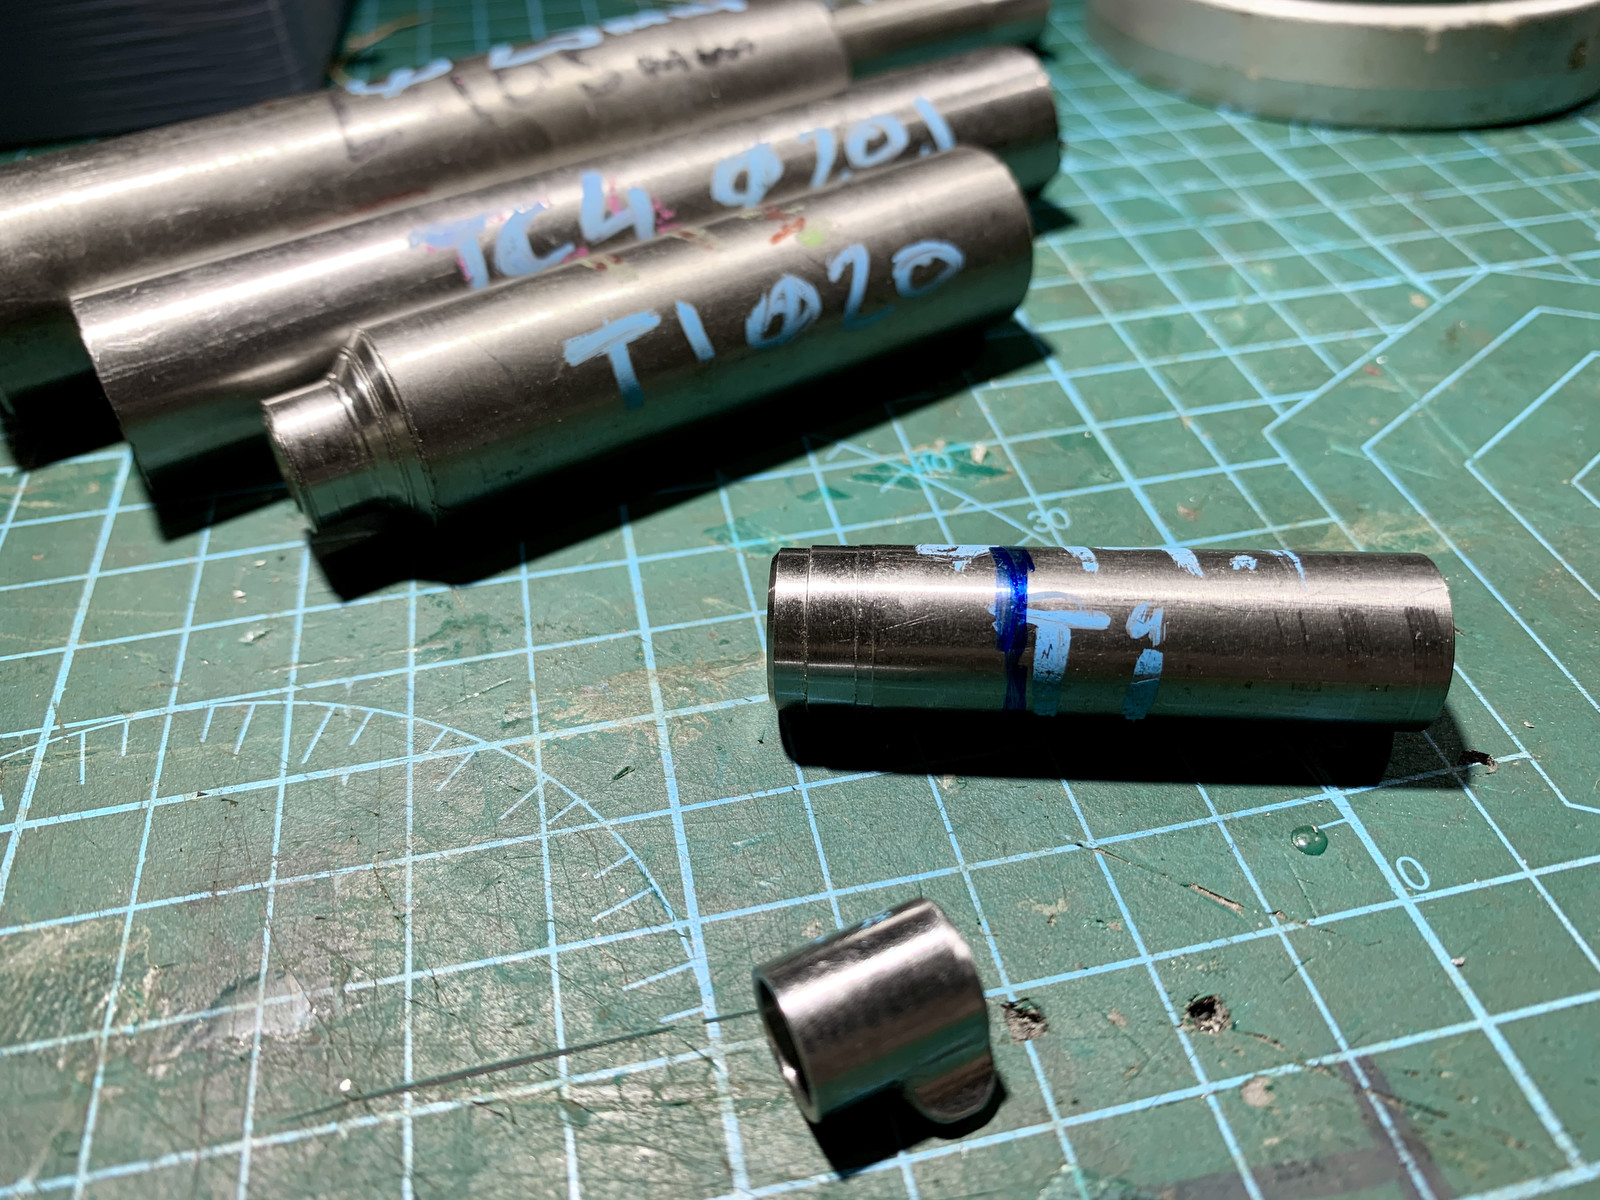
I knew I had some thicker pieces which I ordered years back in the hopes of making a muzzle, but I forgot I had some 14mm, too. Which is the exact size I need (and which I ordered some more of a few weeks back and was eagerly waiting for, haha).
So, I set out to try machining it on the CNC. And one of the hardest things to do is to drill holes in titanium so excuse the next pic, it may be the most boring I have ever uploaded here:
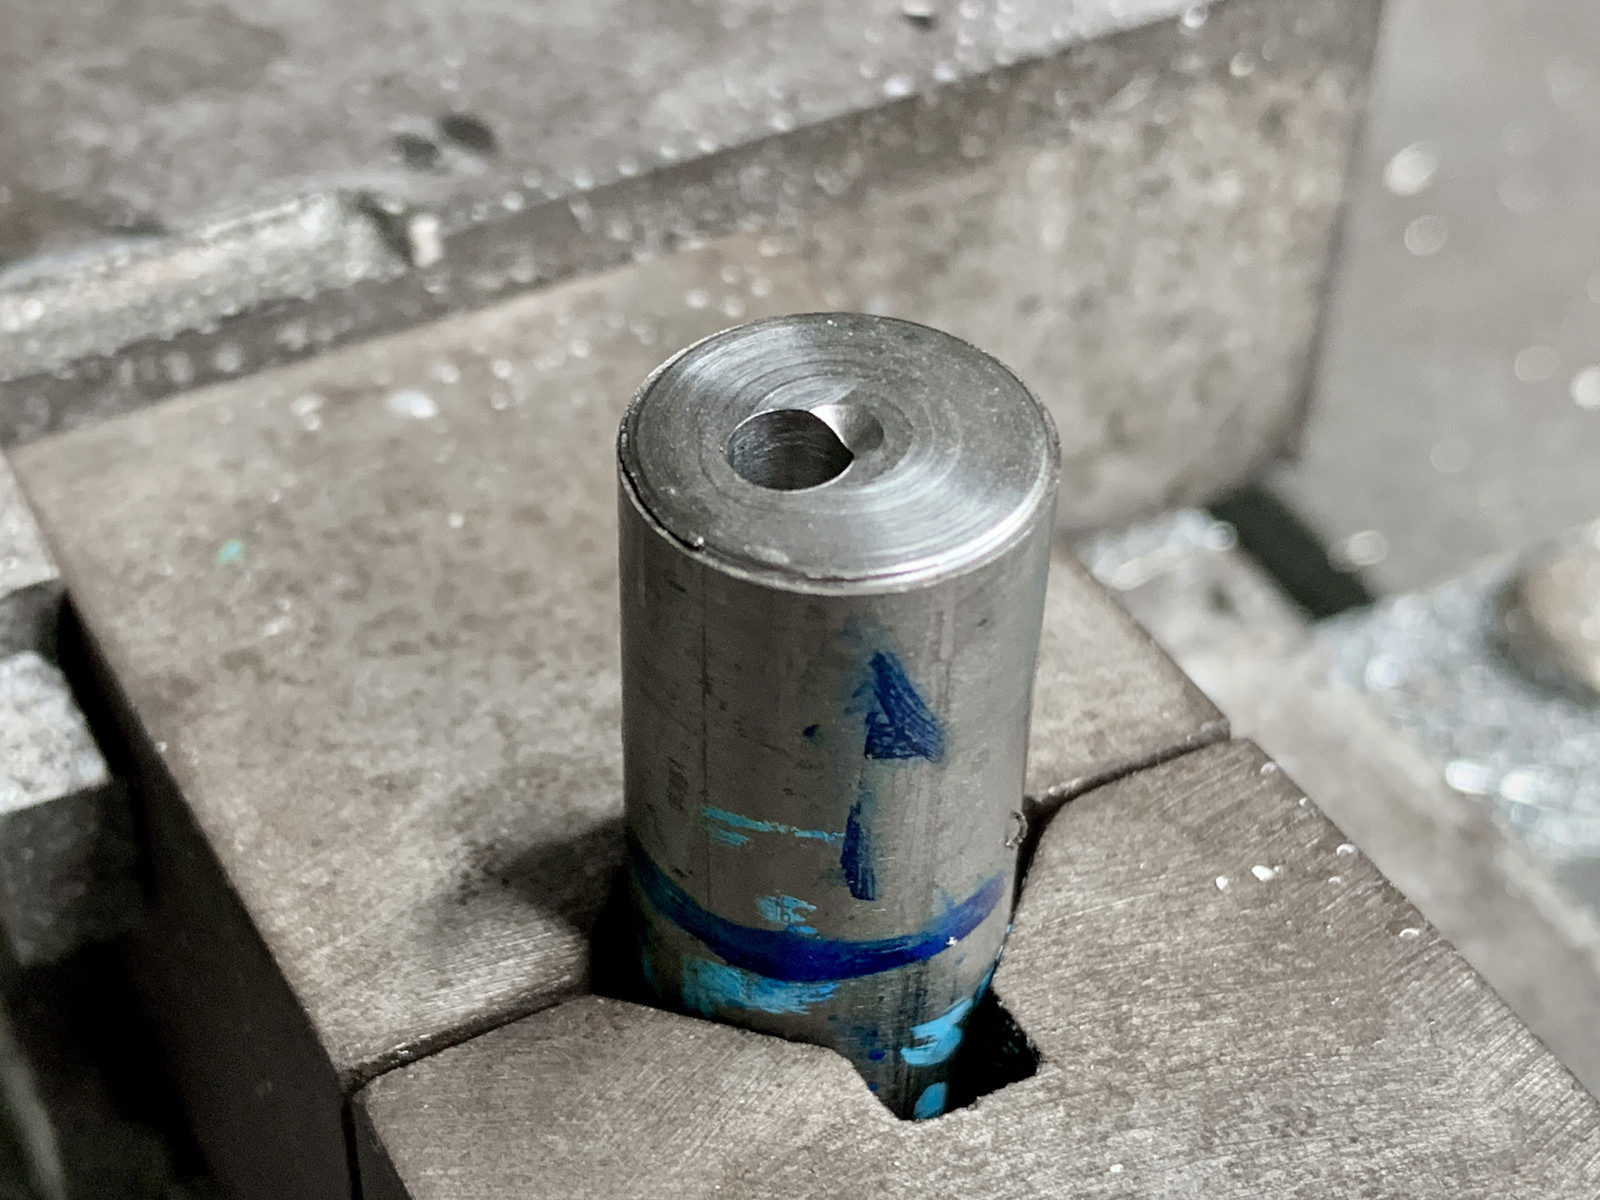
But that's a 4mm hole in a rod of titanium. Not super deep, just around 12.5mm. And only to help the next few ops where I helically bored out the inner features using an end mill.
Admittedly, I wasn't sure my machine could even do this. Everything I read told me titanium likes tons of flood coolant and slow speeds - I have neither. My spindle has no torque at low speeds and I only have alcohol mist coolant. But it worked despite my first spot drilling attempt being centered and not off to the side as it was supposed to be. It was on the limit, I had a few sparks. But if I paused the machine on the retracts (I peck drilled), the drill would get a chance to cool down.
Anyhow, here's another shot from the regular machining:
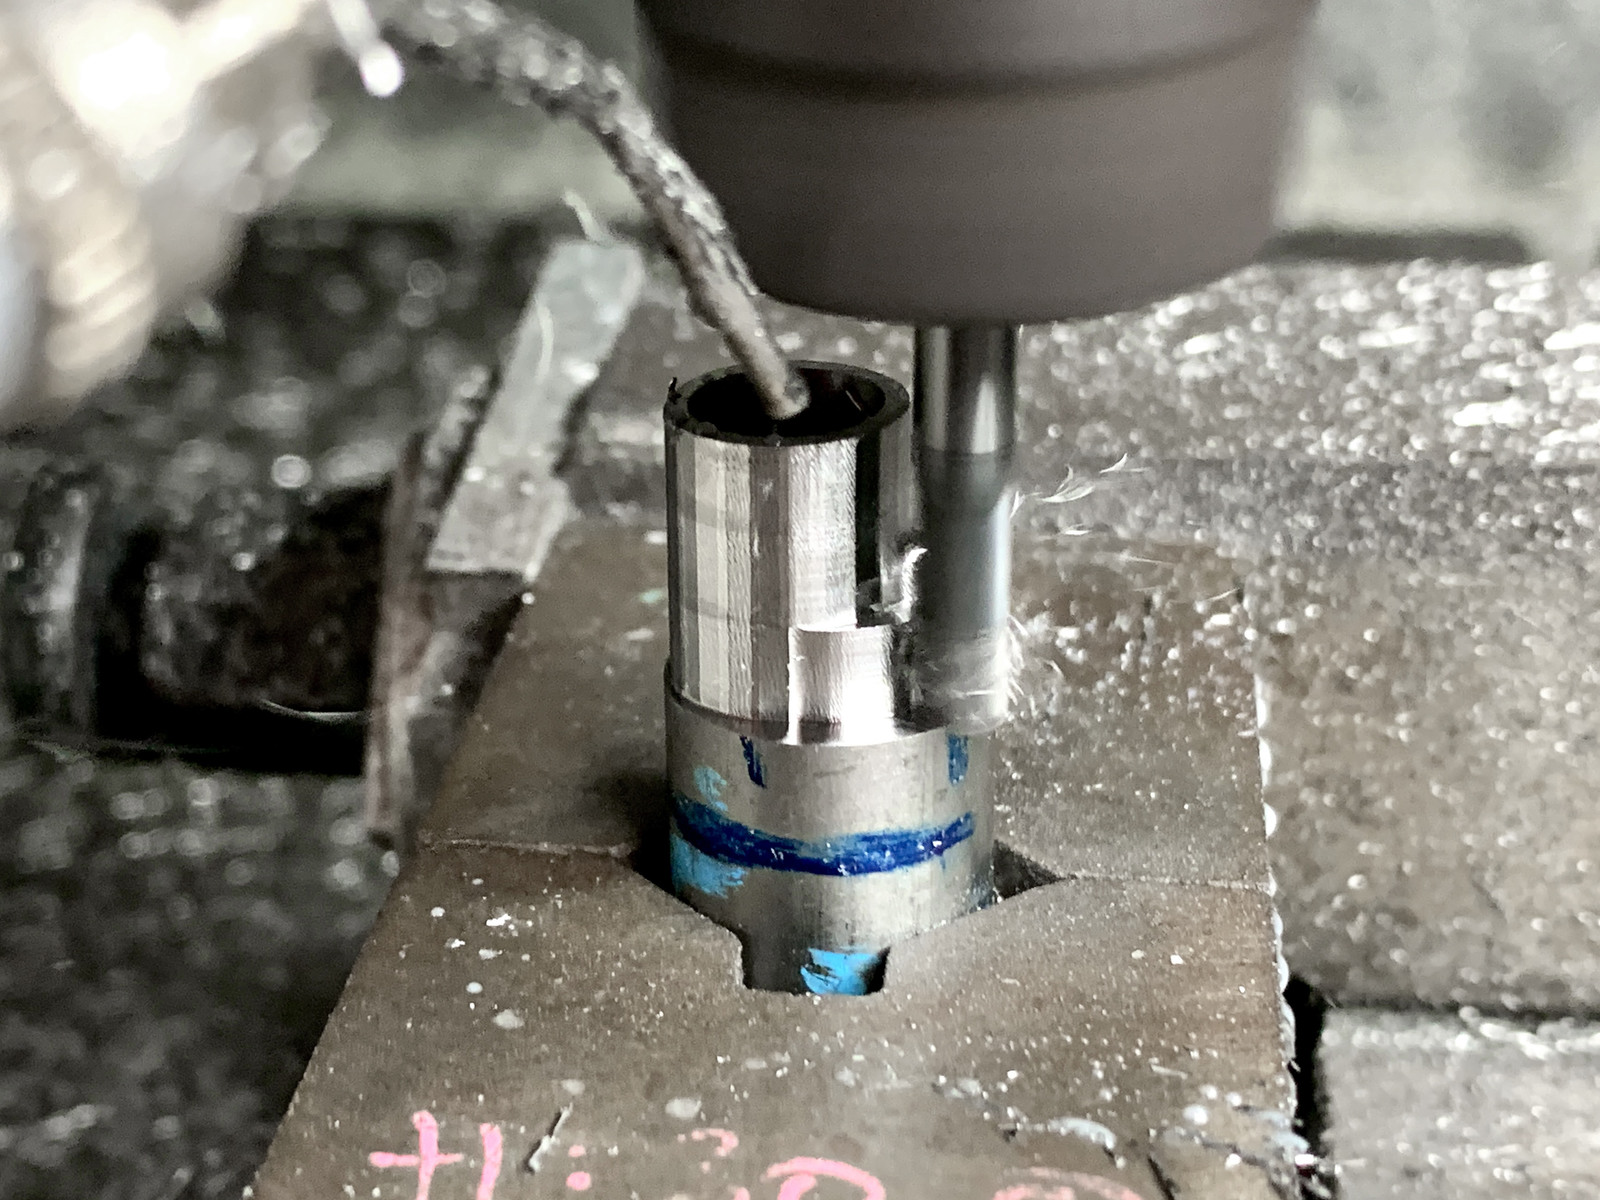
There's a bit of chatter and you can probably see that the round features are facetted. I think that's because this is a roughing strategy. The facetting gets cleaned up later on with some contour passes. But despite the higher than ideal RPMs and the lack of flood coolant, the regular machining worked even better than the drilling. I think it's because the end mill is never engaged or buried fully in the material like the drill is and the chips evacuate much easier and the mist coolant can actually get to the cut.
I machined the features I could reach from just the top side on the CNC and then parted off the slider from the stock on the lathe:
That parting cut went surprisingly well. But I had minimal stick-out, a brand new insert and the carriage lock helps a lot, too.
The flat face on the right of the slider will be the front and I will have to shape it manually as I don't yet have a clever way to hold and indicate the part for a second op in the CNC. If I was making many of these, I would figure that out. But for just a few, it's not worth it.
I did a quick deburr with the hand grinder and did a test fit (though I had already done one whilst the slider was still in the CNC in case I had to go back and enlarge one of the bores):
You can see a bit of stair stepping on the back slope of the lug. I could make those steps much smaller with a simple change in programming. And since I used a bull nose endmill with a bit of a corner radius as opposed to last time when I used only a flat endmill, I could probably get that slope and the rounded edges done quite nicely in the machine.
But here we are with the really important shot, haha - 17-4PH to the left, Gr. 5 titanium to the right:
Same size, same CAD file, just the savings from the lighter material.
I think once I have rounded off the front features on the ti slider and drilled the cross hole, I may get it just under 2g. Not that it matters, but it would be a cool little accomplishment .
.
Surprisingly, machining titanium was actually a whole lot more pleasant than cutting that unhardened gummy 17-4PH. Also, the feeds and speeds aren't much slower than they were for the 17-4PH but using the rod instead of the plate meant the machining time drops a lot. I think this was half the time or even less than last time.
So, I am pretty sure I will make a few more of these. And once I have made a tang or two, I can start using mono as shooting line again and not the draggy dyneema.
This whole slider/tang endeavor started because I was on my very last set of parts for 7mm shafts. I have enough shafts that I can afford to lose one. It would suck, but it would suck even more if I didn't have any replacement sliders and tangs.
As for the tangs, I thought titanium wasn't really the right material for it. Especially not the ones with the much reduced "nipple". People like to say that titanium is stronger than steel, but that's mostly when comparing weight to strength. But since the nipple is a fixed diameter, 17-4PH is actually stronger than titanium. But... that's only once it's heat treated. When it's not, it's actally slightly weaker.
Also, 304/316/2205 are all weaker than titanium. So, perhaps titanium is not so bad for a tang after all. At least until I can get into heat treating and then 17-4PH wins by a substantial ~40%.
But... come to think of it, I may actually have a few short 8mm shaft cut offs - which means I may have a source of hardened 17-4PH already. And 8mm is exactly the size needed for a 7mm shaft slider of this design.
Some days in the workshop things don't go to plan. Today was not one of those days...!
A few days ago, I tried machining sliders out of 17-4PH and it wasn't much fun. I feel like I still have a chip stuck in my throat. Not kidding you. Why I would swallow one, I don't know.
Anyways, I have ordered some titanium rod - also because with rod, it's overall easier and faster to machine as I can get into the part from all around it instead of having to slot around the part in a plate. But then I realized, I should look in my drawer where I keep small rod and see what I found:
I knew I had some thicker pieces which I ordered years back in the hopes of making a muzzle, but I forgot I had some 14mm, too. Which is the exact size I need (and which I ordered some more of a few weeks back and was eagerly waiting for, haha).
So, I set out to try machining it on the CNC. And one of the hardest things to do is to drill holes in titanium so excuse the next pic, it may be the most boring I have ever uploaded here:
But that's a 4mm hole in a rod of titanium. Not super deep, just around 12.5mm. And only to help the next few ops where I helically bored out the inner features using an end mill.
Admittedly, I wasn't sure my machine could even do this. Everything I read told me titanium likes tons of flood coolant and slow speeds - I have neither. My spindle has no torque at low speeds and I only have alcohol mist coolant. But it worked despite my first spot drilling attempt being centered and not off to the side as it was supposed to be. It was on the limit, I had a few sparks. But if I paused the machine on the retracts (I peck drilled), the drill would get a chance to cool down.
Anyhow, here's another shot from the regular machining:
There's a bit of chatter and you can probably see that the round features are facetted. I think that's because this is a roughing strategy. The facetting gets cleaned up later on with some contour passes. But despite the higher than ideal RPMs and the lack of flood coolant, the regular machining worked even better than the drilling. I think it's because the end mill is never engaged or buried fully in the material like the drill is and the chips evacuate much easier and the mist coolant can actually get to the cut.
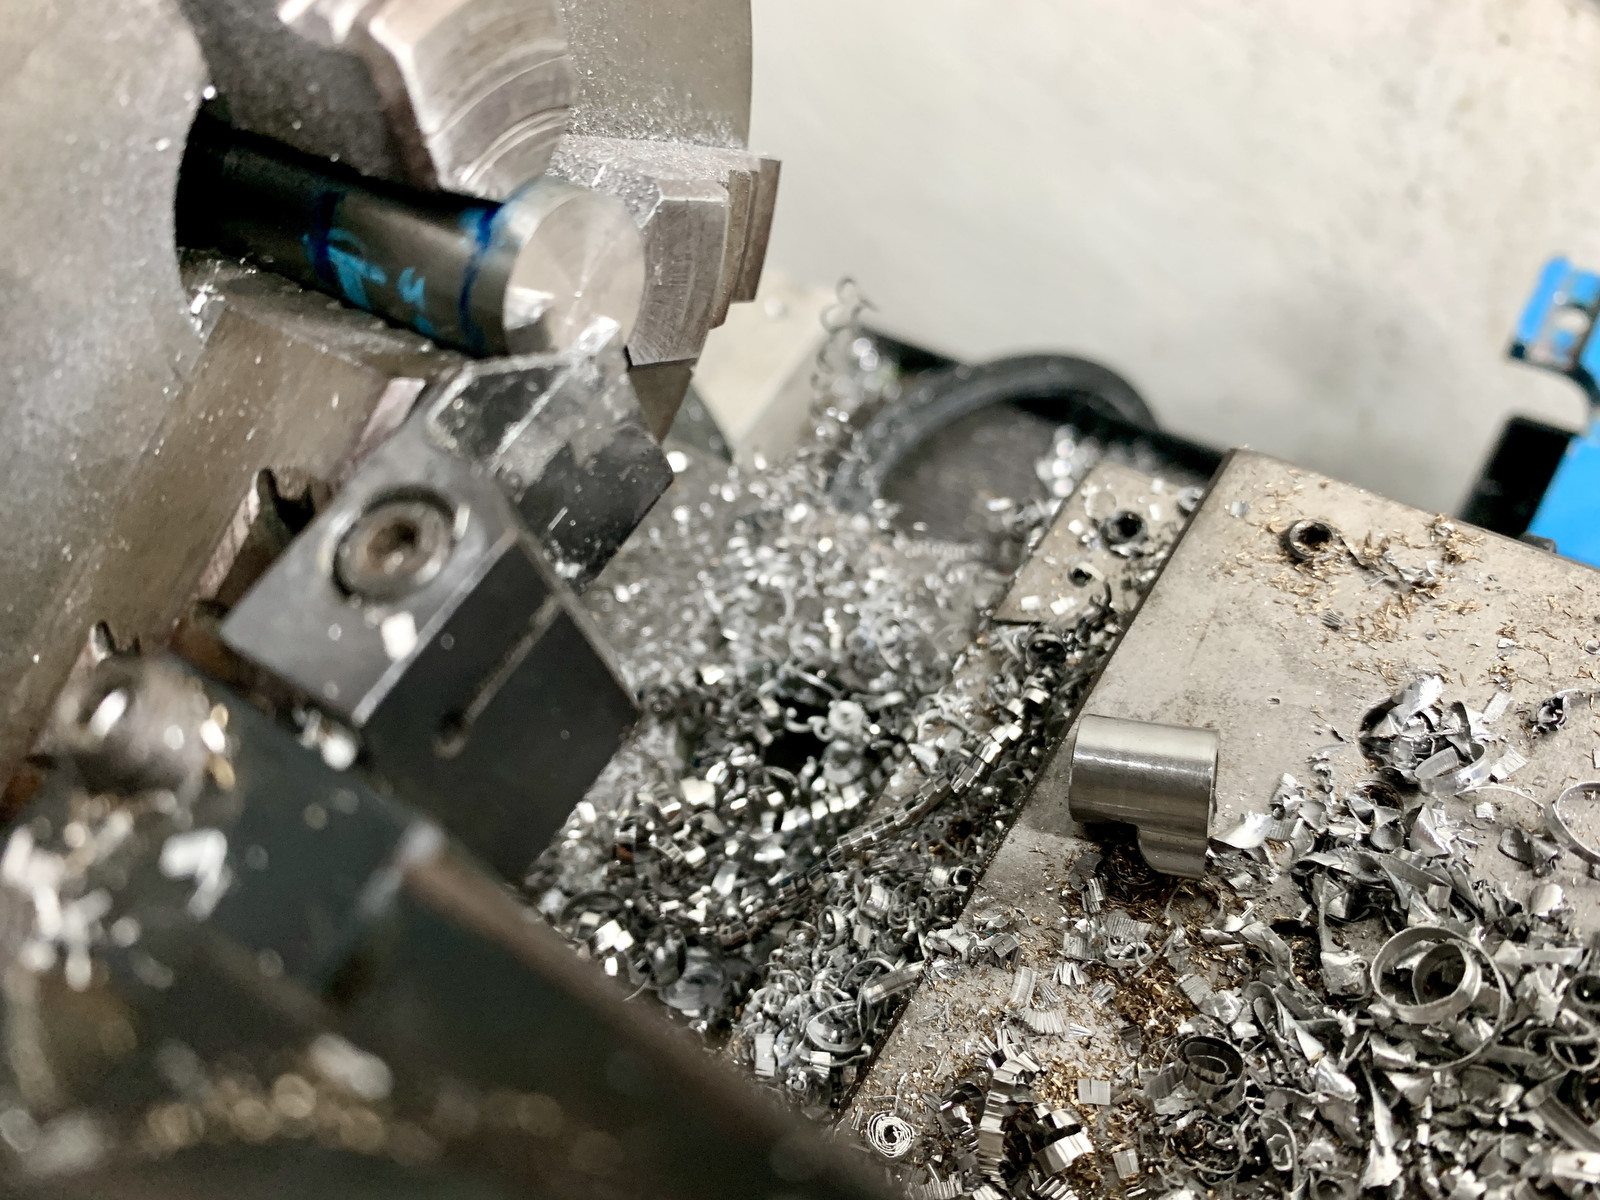
I machined the features I could reach from just the top side on the CNC and then parted off the slider from the stock on the lathe:
That parting cut went surprisingly well. But I had minimal stick-out, a brand new insert and the carriage lock helps a lot, too.
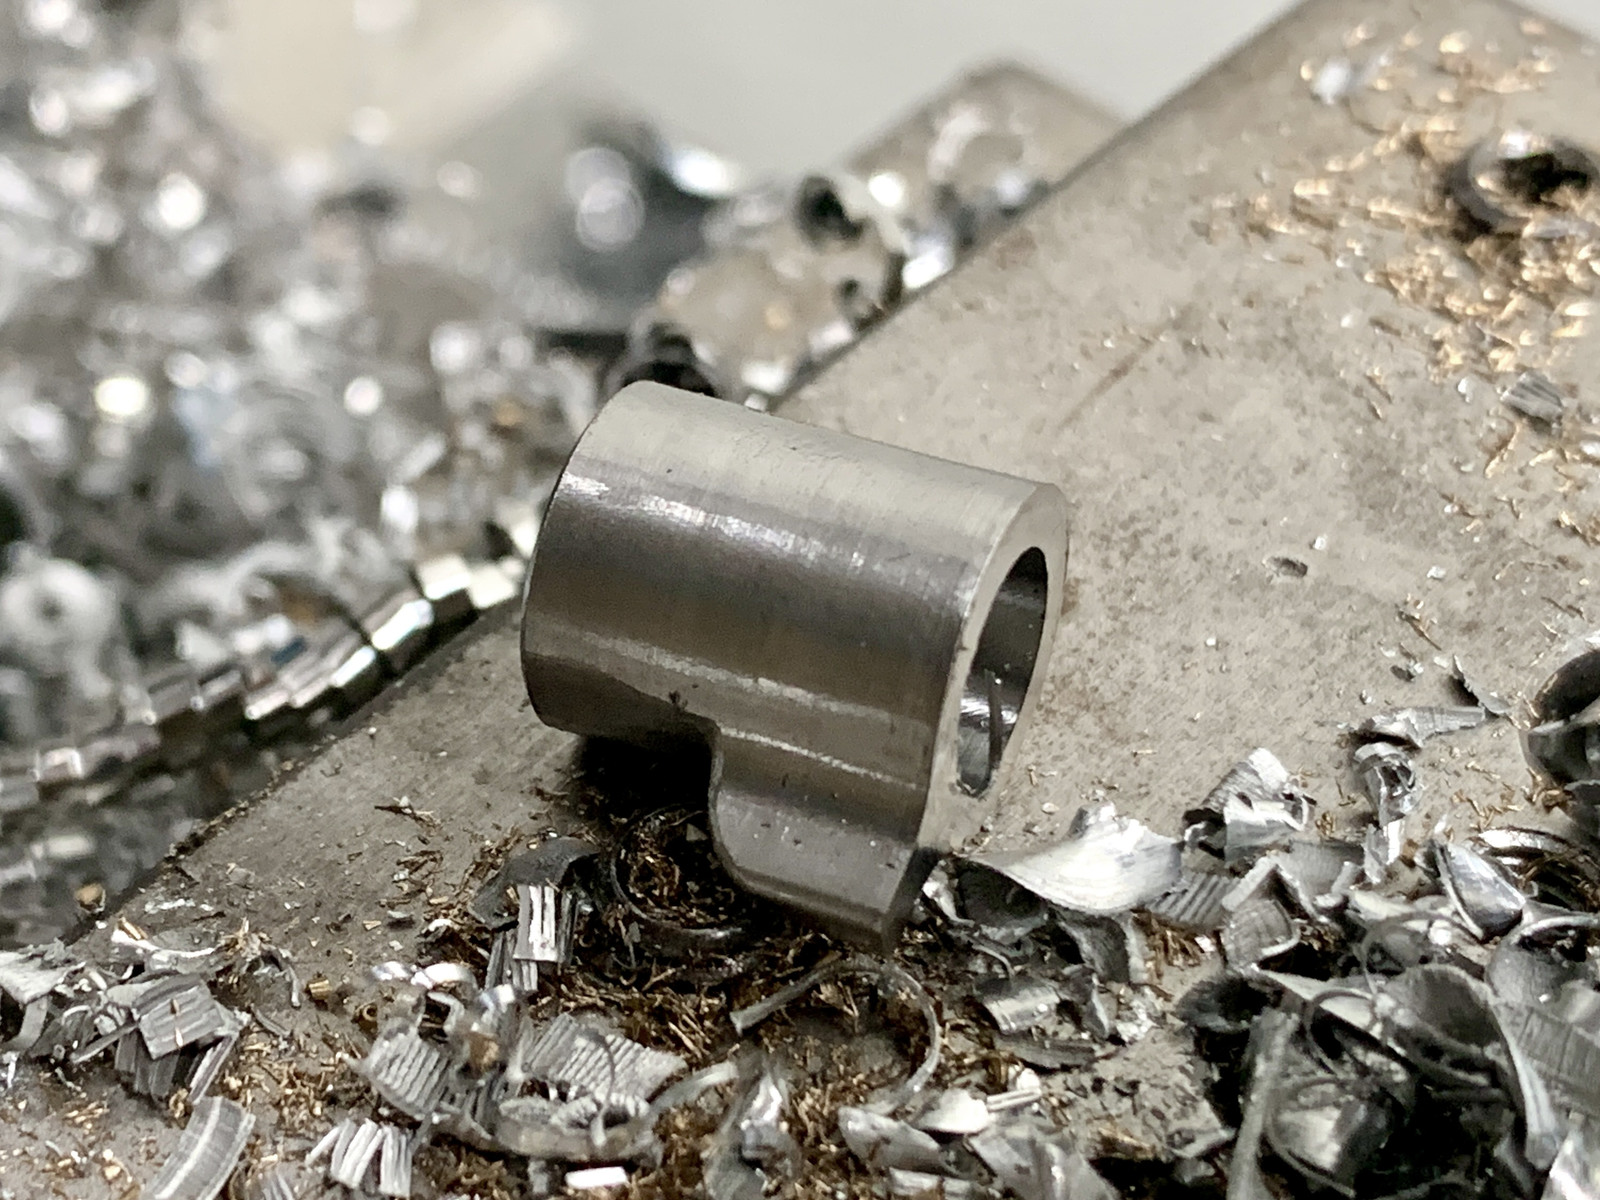
The flat face on the right of the slider will be the front and I will have to shape it manually as I don't yet have a clever way to hold and indicate the part for a second op in the CNC. If I was making many of these, I would figure that out. But for just a few, it's not worth it.
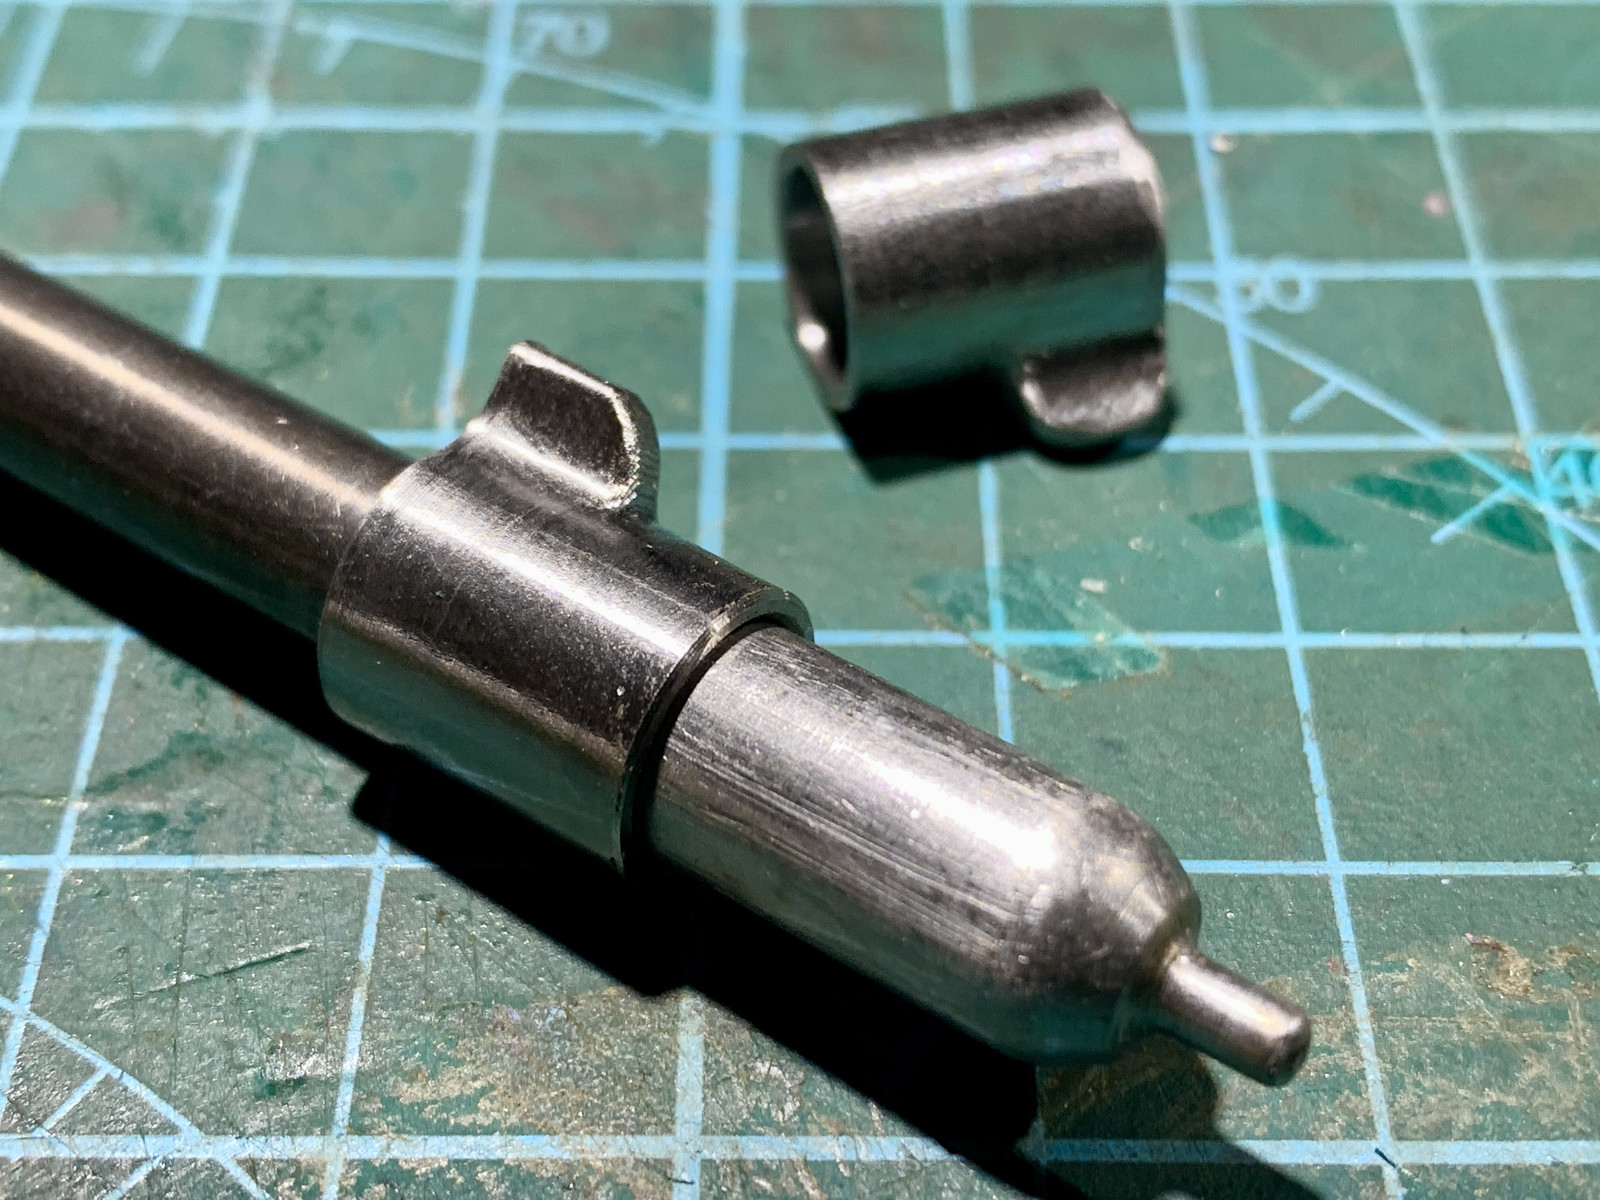
I did a quick deburr with the hand grinder and did a test fit (though I had already done one whilst the slider was still in the CNC in case I had to go back and enlarge one of the bores):
You can see a bit of stair stepping on the back slope of the lug. I could make those steps much smaller with a simple change in programming. And since I used a bull nose endmill with a bit of a corner radius as opposed to last time when I used only a flat endmill, I could probably get that slope and the rounded edges done quite nicely in the machine.
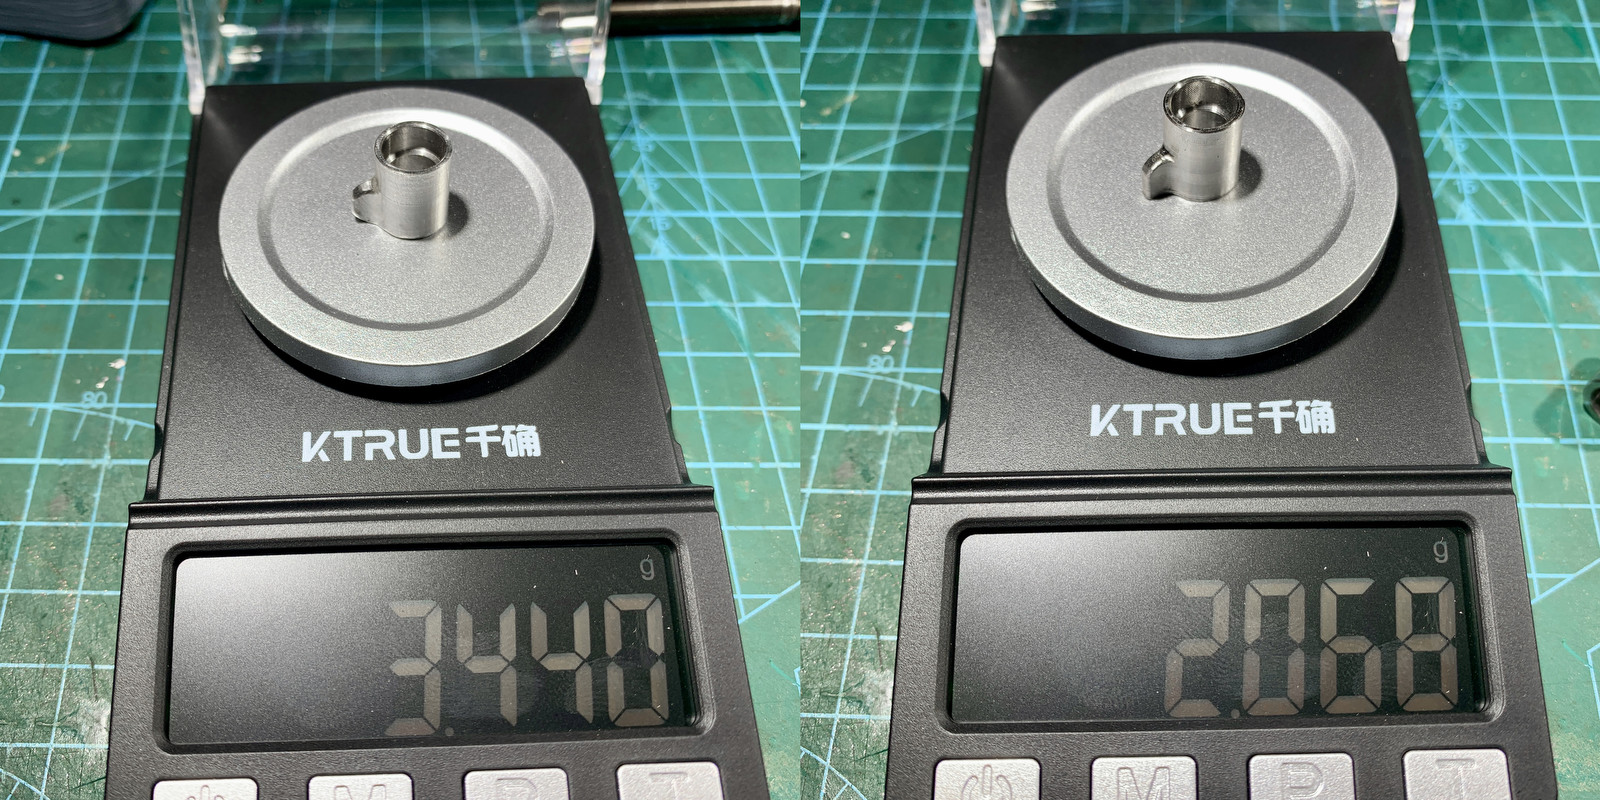
But here we are with the really important shot, haha - 17-4PH to the left, Gr. 5 titanium to the right:
Same size, same CAD file, just the savings from the lighter material.
I think once I have rounded off the front features on the ti slider and drilled the cross hole, I may get it just under 2g. Not that it matters, but it would be a cool little accomplishment
.Surprisingly, machining titanium was actually a whole lot more pleasant than cutting that unhardened gummy 17-4PH. Also, the feeds and speeds aren't much slower than they were for the 17-4PH but using the rod instead of the plate meant the machining time drops a lot. I think this was half the time or even less than last time.
So, I am pretty sure I will make a few more of these. And once I have made a tang or two, I can start using mono as shooting line again and not the draggy dyneema
.This whole slider/tang endeavor started because I was on my very last set of parts for 7mm shafts. I have enough shafts that I can afford to lose one. It would suck, but it would suck even more if I didn't have any replacement sliders and tangs.
As for the tangs, I thought titanium wasn't really the right material for it. Especially not the ones with the much reduced "nipple". People like to say that titanium is stronger than steel, but that's mostly when comparing weight to strength. But since the nipple is a fixed diameter, 17-4PH is actually stronger than titanium. But... that's only once it's heat treated. When it's not, it's actally slightly weaker.
Also, 304/316/2205 are all weaker than titanium. So, perhaps titanium is not so bad for a tang after all. At least until I can get into heat treating and then 17-4PH wins by a substantial ~40%.
But... come to think of it, I may actually have a few short 8mm shaft cut offs - which means I may have a source of hardened 17-4PH already. And 8mm is exactly the size needed for a 7mm shaft slider of this design.
Some days in the workshop things don't go to plan. Today was not one of those days...!
Last edited:
@Zahar
I am curious - What's with the sad smiley...? Last time I posted about this slider design, you also seemed to think I was on the wrong course. I don't need us all to agree, but I do like when people share why they disagree so maybe others can learn.
Do you somehow believe that these sliders won't work and if so, why? Something wrong with using Grade 5 titanium for this or something wrong with my statements on the strength between 17-4PH and titanium?
A few days ago, I explained that the sliders are replicas of the very ones I have been using to shoot 8mm shafts at 38bar with. As well as 7-7.5mm shafts at 33bar (13mm piston guns).
Personally, I have used them since ~2016/2017 on many trips and I never ever had a jam, never ever had a break. I think it's more than fair to say, that the design has proven itself in real world use on some quite powerful guns.
They are totally maintenance free, too and they are easier for me to fabricate than pretty much any other option.
The PU bumper sliders may be great, too. I don't know, I have never tried one.
But so far, this design has never let me down.
I am curious - What's with the sad smiley...? Last time I posted about this slider design, you also seemed to think I was on the wrong course. I don't need us all to agree, but I do like when people share why they disagree so maybe others can learn.
Do you somehow believe that these sliders won't work and if so, why? Something wrong with using Grade 5 titanium for this or something wrong with my statements on the strength between 17-4PH and titanium?
A few days ago, I explained that the sliders are replicas of the very ones I have been using to shoot 8mm shafts at 38bar with. As well as 7-7.5mm shafts at 33bar (13mm piston guns).
Personally, I have used them since ~2016/2017 on many trips and I never ever had a jam, never ever had a break. I think it's more than fair to say, that the design has proven itself in real world use on some quite powerful guns.
They are totally maintenance free, too and they are easier for me to fabricate than pretty much any other option.
The PU bumper sliders may be great, too. I don't know, I have never tried one.
But so far, this design has never let me down.
Last edited:
Wrapping Up The Sliders (A Sub-Two Gram Shaft Slider...)
I made one more titanium slider, so I have two of those and one 17-4PH now for 7mm shafts.
The machining recipe was a bit better today and the wall finish improved a little bit, too:
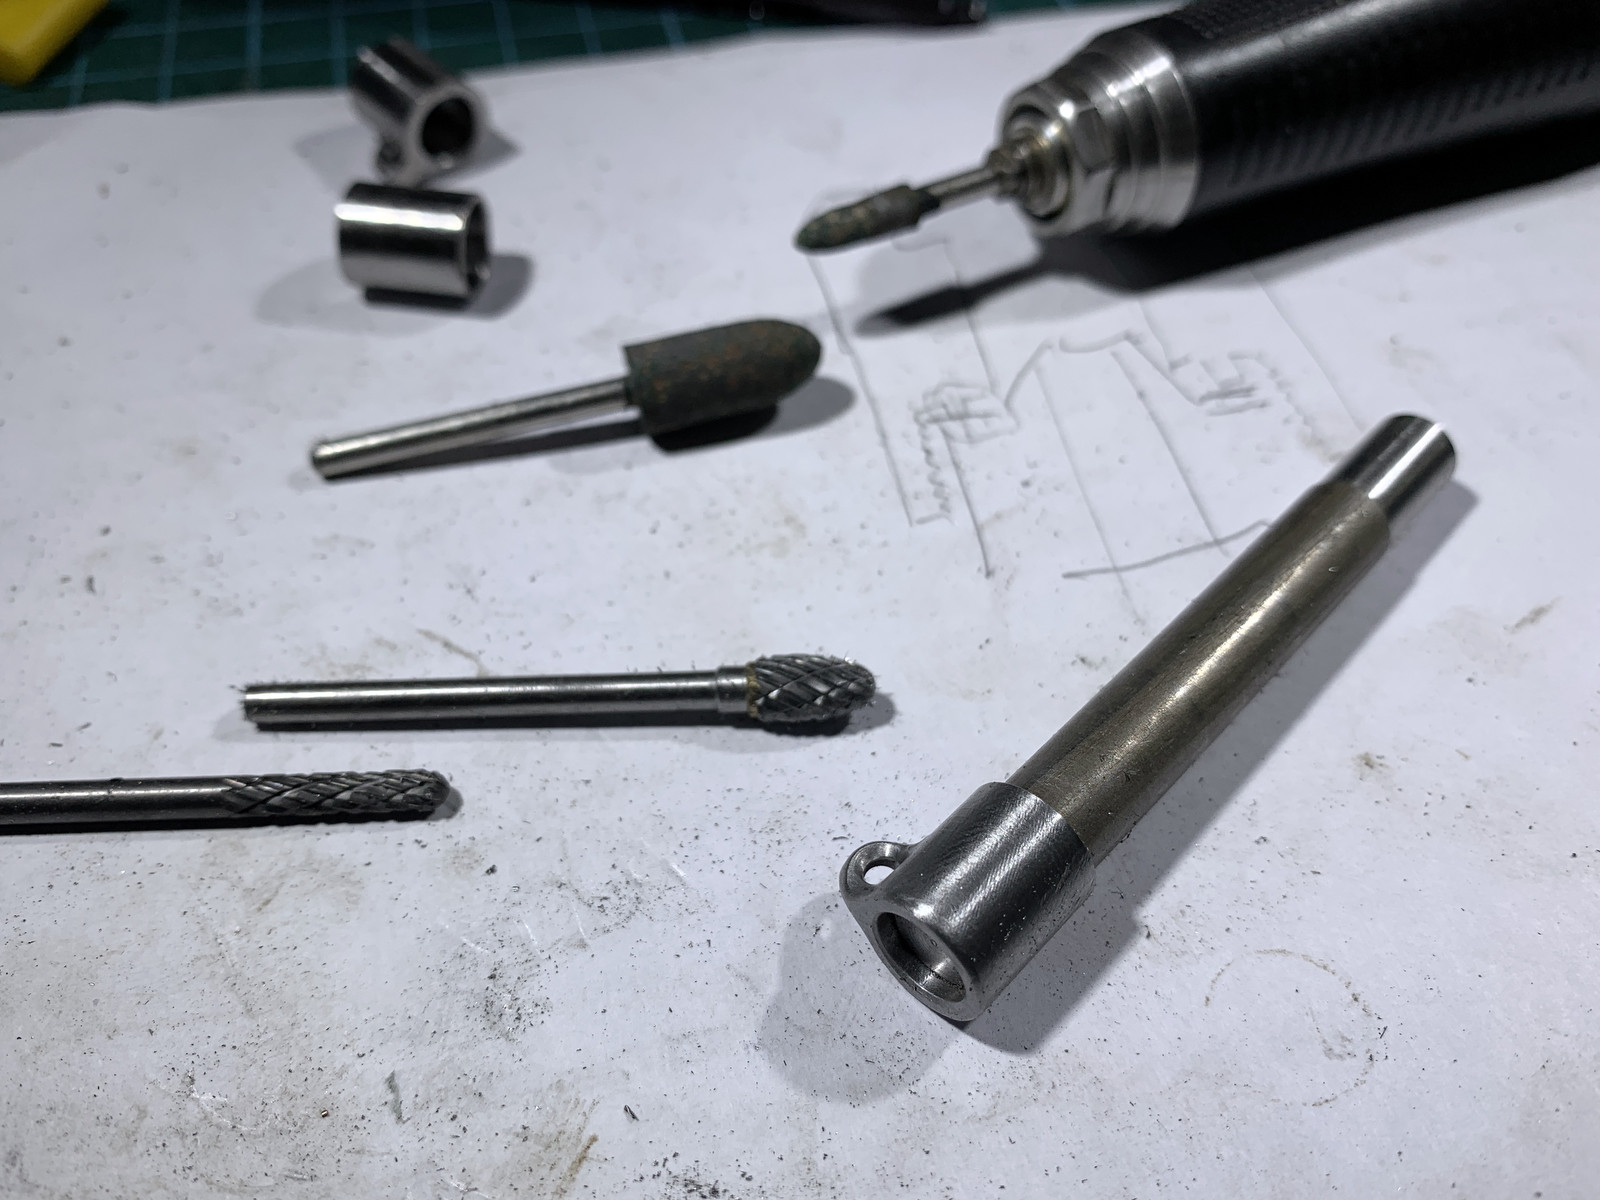
Those are fingerprint lines, not chatter marks, haha.
And the pic is from after I drilled the cross hole on the CNC and I had to grind the front of the sliders and also round the hole edges over. I like my little hand grinder a lot. I went through a few of the very cheap ones and finally decided to treat myself to something a bit better. It has decent torque and hardly any vibrations so you don't get frustrated or numb by using it.
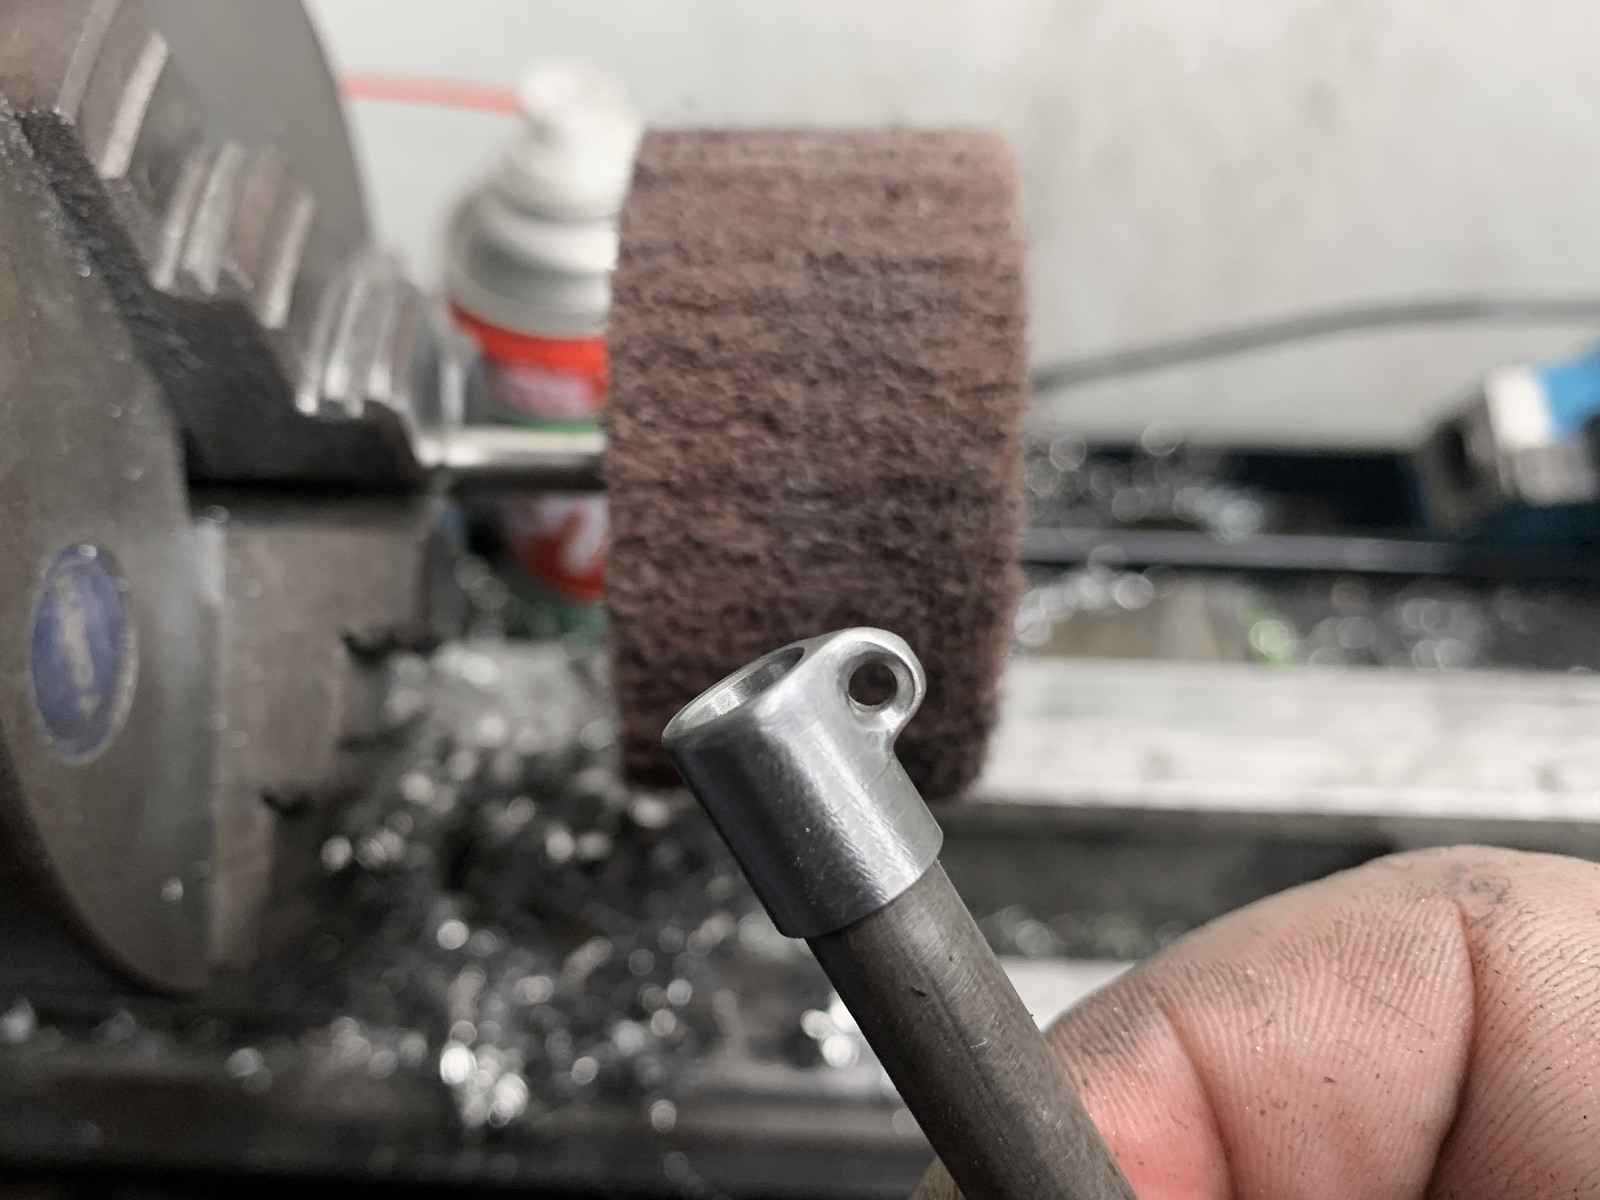
And these "Scotchbrite" wheels are pretty good, too. I think I will order some bigger ones and see if they have an even finer one. I have what corresponds to 180, 320 and 600 grit. Would be good with a 1200/1500 one, too:
Here's a pic right after I had parted the second titanium slider off from the stock on the lathe (it's the new one on the left). I had mentioned that I could reduce the stair stepping on the lug with a slight change in the CAM programming. I think it added about a little over 1min of machining time:
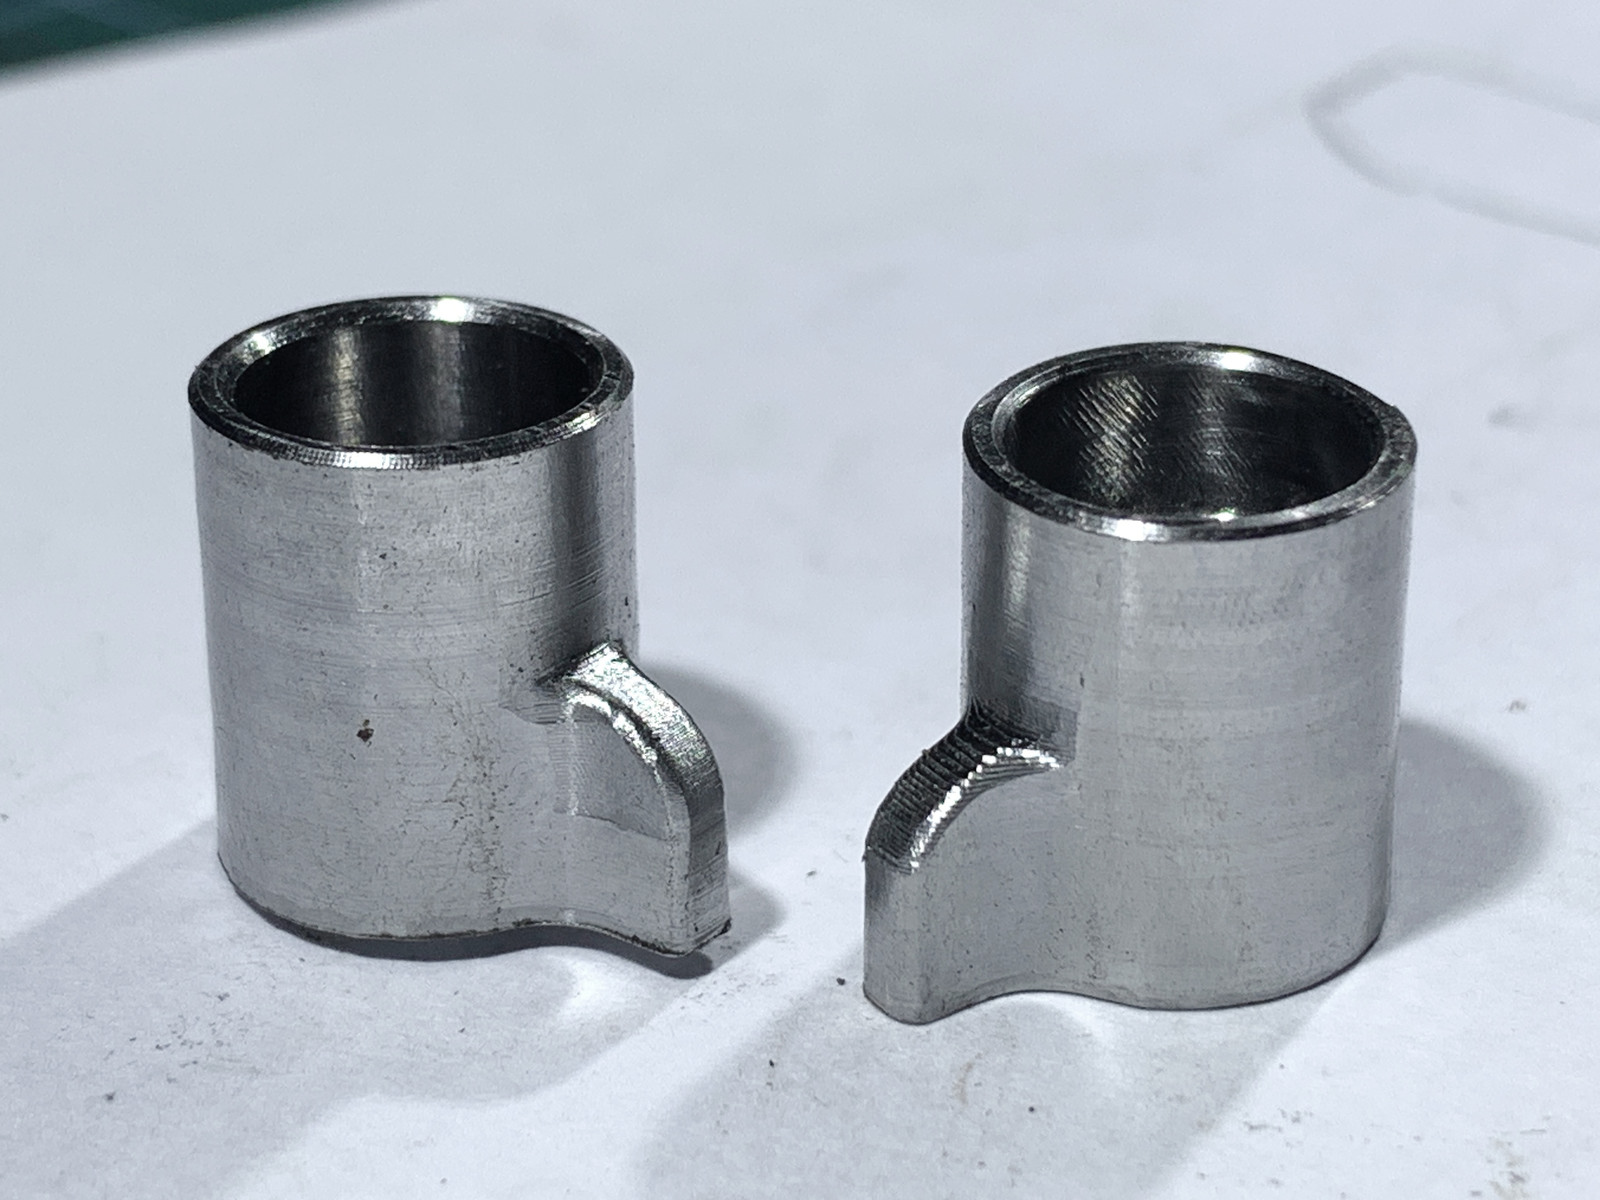 These close up pics are unforgiving though - I hadn't even noticed that little step halfway down the lug. But it disappeared in the hand finishing later.
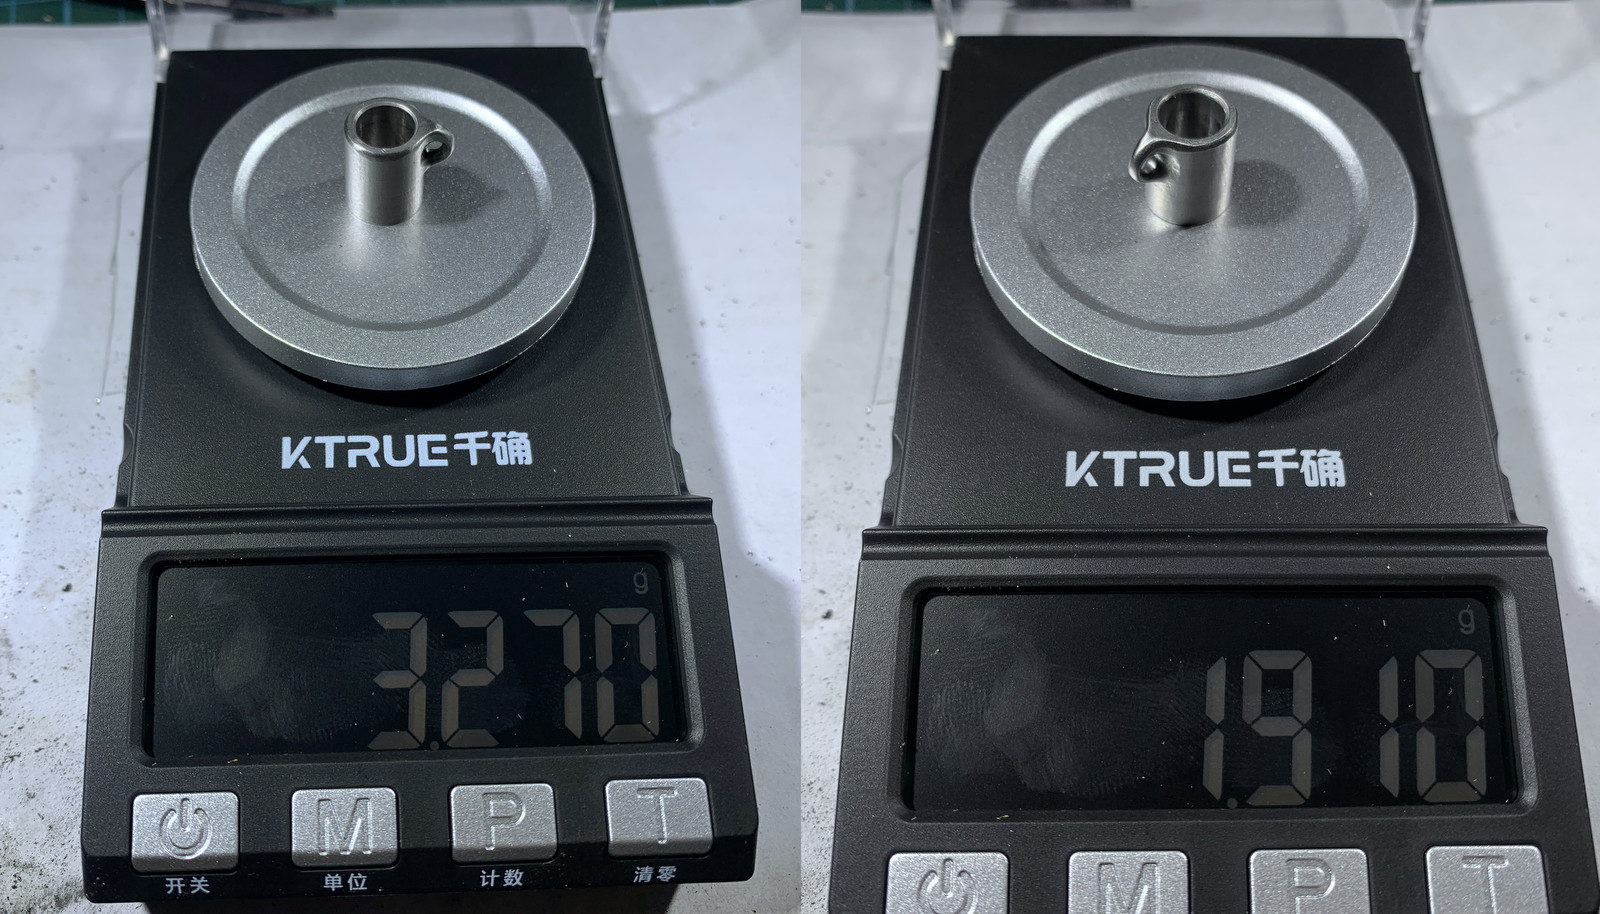
And yep, once the hole and the hand shaping to the front was done, I did get it under the 2g:
Strong Enough...?
Whether the ti sliders are strong enough, I don't know. I think for 7mm shafts they likely will be as first off all, I have less pressure in the guns shooting 7mm shafts, there's less impact on the sliders and the fish wont be monsters. But perhaps most importantly, since the OD of the sliders is fixed at 9.95mm whether the slider is for a 7mm, 7.5mm or 8mm shaft it means the wall thickness for the thinner shaft sliders is actually bigger than it is for the bigger shafts.
For this muzzle, where the slider OD is set already, it would probably be smart to go back to 17-4PH for at least the 8mm ones.
Tool Deflection
Also, the bores for the ti sliders ended up ever so slightly smaller than for the steel one - though they still slide fine on the test pieces of shaft I have. When I cut the 17-4PH slider I had used a 6mm end mill but went to 4mm for the titanium one and the machine sounded much happier. But either the 4mm end mills are a tiny bit undersized, or more likely, because it's a thinner cutter, there's a bit more tool deflection. So, I just ordered some gauge pins in the exact bore sizes I need for these various slider sizes - so when I make more of these I can check them super precisely on the CNC. Gauge pins are surprisingly cheap in China - I bought seven in sizes from 7.1-10.1mm and in total I paid about USD 2, that's honestly crazy...
A Rant About A Sh*t CNC Controller
I also hope to find time to change out the very restricted controller I have on the CNC as it's getting more and more frustrating to use as I become better at machining, haha. E.g. the controller wont let me adjust for tool wear which is neat trick you can use to really fine tune a feature like the size of these bores on the controller. As it is now, if I want to make a bore, say, 0.05mm larger, I have to go back and change the CAM on the laptop, export a new tool path/program, put it on a USB stick and take it to the machine, import it there and then run the program again... Also, I can't probe with this controller despite already having a 3D probe. And the controller doesn't stop for manual tool changes which means I need a program for each tool. All this is just artificial restrictions to drive sales for their more expensive models.
I already have most of what I need to change the controller to LinuxCNC, just need to man up and get it done... haha.
I made one more titanium slider, so I have two of those and one 17-4PH now for 7mm shafts.
The machining recipe was a bit better today and the wall finish improved a little bit, too:
Those are fingerprint lines, not chatter marks, haha.
And the pic is from after I drilled the cross hole on the CNC and I had to grind the front of the sliders and also round the hole edges over. I like my little hand grinder a lot. I went through a few of the very cheap ones and finally decided to treat myself to something a bit better. It has decent torque and hardly any vibrations so you don't get frustrated or numb by using it.
And these "Scotchbrite" wheels are pretty good, too. I think I will order some bigger ones and see if they have an even finer one. I have what corresponds to 180, 320 and 600 grit. Would be good with a 1200/1500 one, too:
Here's a pic right after I had parted the second titanium slider off from the stock on the lathe (it's the new one on the left). I had mentioned that I could reduce the stair stepping on the lug with a slight change in the CAM programming. I think it added about a little over 1min of machining time:
And yep, once the hole and the hand shaping to the front was done, I did get it under the 2g:
Strong Enough...?
Whether the ti sliders are strong enough, I don't know. I think for 7mm shafts they likely will be as first off all, I have less pressure in the guns shooting 7mm shafts, there's less impact on the sliders and the fish wont be monsters. But perhaps most importantly, since the OD of the sliders is fixed at 9.95mm whether the slider is for a 7mm, 7.5mm or 8mm shaft it means the wall thickness for the thinner shaft sliders is actually bigger than it is for the bigger shafts.
For this muzzle, where the slider OD is set already, it would probably be smart to go back to 17-4PH for at least the 8mm ones.
Tool Deflection
Also, the bores for the ti sliders ended up ever so slightly smaller than for the steel one - though they still slide fine on the test pieces of shaft I have. When I cut the 17-4PH slider I had used a 6mm end mill but went to 4mm for the titanium one and the machine sounded much happier. But either the 4mm end mills are a tiny bit undersized, or more likely, because it's a thinner cutter, there's a bit more tool deflection. So, I just ordered some gauge pins in the exact bore sizes I need for these various slider sizes - so when I make more of these I can check them super precisely on the CNC. Gauge pins are surprisingly cheap in China - I bought seven in sizes from 7.1-10.1mm and in total I paid about USD 2, that's honestly crazy...
A Rant About A Sh*t CNC Controller
I also hope to find time to change out the very restricted controller I have on the CNC as it's getting more and more frustrating to use as I become better at machining, haha. E.g. the controller wont let me adjust for tool wear which is neat trick you can use to really fine tune a feature like the size of these bores on the controller. As it is now, if I want to make a bore, say, 0.05mm larger, I have to go back and change the CAM on the laptop, export a new tool path/program, put it on a USB stick and take it to the machine, import it there and then run the program again... Also, I can't probe with this controller despite already having a 3D probe. And the controller doesn't stop for manual tool changes which means I need a program for each tool. All this is just artificial restrictions to drive sales for their more expensive models.
I already have most of what I need to change the controller to LinuxCNC, just need to man up and get it done... haha.
Last edited:
Titanium Shooting Barrels... Yes, No, Maybe...?
First of all, I want to make clear that I actually don't have a personal need for a bling, bling titanium shooting barrel, haha. But later in this post I will get into the reasons why a particular gun build I have in mind may call for it.
First, let me remind you how "bad" the first sample tubes were:
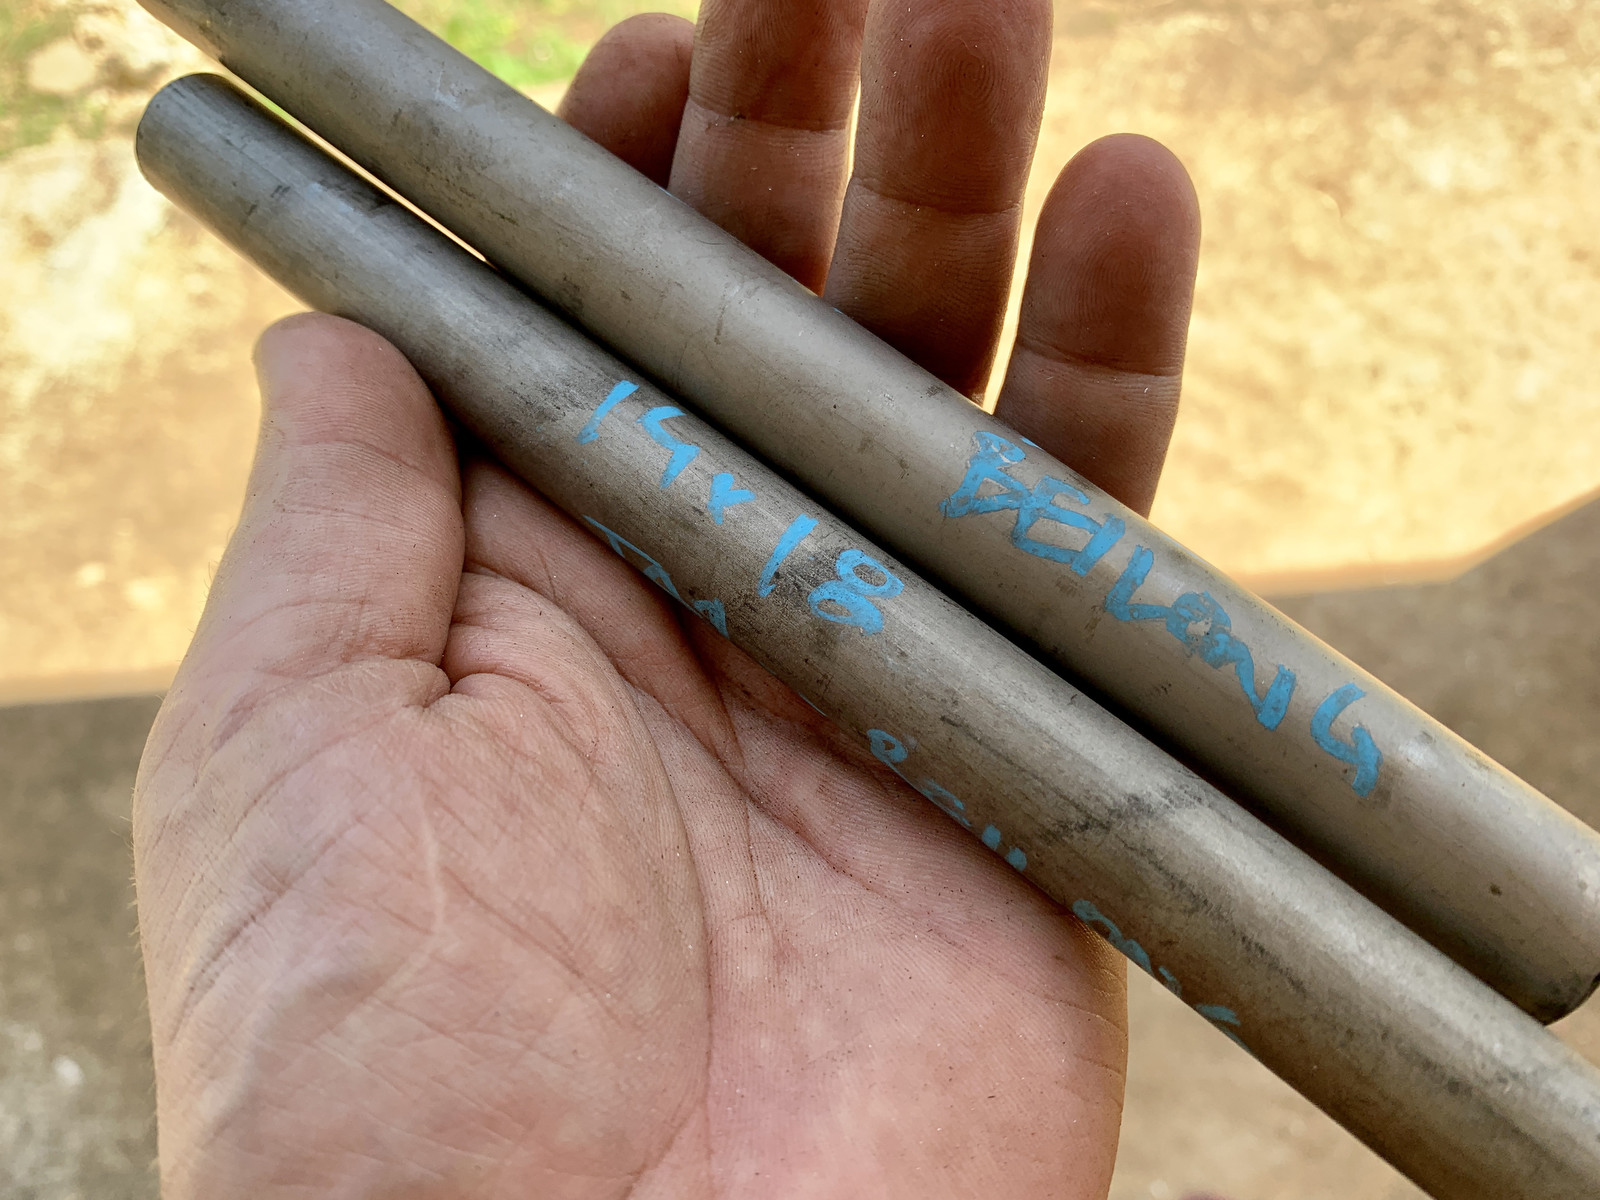
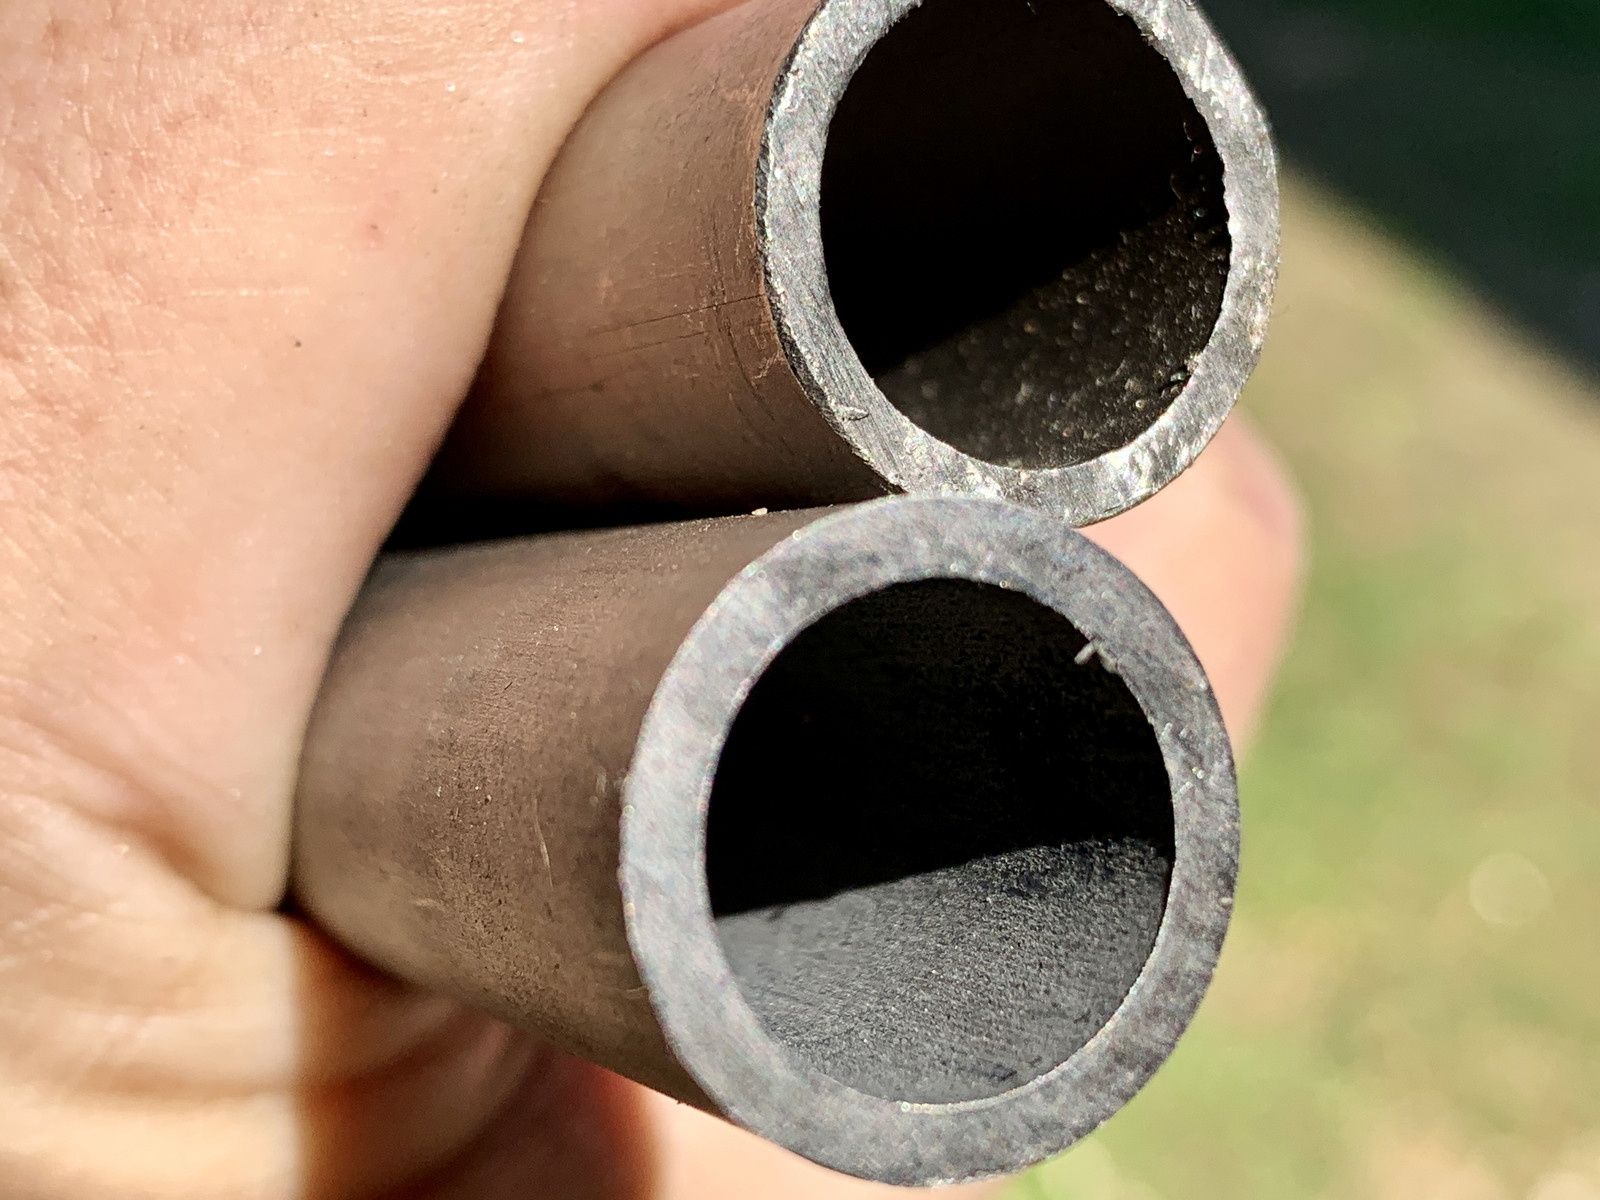
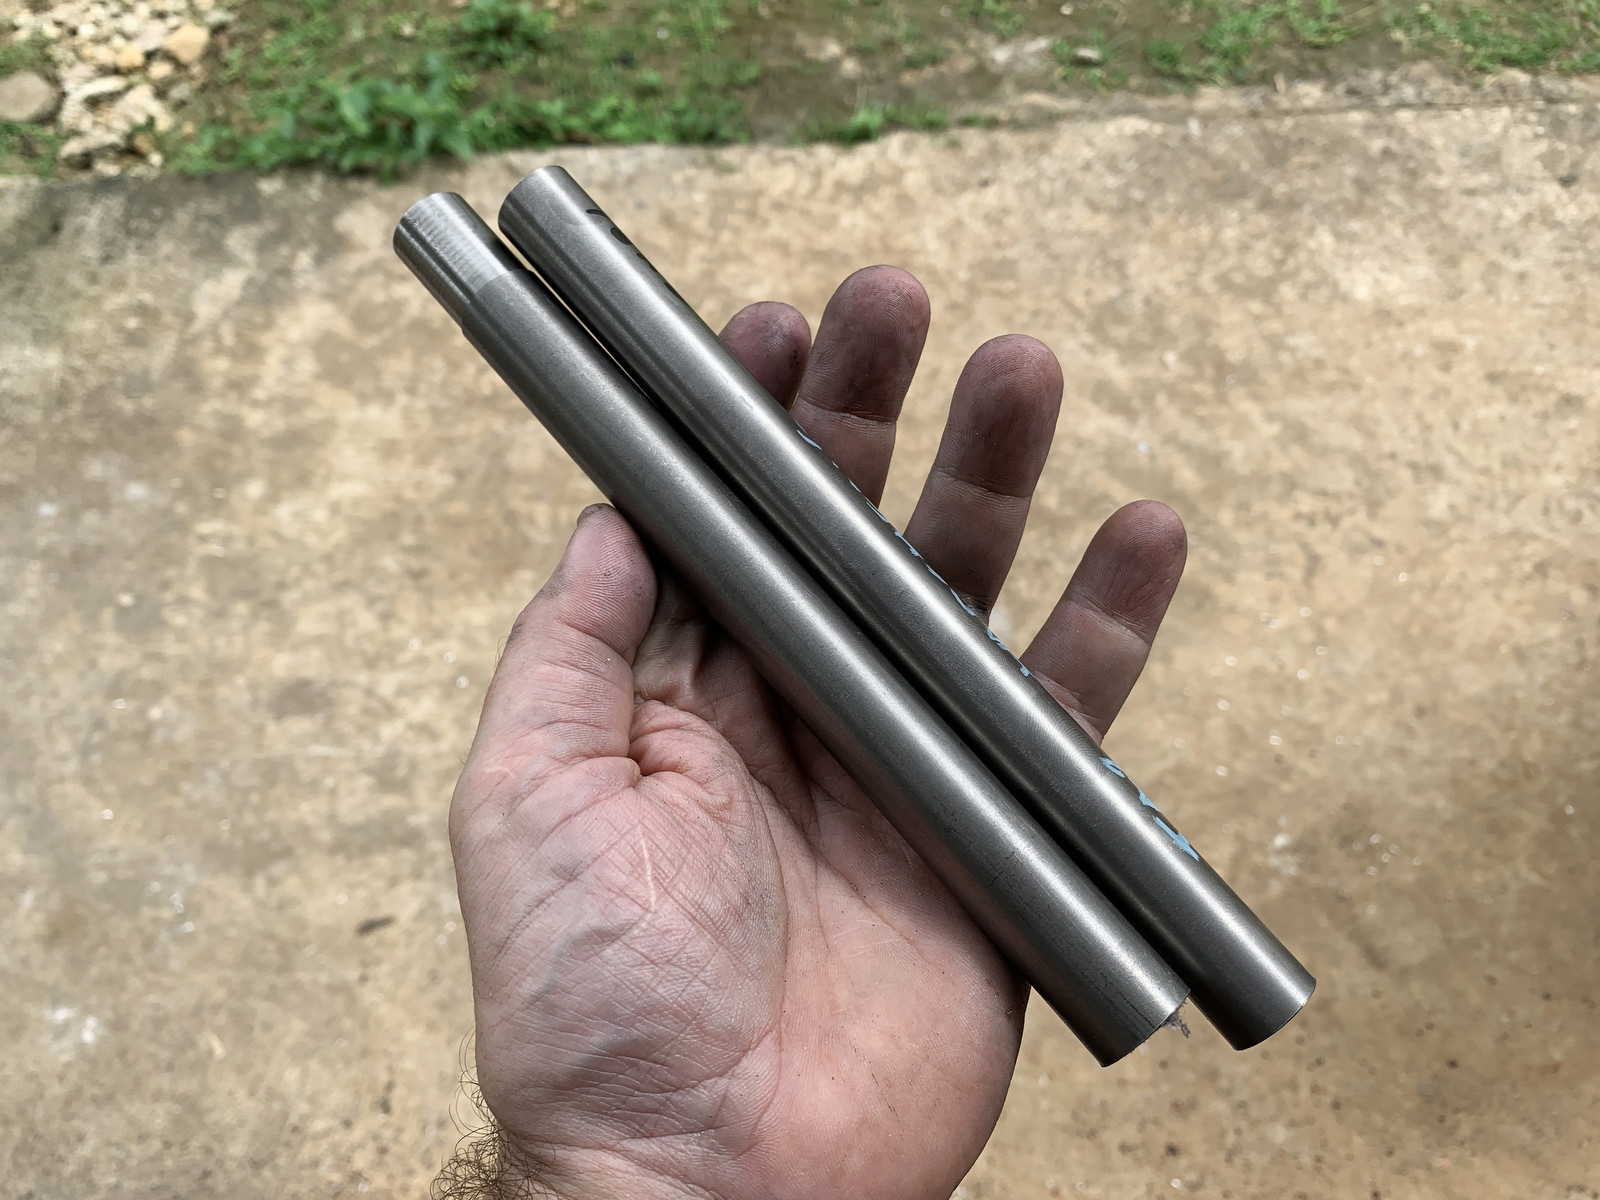
But today, these other two tubes arrived and the outside already looks much better:
And so does the inside:
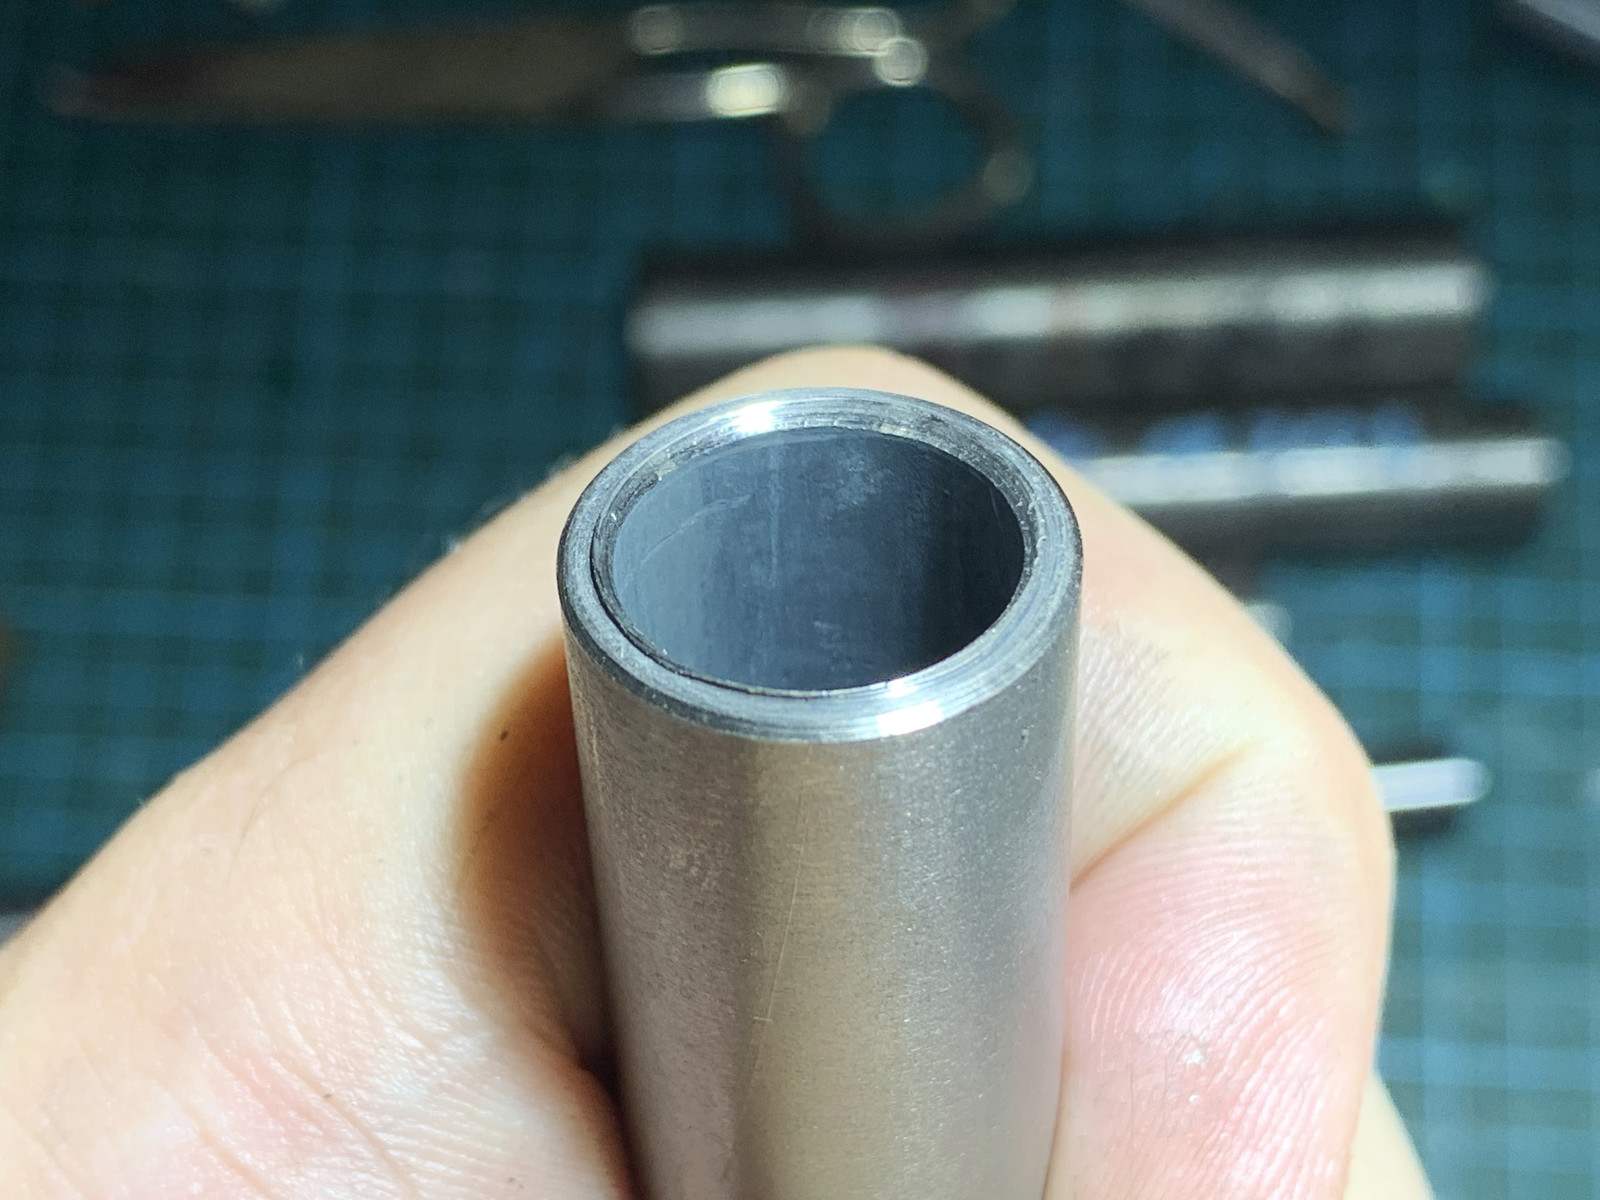
BTW, this is not GR5. This is just GR2.
I can't find any GR5 (grade 5) in the lengths needed. I asked around and I think they would have to made on a gun drilling lathe but the few suppliers I asked didn't want to do it. I think GR1 and GR2 which are softer can be made in dies or rolled and welded? Either way, the outcome is I can find tubes long enough in GR1 and GR2 but none in GR5 which is a bummer.
So, this latest sample is grade 2 and I took some cuts and made a test thread already:
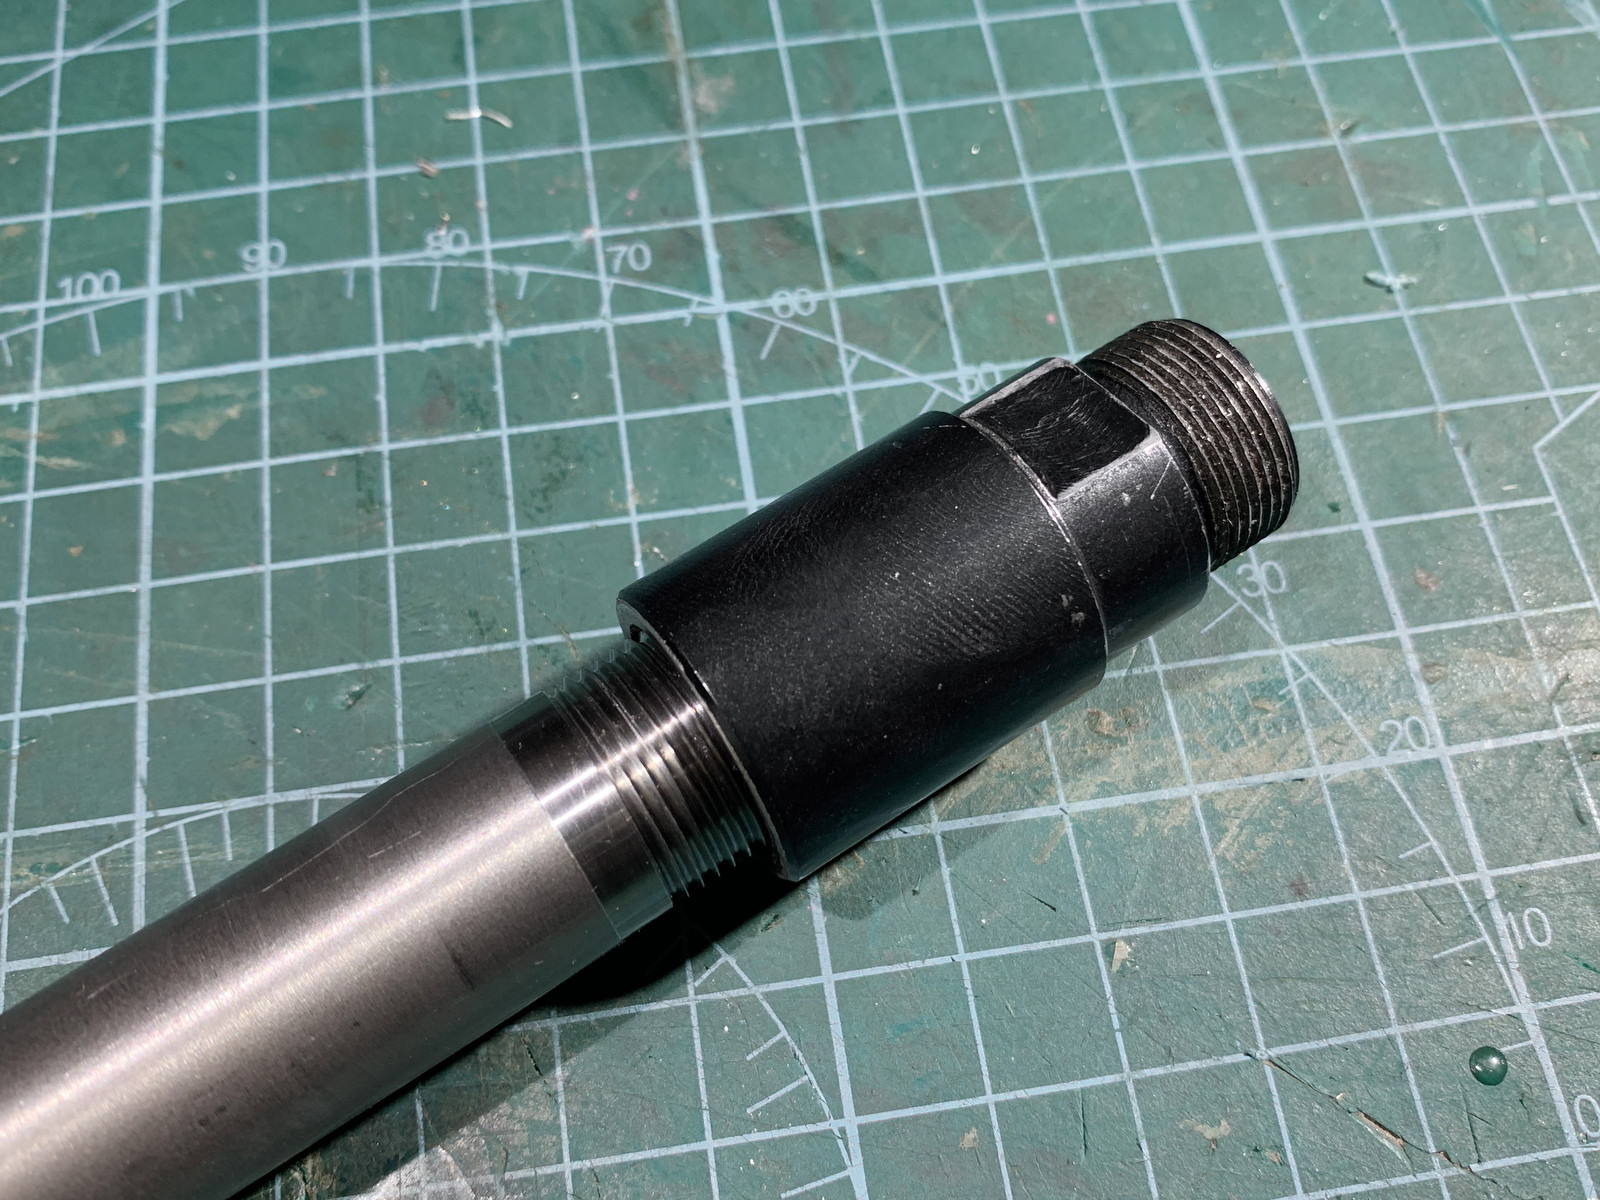
It cuts pretty nicely - which is important as I would need to thread this and also reduce the OD.
The pic above showing how the inside was pretty good, that was sadly the 14mm ID tube. The 15mm is not as good. But maybe another vendor has a 15mm grade 2 tube that will work.
And then I will have to figure out how to sand/polish them to an even better finish.
But Why...?
The thing is, I would like to make my own carbon fiber cuttlefish shaped reservoir this year and I would like an even higher Mirage ratio. Going to a larger piston diameter will help the reservoir not have to deal with such high pressures and will also give me a higher ratio for the Mirage pumping.
I am aiming for 15mm. But I can't find a source for nice 15mm alu barrels in a good quality that's already anodized.
I guess I could start looking for some raw ones, machine them and then send them off for anodizing.
But for now, I am checking out titanium tubes and also stainless. The latter has certainly been used both by the "Black Sea" builders and some of the Italians for modding guns. But for weight reasons, I would prefer titanium and it's actually not as expensive as you might think.
I actually don't know what type of stainless the Italian gun builders have traditionally used perhaps it's simply 304L/316L as those can be found in polished versions pretty easily.
I am also waiting for some stainless tube because even though I would prefer the weight savings of the titanium, since the goal is to make a custom reservoir, I can add a bit volume to carry a heavier shooting barrel if need be. So, if I can't get the wall finish I need from a titanium tube, I will probably go with a pre-polished 316L tube.
Some of you might find the comparison below interesting (AI sourced, not double checked):
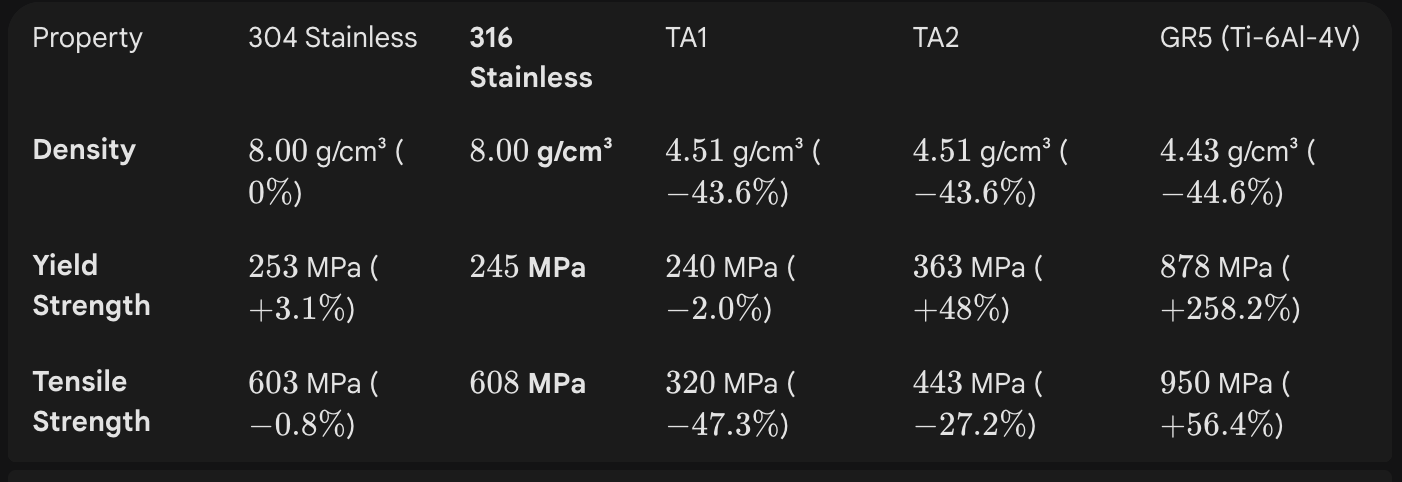
TA2 is GR2 and that's what I can source. And as far as I understand, the important property is the yield strength as it will be muzzle threads yielding that we will have to look out for. So, even at 43% of a weight saving over 304/316 we still have 48% higher yield strength. (But you can also see why having a GR5 barrel would be amazing...).
But it turns out (if AI can be trusted - and I will test this in real life) that even if I cut an M18x1 muzzle thread in a thin walled 15x18mm (IDxOD) GR2 tube, it would still take 1600kgf to break that tube at the treads... Now, not sure what kinda of impacts the thread sees from the piston and whether it can fatigue the thread at all or if it's so tiny in comparison that it's not a worry? But 1600kgf to break the thread is still a nice safety factor as I doubt I will have more than 350kgf pushing on the thread via the nose cone.
Stronger Threads
One last thought on threads and (not) breaking them. I have mentioned I am trying to use ISO-style threading inserts (or "full-profile insert") more and more on the lathe. These have a wider root radius and are designed to work for one specific pitch whereas the generic ones tend to be much pointier. So, the generic inserts actually cut deeper into the wall, leave less material and make threads where each valleys come to a sharper point which could be a stress riser.
Here's a close-up of the M18x1.25 test thread I just cut in the sample titanium tube:
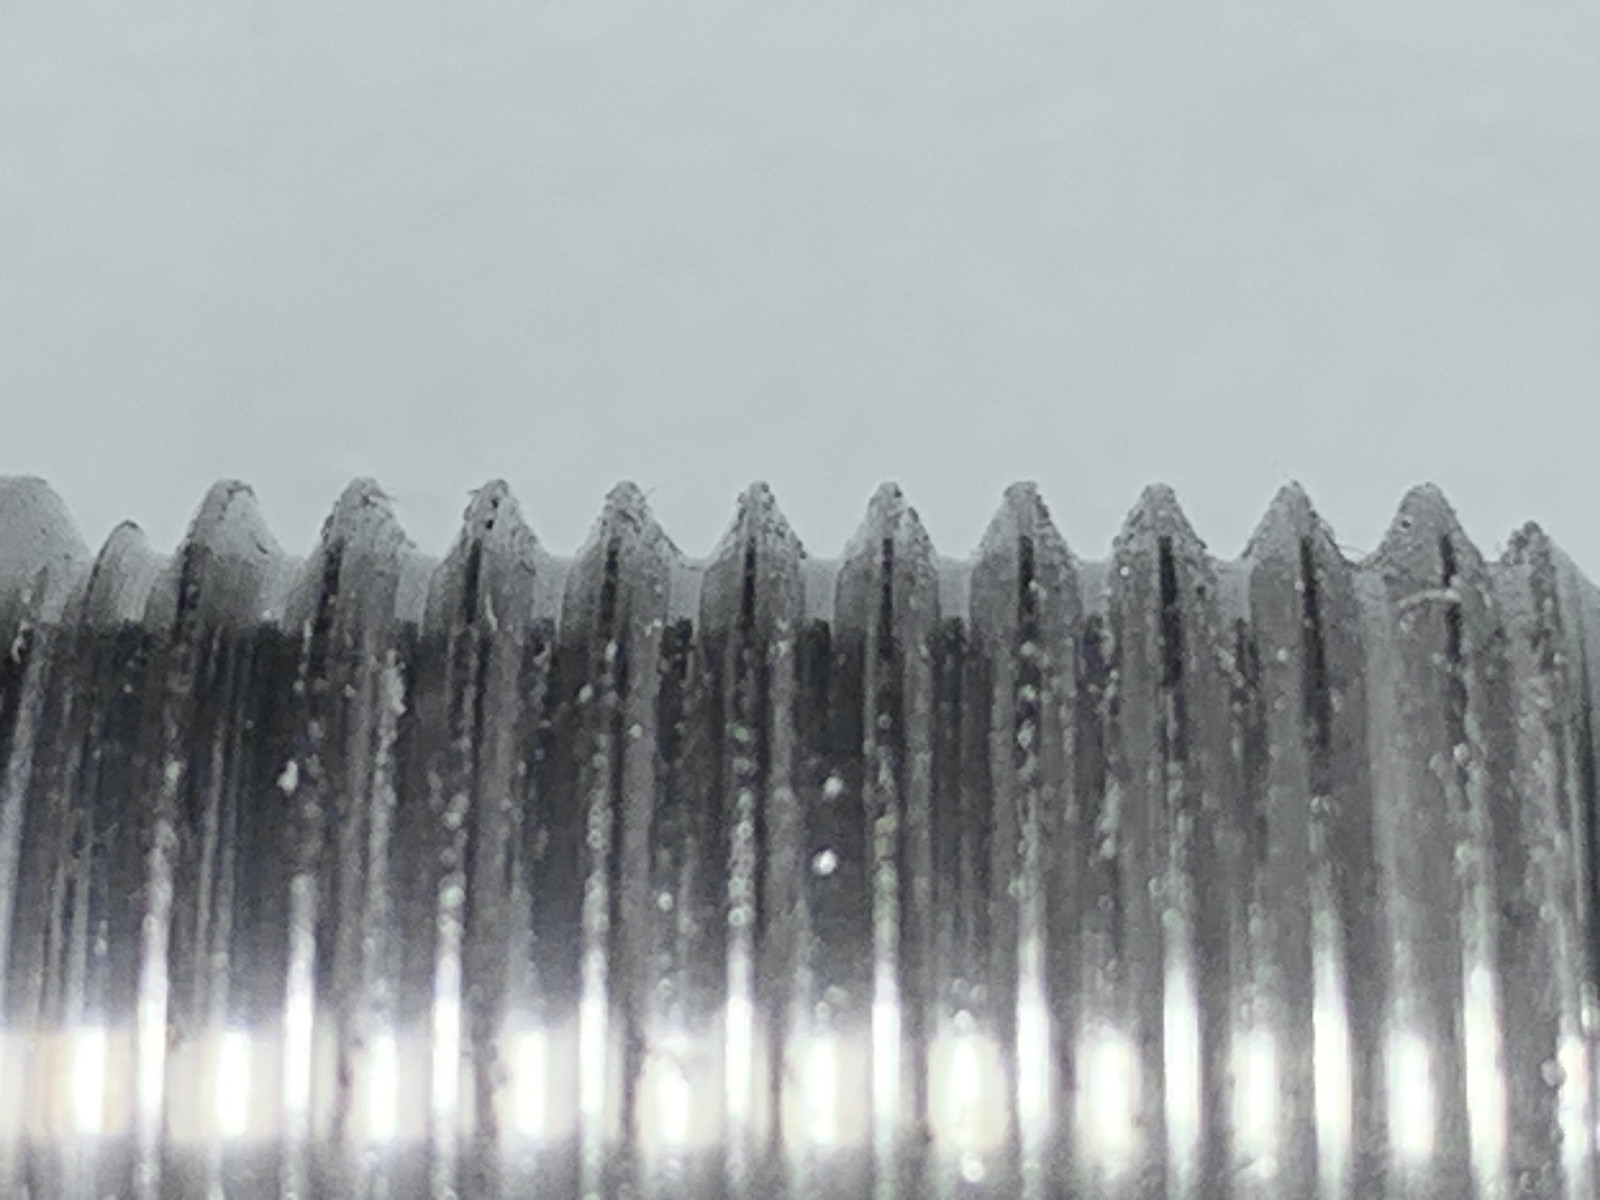
Whilst I don't have a comparison thread cut with a pointier, generic pitch insert, I think we can agree that those shallower and radiused thread valleys can only be a good thing strength wise.
Update 1
Actually, I wouldn't mind testing the bigger pistons even before I set out to make my custom reservoirs. This would mean using my 40mm CF reservoirs and thus be fairly constrained in terms of buyoancy unless I add some foam wings or a little foam belly.
But to check how bad it would be, I did some quick CAD now to get a sense of how heavy a 15x18mm 316L barrel would be compared to a classic 13x18 alu barrel. For my Mirage 100, it would be 100g heavier - that's if I shave down the OD of the 316 tube a bit, too. So, not great but not super terrible. But I can't really save a lot more weight on the rest of the system, perhaps max. 20-30g. it's a tiny bit positive right now so there's a bit to be gained there, too. Might be worth a try for testing purposes...
I would need a new muzzle, shock absorber, piston too, though. But I was planning on having a go at making those anyways. The new muzzle would be to test my own design for a vacuum cuff but also because I think it could be smart to go to M18x1 (from M18x1.25) to save some more meat in the thinner wall of a 15x18mm tube.
As for a 15x18mm titanium barrel, even without reducing the OD, it's only 20g heavier than the stock alu barrel. And if I thin the OD of the titanum barrel, I can easily lose +60g. And still have a stronger barrel than the 316L.
So, I will still try to find a titanium tube with a smooth inner wall. Though getting a polished 316L tube is tempting as they should be very smooth already.
I think on a longer Mirage, like the 135 I made for doggies, I could possibly make it neutral with a stainless barrel, but not sure if I would also be able to carry a thicker shaft.
It might be worth it doing the weight budget on that one as that could be the ultimate test rig: 135 Mirage with a 15mm piston shooting an 8mm shaft. Having that gun at a very manageable ~33bar would be equavalent to ~45bar in a 13mm classic oleo... Kaboom!
First of all, I want to make clear that I actually don't have a personal need for a bling, bling titanium shooting barrel, haha. But later in this post I will get into the reasons why a particular gun build I have in mind may call for it.
First, let me remind you how "bad" the first sample tubes were:
But today, these other two tubes arrived and the outside already looks much better:
And so does the inside:
BTW, this is not GR5. This is just GR2.
I can't find any GR5 (grade 5) in the lengths needed. I asked around and I think they would have to made on a gun drilling lathe but the few suppliers I asked didn't want to do it. I think GR1 and GR2 which are softer can be made in dies or rolled and welded? Either way, the outcome is I can find tubes long enough in GR1 and GR2 but none in GR5 which is a bummer.
So, this latest sample is grade 2 and I took some cuts and made a test thread already:
It cuts pretty nicely - which is important as I would need to thread this and also reduce the OD.
The pic above showing how the inside was pretty good, that was sadly the 14mm ID tube. The 15mm is not as good. But maybe another vendor has a 15mm grade 2 tube that will work.
And then I will have to figure out how to sand/polish them to an even better finish.
But Why...?
The thing is, I would like to make my own carbon fiber cuttlefish shaped reservoir this year and I would like an even higher Mirage ratio. Going to a larger piston diameter will help the reservoir not have to deal with such high pressures and will also give me a higher ratio for the Mirage pumping.
I am aiming for 15mm. But I can't find a source for nice 15mm alu barrels in a good quality that's already anodized.
I guess I could start looking for some raw ones, machine them and then send them off for anodizing.
But for now, I am checking out titanium tubes and also stainless. The latter has certainly been used both by the "Black Sea" builders and some of the Italians for modding guns. But for weight reasons, I would prefer titanium and it's actually not as expensive as you might think.
I actually don't know what type of stainless the Italian gun builders have traditionally used perhaps it's simply 304L/316L as those can be found in polished versions pretty easily.
I am also waiting for some stainless tube because even though I would prefer the weight savings of the titanium, since the goal is to make a custom reservoir, I can add a bit volume to carry a heavier shooting barrel if need be. So, if I can't get the wall finish I need from a titanium tube, I will probably go with a pre-polished 316L tube.
Some of you might find the comparison below interesting (AI sourced, not double checked):
TA2 is GR2 and that's what I can source. And as far as I understand, the important property is the yield strength as it will be muzzle threads yielding that we will have to look out for. So, even at 43% of a weight saving over 304/316 we still have 48% higher yield strength. (But you can also see why having a GR5 barrel would be amazing...).
But it turns out (if AI can be trusted - and I will test this in real life) that even if I cut an M18x1 muzzle thread in a thin walled 15x18mm (IDxOD) GR2 tube, it would still take 1600kgf to break that tube at the treads... Now, not sure what kinda of impacts the thread sees from the piston and whether it can fatigue the thread at all or if it's so tiny in comparison that it's not a worry? But 1600kgf to break the thread is still a nice safety factor as I doubt I will have more than 350kgf pushing on the thread via the nose cone.
Stronger Threads
One last thought on threads and (not) breaking them. I have mentioned I am trying to use ISO-style threading inserts (or "full-profile insert") more and more on the lathe. These have a wider root radius and are designed to work for one specific pitch whereas the generic ones tend to be much pointier. So, the generic inserts actually cut deeper into the wall, leave less material and make threads where each valleys come to a sharper point which could be a stress riser.
Here's a close-up of the M18x1.25 test thread I just cut in the sample titanium tube:
Whilst I don't have a comparison thread cut with a pointier, generic pitch insert, I think we can agree that those shallower and radiused thread valleys can only be a good thing strength wise.
Update 1
Actually, I wouldn't mind testing the bigger pistons even before I set out to make my custom reservoirs. This would mean using my 40mm CF reservoirs and thus be fairly constrained in terms of buyoancy unless I add some foam wings or a little foam belly.
But to check how bad it would be, I did some quick CAD now to get a sense of how heavy a 15x18mm 316L barrel would be compared to a classic 13x18 alu barrel. For my Mirage 100, it would be 100g heavier - that's if I shave down the OD of the 316 tube a bit, too. So, not great but not super terrible. But I can't really save a lot more weight on the rest of the system, perhaps max. 20-30g. it's a tiny bit positive right now so there's a bit to be gained there, too. Might be worth a try for testing purposes...
I would need a new muzzle, shock absorber, piston too, though. But I was planning on having a go at making those anyways. The new muzzle would be to test my own design for a vacuum cuff but also because I think it could be smart to go to M18x1 (from M18x1.25) to save some more meat in the thinner wall of a 15x18mm tube.
As for a 15x18mm titanium barrel, even without reducing the OD, it's only 20g heavier than the stock alu barrel. And if I thin the OD of the titanum barrel, I can easily lose +60g. And still have a stronger barrel than the 316L.
So, I will still try to find a titanium tube with a smooth inner wall. Though getting a polished 316L tube is tempting as they should be very smooth already.
I think on a longer Mirage, like the 135 I made for doggies, I could possibly make it neutral with a stainless barrel, but not sure if I would also be able to carry a thicker shaft.
It might be worth it doing the weight budget on that one as that could be the ultimate test rig: 135 Mirage with a 15mm piston shooting an 8mm shaft. Having that gun at a very manageable ~33bar would be equavalent to ~45bar in a 13mm classic oleo... Kaboom!
Last edited:
@Zahar
I am curious - What's with the sad smiley...? Last time I posted about this slider design, you also seemed to think I was on the wrong course. I don't need us all to agree, but I do like when people share why they disagree so maybe others can learn.
Do you somehow believe that these sliders won't work and if so, why? Something wrong with using Grade 5 titanium for this or something wrong with my statements on the strength between 17-4PH and titanium?
A few days ago, I explained that the sliders are replicas of the very ones I have been using to shoot 8mm shafts at 38bar with. As well as 7-7.5mm shafts at 33bar (13mm piston guns).
Personally, I have used them since ~2016/2017 on many trips and I never ever had a jam, never ever had a break. I think it's more than fair to say, that the design has proven itself in real world use on some quite powerful guns.
They are totally maintenance free, too and they are easier for me to fabricate than pretty much any other option.
The PU bumper sliders may be great, too. I don't know, I have never tried one.
But so far, this design has never let A sad smiley face about using titanium for the shaft slide. 1. Titanium should not be used in conjunction with other metals in saltwater. Galvanic coating will destroy everything near the titanium. 2. Titanium is a friction metal. Sand trapped between the shaft and titanium will jam the shaft slider. Stainless steel, plastic, or steel and plastic should be used. This is my opinion, based on repairing numerous spearguns. The smaller the shaft diameter, the greater the shaft bends when loaded under load. This applies to shafts 7mm and smaller. This bending creates friction on the titanium and interferes with loading, as well as scratches the shaft, leading to vacuum leaks through the vacuum seal. This is a rake that everyone steps on every time.

@Diving Gecko As for the fibre optic issue, I have used cheap chinese fibre optic rods off ebay and used that method of burning the end and leaving a short piece. In order to get a good result you need to light a lighter and leave it quite ab it away from the fibreoptic and do it slowly, if it gets too hot it bubbles and you mess it up (it needs some patience). Personally with a small peice of fibre optic i have found it more than sufficient and you can see it clearly even at 30m. As for polishing them after burning its possible but quite a lot of work when htey are embedded onto the part
As for the smoothness of titanium barrels, even with stianless steel abrrels i heard its quite a common practise to polish them with lapping on the inside, and on the lathe maybe it wouldnt be too difficult to do.
Yes, I have been nerding out big time on lapping, honing, polishing and how to make your own lapping tools.As for the smoothness of titanium barrels, even with stianless steel abrrels i heard its quite a common practise to polish them with lapping on the inside, and on the lathe maybe it wouldnt be too difficult to do.
I have polished barrels in the lathe before, well just one and some pumping barrels with cotton bits and diamond paste but for the titanium barrels I think I would need to start with something way more aggressive.
I also looked at my old notes and the thing to get in 316L is BA - Bright Annealed. I think it's a process where they anneal in vacuum or with an inert gas so there's no mill scale forming and then they polish. BA tubes are often use decoratively or for stanchions and such exactly because they have such a good finish.
Next level after BA is EP where they electropolish the BA tubes to an ever finer surface.
Probably too fine to hold an oil film so not needed for our pupurposes and also, they don't come in the sizes I am after.
Here's the thing, I can easily get 316L BA in the proper size and it's not even expensive so I may give it a go.
Aha, interesting.@Diving Gecko As for the fibre optic issue, I have used cheap chinese fibre optic rods off ebay and used that method of burning the end and leaving a short piece. In order to get a good result you need to light a lighter and leave it quite ab it away from the fibreoptic and do it slowly, if it gets too hot it bubbles and you mess it up (it needs some patience). Personally with a small peice of fibre optic i have found it more than sufficient and you can see it clearly even at 30m. As for polishing them after burning its possible but quite a lot of work when htey are embedded onto the part
The very first fiber optic I got, despite living in China about 8 - 10 years ago, I bought from the US. The last few pieces I have now are probably a mix of that old stuff plus some Chinese sourced. But I will try as low heat as I possibly can.
And I stand corrected - it seems even a short piece is fine at depth.
That said, by short - that Calibro one above looks really short and ~3mm of the light gathering part is obstructed by the ring it sits in. Are you talking about pieces that short, too?
Last edited:
Hi @Zahar
I can't get the quote function to work on your message so wil C+P it here.
Zahar said:
But maybe a 316L barrel is indeed a much better choice for this. It's cheaper and should be easier to find in a good surface finish.
As for the sliders, plastic isn't strong enough for the Mirage, I think. I will probably try the titanium slider for a bit and see how it goes. I know Tomi, Duccio and quite a few others have been using them for quite a long time now. Also, my original sliders are titanium, too. They are so light I am almost sure they have to be. And I haven't had one jam. Not that I noticed. Or maybe they do a little bit sometimes, but we just don't notice because the shot is so fast? I can see scratches on them though, that's true. So maybe you're right that the sand would embed more easily in a titanium slider.
At least corrosion shouldn't be an issue in reg. to the steel shaft. And if using an alu muzzle, then it should probably have good anodizing or to make things even safer, a front element made in plastic.
One advantage I have in all this is that I can take my guns apart often and easily to keep an eye on these issues - and I can source most of the materials quite affordably, too so even it ends up being the wrong choice at least it wasn't a costly mistake.
Thanks for explaining Zahar, it's much appreciated.
I can't get the quote function to work on your message so wil C+P it here.
Zahar said:
- 1. Titanium should not be used in conjunction with other metals in saltwater. Galvanic coating will destroy everything near the titanium.
- 2. Titanium is a friction metal. Sand trapped between the shaft and titanium will jam the shaft slider. Stainless steel, plastic, or steel and plastic should be used.
- This is my opinion, based on repairing numerous spearguns. The smaller the shaft diameter, the greater the shaft bends when loaded under load. This applies to shafts 7mm and smaller. This bending creates friction on the titanium and interferes with loading, as well as scratches the shaft, leading to vacuum leaks through the vacuum seal. This is a rake that everyone steps on every time
But maybe a 316L barrel is indeed a much better choice for this. It's cheaper and should be easier to find in a good surface finish.
As for the sliders, plastic isn't strong enough for the Mirage, I think. I will probably try the titanium slider for a bit and see how it goes. I know Tomi, Duccio and quite a few others have been using them for quite a long time now. Also, my original sliders are titanium, too. They are so light I am almost sure they have to be. And I haven't had one jam. Not that I noticed. Or maybe they do a little bit sometimes, but we just don't notice because the shot is so fast? I can see scratches on them though, that's true. So maybe you're right that the sand would embed more easily in a titanium slider.
At least corrosion shouldn't be an issue in reg. to the steel shaft. And if using an alu muzzle, then it should probably have good anodizing or to make things even safer, a front element made in plastic.
One advantage I have in all this is that I can take my guns apart often and easily to keep an eye on these issues - and I can source most of the materials quite affordably, too so even it ends up being the wrong choice at least it wasn't a costly mistake.
Thanks for explaining Zahar, it's much appreciated.
Last edited:

Truly impressive artistic skills there @Diving GeckoYes, I had something similar in mind though inside the circle. Less risk of it getting tangled or bent. That said, maybe just the open hole is fine enough and having less obstruction of the sight picture might be preferable? I will print a few options and see what works best for me.
Update
I printed these today but wont get to mount and test them until I am back in the workshop:
View attachment 61527
Three of them just have increasingly larger apertures whereas the last two have some alignment aid added.
My gut feeling is it's going to be a balance between making the sight small enough that it doesn't start blocking the view and still large enough that I can actually easily see its features as well as being sturdy enough to survive being dropped on boats, rocks, etc.
Update 2
My artistic skills are quite impressive, I know...View attachment 61533Sharing pics of the sightline doesn't really make sense. They don't look like they do in real life and lining the sight, gun and target up whilst holding the phone is almost impossible but here's one:
View attachment 61535
This is a "5m shot" but the perspective is too compressed and makes it look much closer. But when doing it in person you can actually learn a bit. But it becomes hard to explain as it really has to do with feel and preference. E.g. I don't think I like the one with the post in the middle, which I thought I would. But it's almost like it begs for attention and would not let me look elsewhere. I know it sounds weird or possibly even like an advantage but it felt too restrictive somehow, like it gave me forced tunnel vision.
The one with the two small pointy horizontal pegs was quite good though. It left more of an image inside the circle and felt like it allowed me to look around a bit more whilst still having more visual sight aid than the purely round options. Less obtrusive than the post, but still helpful once I decided to lock in on the target.
I think the smart thing to do would be to 3D print some more options but make them so that I can somehow stick them on the gun and try them in the pool or ocean. Then I don't risk machining a whole new bulkhead with a sight I am not yet fully sure would even work for me.
Im interested to know where the point of impact is for you if you use such a sight as an aiming point?
In my case using Vuotos id say my shot would go very high above the mark the sight was aligned to. Ive never understood why that is and I am not even sure how I aim the gun now, I just line it up and shoot and its generally extremely accurate. If I start consciously 'aiming' using the sight on the Vuoto it really affects my accuracy badly. With my Sporasub one airs, which are sadly inoperative now, the opposite was true - I used to aim along the barrel and found it was extremely accurate.
Thanks G!Truly impressive artistic skills there @Diving Gecko
My GF was not impressed. Well, she laughed, so that's gotta count for something
Im interested to know where the point of impact is for you if you use such a sight as an aiming point?
In my case using Vuotos id say my shot would go very high above the mark the sight was aligned to. Ive never understood why that is and I am not even sure how I aim the gun now, I just line it up and shoot and its generally extremely accurate. If I start consciously 'aiming' using the sight on the Vuoto it really affects my accuracy badly.
When you can instinctively aim a gun it really is the nicest feeling... But I haven't been in the water enough to get there or stuck with the same gun for long enough in the past year and I miss that feeling. I even shot a band gun mostly the last few years. Oh, the horror!
So, I can't really say how I would aim this gun yet.
But... here's a curveball or two, I recently managed to do a few back to back shots between dyneema shooting line and mono, same shaft, same pressure and the dyneema shot way higher, like a full hand width higher at 4m, I think. Which is "interesting" and by that I mean incredibly frustrating, haha. Also, the gun shoots very left but that might recoil and me not gripping it hard enough.
I hope to find a lot more pool testing time soon to sort those two things out. And then hopefully get enough shots off that I can start not having to to think about things too much or find a sight that works well and figure out how to aim it.
Zero One Airs...
Same here. I used to call it my laser or scalpel. But it's dead. I took it apart a year ago but the trigger transfer pin in the reservoir endcap was corroded and stuck and I had to get quite destructive to get it out. I could probably make it come back alive again but it would take quite some work but I got back into the Mirage project around the same time.With my Sporasub one airs, which are sadly inoperative now, the opposite was true - I used to aim along the barrel and found it was extremely accurate.
From memory, I speculated that there was an issue with mine where Sporasub cheaped out and used a galvanized steel for the trigger pin(s) instead of just a good stainless. Or their supplied swapped materials without telling them. Either way, I noticed that the surface of the pin had started flaking and again from my spotty memory I thought that was a bad sign and that it could possibly migrate far enough to start affecting the seal.
But when I took it apart, this is the first thing I saw. A trigger pin that wouldn't move one bit. I soaked it in WD40, vinegar, oil, what have you for days and no dice. So, eventually had to get forceful.
Maybe water got behind the piston on this gun. It's that thing we don't like to talk about and like to think modern cuff seals are immune to, but quite a few people are beginning to say it ain't so. E.g. Tomi suggests that if you don't turn your gun upside down before loading you should probably make sure to service it at least once a year. Here's the thing, I don't tip my guns but I do take most of my guns apart more often that that. But I think I only ever took the One Air apart once before and that was many, many years ago. I must have shot it on a trip or two after that and then left it in storage for possibly 5-7 years...
Here's the thing, I am almost certain that a classic gun with the same amount of corrosion can be made to work again with very little effort as long as the barrel survived. Perhaps it would need a new piston but that would be about it. But here, the trigger "transmission" parts broke and whilst the sear and that locking plate could be cleaned and polished and the springs are all good, it would take fabricating new parts from scratch making this gun come back to live - unless one could source that rear cap as a spare part.
Perhaps if you take yours apart soon, it will have less damage and may still be resurrectable...
Last edited:
Thanks - its good to be back and great to see some of the old threads from 10-15+ yrs ago are still active. Amazing really.Hi Grantl,
Good to hear from you
First off, when you can instinctively aim a gun it really is the nicest feeling. But I haven't been in the water enough to get there or stuck with the same gun for long enough in the past year and I miss that feeling.
So, I can't really say how I would aim this gun yet.
But... here's a curveball or two, I recently managed to do a few back to back shots between dyneema shooting line and mono, same shaft, same pressure and the dyneema shot way higher, like a full hand width higher at 4m, I think. Which is "interesting" and by that I mean incredibly frustrating, haha. Also, the gun shoots very left but that might recoil and me not gripping it hard enough.
I hope to find a lot more pool testing time soon to sort those two things out. And then hopefully get enough shots off that I can start not having to to think about things too much or find a sight that works well and figure out how to aim it.
Zero One Airs...
Same here. I used to call it my laser or scalpel. But it's dead. I took it apart a year ago but the trigger transfer pin in the reservoir endcap was corroded and stuck and I had to get quite destructive to get it out. I could probably make it come back alive again but it would take quite some work but I got back into the Mirage project around the same time.
From memory, I speculated that there was an issue with mine where Sporasub cheaped out and used a galvanized steel for the trigger pin(s) instead of just a good stainless. Or their supplied swapped materials without telling them. Either way, I noticed that the surface of the pin had started flaking and again from my spotty memory I thought that was a bad sign and that it could possibly migrate far enough to start affecting the seal.
But when I took it apart, this is the first thing I saw. A trigger pin that wouldn't move one bit. I soaked it in WD40, vinegar, oil, what have you for days and no dice. So, eventually had to get forceful. View attachment 61560But the trigger bulkhead had definitely also seen some water:
View attachment 61561
View attachment 61562
Maybe water got behind the piston on this gun. It's that thing we don't like to talk about and like to think modern cuff seals are immune to, but quite a few people are beginning to say it ain't so. E.g. Tomi suggests that if you don't turn your gun upside down before loading you should probably make sure to service it at least once a year. Here's the thing, I don't tip my guns but I do take most of my guns apart more often that that. But I think I only ever took the One Air apart once before and that was many, many years ago. I must have shot it on a trip or two after that and then left it in storage for possibly 5-7 years...
Here's the thing, I am almost certain that a classic gun with the same amount of corrosion can be made to work again with very little effort as long as the barrel survived. Perhaps it would need a new piston but that would be about it. But here, the trigger "transmission" parts broke and whilst the sear and that locking plate could be cleaned and polished and the springs are all good, it would take fabricating new parts from scratch making this gun come back to live - unless one could source that rear cap as a spare part.
Perhaps if you take yours apart soon, it will have less damage and may still be resurrectable...
My 110 one air went first - the rear transfer valve started leaking and on inspection I assumed it had been doing so for some time - the inner surface was badly corroded , trigger pin was similar to yours, piston was corroded etc. I salvaged parts out my Airbalete but there was too much damage done. Interestingly the transfer valve out the Airbalete had the same issues and it ultimately failed. The BB surface was pitted as was the valve where the BB sits.
My 70 One Air shortly went in exactly the same way - internals corroded. Id changed oil in those guns every year too. I have a salvimar from over 15 yrs ago that I used for 5 years at least before I ever serviced it and I opened up last year just for a look and it looks almost new in comparison to the One Air.
Id literally buy two One Airs again if they were to remake them though - i found them very nice to use. I think their higher mass contributed a lot to their accuracy and minimal recoil - they were proper sniping tools.