Ok... once again, Im not sure that this is the appropriate place for this but i figured it was close. Gyotaku isnt really a DIY hunting accessory. I didnt want to offend any non-spearos in the Beach bar so I figured this was as good a place as any. That being said I apologize to the higher powers if they need to move it:blackeye
I had a bit of interest when I posted "my first successful gyotaku" so I figured I would do a little tutorial for those interested in trying there own. DISCLAIMER The fallowing techniques are ones that I personally use. My opinions and techniques are not necessarily the same as the true "professional" gyotaku artists.")
Lets get started:
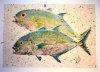
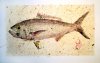
Gyotaku is an old Japanese art form. "gyo" meaning fish and "taku" meaning rubbing or impression.
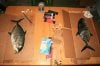
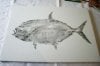
Step 1: When a fish has been caught that one might consider a "trophy" or even just want to save a symbol from a memorial dive or trip, this fish is a perfect candidate for a Gyotaku. Make sure to take the fish whole (do not gut or scale!) When ready to make your print rinse fish clean of any slime and pat dry with a paper towel or cloth. Place fish on newspaper or clean workplace with the side you are going to print UP.(Pic 1, Note key element for successful gyotaku in top center of pic.... ice cold frosty mug filled with a black and tan:friday)
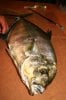
Step 2: I use toothpicks to prop fins out or open. Other techniques I have heard work well is using little foam blocks to hold fins up. You dont want to have to move anything once the fish has been painted. (pic 2)
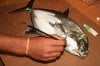
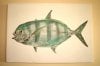
Step 3: (pic 3)Once fish is positioned the way you want it to print you may now brush on the ink for the print. I use a water based acrylic paint. This enables you to rinse the fish off once you are finished and proceed to the kitchen with it. No wasted catch! The paint shown in the image is white but I did my print w/black (which turned out a bit better). The process is the same, just switch the white paint for black. I recommend black paint on white fabric for your first few prints.
Keep the paint fairly "watered down." I dip the brush in water before the paint to insure that the paint stays thin and doesnt dry too fast. You want to do this as quickly and evenly as possible. Once the fish is fully covered take a damp paper towel and blot the whole fish. This gets rid of any brush strokes in the paint. Take care to not take off too much paint. finally take all the paint off of the eye of the fish as this detail will be painted in later. Also take paint off of any wound (caused by gaff or spear) you may also paint this part in later.
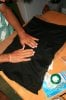
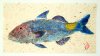
Step 4: Place cloth over painted fish (Pic 4) I found a bed sheet at my local salvation army that has worked very well. Im not sure what type of fabric it is but the knit is very small. Im thinking it must by a cotton and polyester mix. Traditional Gyotaku is done with rice paper but I havnt done too many with the rice paper...Yet! Be sure to iron your fabric before you print. Any crease or fold in the fabric will show up in the print either as a dark line or a light one.
Take care to place the fabric straight down on your fish centering it at the same time. Next use your hands to press the fabric on the fish evenly. I start at the head and work my way to the tail. I usually get the body finished first and then use my fingers to press the fins and tail. Once your fabric is placed on the fish do not pull it off and try to move it. You will never get it in the same position and may as well start over.
Once you are satisfied that the whole fish has been printed carefully peel the fabric off.
Step 5: (pic 5) Stretch your print on a canvas frame. I buy ready-milled canvas frame pieces at a local hardware store. With these you are able to make just about any sized canvas. Since my fabric is relatively thin I stretch an under-layer first and then the print on top.
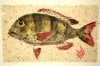
Step 6: Paint in the color, eye, and other detail. For this I have used water color pencils and acrylic paint. The paint works the best. Be sure to use very light, watered down coloring. Think of it as dying the fabric as apposed to painting on top of it. You want to be sure that the black print will show up under your color. Paint in the eye. You can also use black and touch up any part of the print that didnt print well the first time. I usually take the black and outline the fins and the edges of the print before I color.
Hope this isnt too confusing. Keep in mind that I am very new to this art. I am still learning as I go. These are basic techniques that should be taken in stride. Feel free to experiment and test other techniques. If you find one that works well post it here!
Aloha
P.S. I would love to see some of your gyotaku as well. Post Pics!
PPS if there are any gyotaku artists that would like to comment on this or give some constructive criticismplease do so!
I had a bit of interest when I posted "my first successful gyotaku" so I figured I would do a little tutorial for those interested in trying there own. DISCLAIMER The fallowing techniques are ones that I personally use. My opinions and techniques are not necessarily the same as the true "professional" gyotaku artists.
Lets get started:
Gyotaku is an old Japanese art form. "gyo" meaning fish and "taku" meaning rubbing or impression.
Step 1: When a fish has been caught that one might consider a "trophy" or even just want to save a symbol from a memorial dive or trip, this fish is a perfect candidate for a Gyotaku. Make sure to take the fish whole (do not gut or scale!) When ready to make your print rinse fish clean of any slime and pat dry with a paper towel or cloth. Place fish on newspaper or clean workplace with the side you are going to print UP.(Pic 1, Note key element for successful gyotaku in top center of pic.... ice cold frosty mug filled with a black and tan:friday)
Step 2: I use toothpicks to prop fins out or open. Other techniques I have heard work well is using little foam blocks to hold fins up. You dont want to have to move anything once the fish has been painted. (pic 2)
Step 3: (pic 3)Once fish is positioned the way you want it to print you may now brush on the ink for the print. I use a water based acrylic paint. This enables you to rinse the fish off once you are finished and proceed to the kitchen with it. No wasted catch! The paint shown in the image is white but I did my print w/black (which turned out a bit better). The process is the same, just switch the white paint for black. I recommend black paint on white fabric for your first few prints.
Keep the paint fairly "watered down." I dip the brush in water before the paint to insure that the paint stays thin and doesnt dry too fast. You want to do this as quickly and evenly as possible. Once the fish is fully covered take a damp paper towel and blot the whole fish. This gets rid of any brush strokes in the paint. Take care to not take off too much paint. finally take all the paint off of the eye of the fish as this detail will be painted in later. Also take paint off of any wound (caused by gaff or spear) you may also paint this part in later.
Step 4: Place cloth over painted fish (Pic 4) I found a bed sheet at my local salvation army that has worked very well. Im not sure what type of fabric it is but the knit is very small. Im thinking it must by a cotton and polyester mix. Traditional Gyotaku is done with rice paper but I havnt done too many with the rice paper...Yet! Be sure to iron your fabric before you print. Any crease or fold in the fabric will show up in the print either as a dark line or a light one.
Take care to place the fabric straight down on your fish centering it at the same time. Next use your hands to press the fabric on the fish evenly. I start at the head and work my way to the tail. I usually get the body finished first and then use my fingers to press the fins and tail. Once your fabric is placed on the fish do not pull it off and try to move it. You will never get it in the same position and may as well start over.
Once you are satisfied that the whole fish has been printed carefully peel the fabric off.
Step 5: (pic 5) Stretch your print on a canvas frame. I buy ready-milled canvas frame pieces at a local hardware store. With these you are able to make just about any sized canvas. Since my fabric is relatively thin I stretch an under-layer first and then the print on top.
Step 6: Paint in the color, eye, and other detail. For this I have used water color pencils and acrylic paint. The paint works the best. Be sure to use very light, watered down coloring. Think of it as dying the fabric as apposed to painting on top of it. You want to be sure that the black print will show up under your color. Paint in the eye. You can also use black and touch up any part of the print that didnt print well the first time. I usually take the black and outline the fins and the edges of the print before I color.
Hope this isnt too confusing. Keep in mind that I am very new to this art. I am still learning as I go. These are basic techniques that should be taken in stride. Feel free to experiment and test other techniques. If you find one that works well post it here!
Aloha
P.S. I would love to see some of your gyotaku as well. Post Pics!
PPS if there are any gyotaku artists that would like to comment on this or give some constructive criticism
please do so!