• Welcome to the DeeperBlue.com Forums, the largest online community dedicated to Freediving, Scuba Diving and Spearfishing. To gain full access to the DeeperBlue.com Forums you must register for a free account. As a registered member you will be able to:

    • Join over 44,280+ fellow diving enthusiasts from around the world on this forum
    • Participate in and browse from over 516,210+ posts.
    • Communicate privately with other divers from around the world.
    • Post your own photos or view from 7,441+ user submitted images.
    • All this and much more...

    You can gain access to all this absolutely free when you register for an account, so sign up today!

Teak 80 - Part one: The stock

Thread Status: Hello , There was no answer in this thread for more than 60 days.
It can take a long time to get an up-to-date response or contact with relevant users.

portinfer

Aquatic shopper...
Jul 3, 2003
1,327
408
173
I decided to make an 80cm gun for fishing for fast moving bass in the winter or when you fish in the shallows. Pete thought it was a good idea too - he kindly offered to be the model while I took the photos.

The main design criteria was that the gun had to be agile and had to fire the shaft rapidly over a short distance.

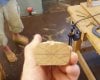
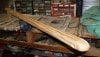
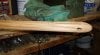
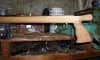
With this in mind I chose a 115cm / 6mm Devoto shaft, a totemsub Guizzo trigger mech, 18mm bands at 56cm long and a dyneema wishbone and a laminated teak stock.

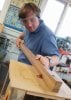
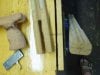
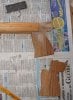
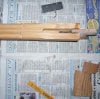
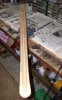
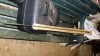
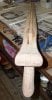
These photos are from making the stock... more later :) - Hope you find this helpful and that it will help people to take the jump to making their own guns.

Ed

Many many thanks to Dave for taking the time to look after us kids !
 
Last edited:
  • Like
Reactions: icarus pacific
What we did :
We asked the local timber yard to cut us some lengths of teak and then we glued these with West System glue.

We used a table router to cut three cuts for the trigger mech and a side cut for the line release.

What we shoud have done:
In hindsight it would have been better to buy one large length and then cut it ourselves into thinner laminate strips for a more rigid gun less likely to warp/move. Additionally after it had been glued we could then run it through a plane/thicknesser to get a completely straight stock. Our original method is fine but this would be an improvement (if you have access to these tools).
 
Last edited:
What we did:
We drilled a hole near the end for the rubbers.

We practised how to make the cuts on a piece of scrap and also made a complete dummy gun from a piece of scrap. This allowed us to make mistakes on scrap wood without wasting teak.

The rail was cut the full length and the edges rounded off.
 
Last edited:
What we did:
We put a piece of scrap wood with a v cut in it so that the router head stood proud of the table but we also had an edge to run the wood along. This allowed us to make the cuts.
 
Last edited:
We used a wheel guide head on the router to make the edge bevel cuts. It is really easy and you just run the wood along until all the edge has gone.

Dave worked out where the holding pins should go. This is a little tricky as you need to get it right first time or else you will be drilling more holes than necessary in the stock - luckily Dave has a good eye or x-ray vision, one or the other...

In the second picture you can see that the handle is larger than it needs to be. As this is the first gun we roughed out the shape and have trimmed it down to a personalised fit. Some people have bigger hands than others and Dave never wears gloves whereas I often do, little things like this can really make the gun fit you better if you take the time to work it out and try different things.

We discovered that the handle was too far away from the trigger - the guizzo trigger is a little smaller than the pelagos one I think. Anyway this was rectified by reducing the wood and raising the hand position too to be more in line with the shaft line - and hopefully reduce recoil - although with the slightly greater mass of the gun than a normal 80cm and the 17,5mm / 18mm bands this hopefully wont be an issue. Any thoughts on handle position anyone ? As mentioned - we are complete beginners at this so any pointers or constructive criticism would be appreciated.
 

Attachments

  • hmg_015.jpg
    hmg_015.jpg
    16.8 KB · Views: 805
  • hmg_016.jpg
    hmg_016.jpg
    14.4 KB · Views: 733
Last edited:
Rounding off the edges...

We decided to make the stock a bit wider than usual. I've been looking at all the current commercial wooden guns like Totemsub, Abellan, Gimansub and have had the good fortune of owning a Pelagos 100 and have seen a Gimansub Labrax 80 (a fine piece of craftsmanship).

I also looked alot at the other guns that people are making and all the info on the Persiko site (http://www.arbalegno.com/eng_index.htm).

I liked the wider Abellan guns and fluid shapes of the Giman guns. It seems like many of the commercial guns are not finished to the standard that I would like so that was another reason to make my own. You can see that the shape has come from a machine cut rather than a human hand. While this is good for getting everything true and straight I still think that the aesthetics of sanding out the router end cuts and making it more fluid are worth it.

The stock was made wider because we wanted to make a gun that had good ltracking from side to side. In the shallows where we would be using this gun it isn't so important (in my very inexperienced opinion...) to vertical track quickly but it is important to be able to move sideways fast. The bass that we will be targetting can appear rapidly in the murky winter water and often move alot faster than when you try for them in deeper water on aspetto.

The dummy stock that we used for the initial prinicple was made with a tapered nose. In this respect it is similar to the totem guizzo or pelagos 90 but with the extra width it didn't seem aesthetically pleasing. I don't know about anyone else but I like to use objects that are visually pleasing. So we changed it to have a flared round end nose more like the giman/abellan guns.
 

Attachments

  • hmg_018.jpg
    hmg_018.jpg
    8.4 KB · Views: 683
  • hmg_019.jpg
    hmg_019.jpg
    9.2 KB · Views: 676
  • hmg_020.jpg
    hmg_020.jpg
    10.4 KB · Views: 754
Last edited:
The dummy stock can be seen on the far left. Next we glued in a flat piece of wood for the handle. Other blocks were glued ontop of this central piece and the handle was built up.

As you can see the handle is slightly different wood.
Dave managed to rustle up some vintage teak from his personal stash for the handles. It smells gorgeous, so much oil in it and very dark and ... well beautiful.

When glueing teak there seems to be a good consensus on the glue to use : West System slow cure but a bit of debate over the gluing method.

Despite Daryl Wong saying that he doesn't clean the teak with acetone we decided to both for the stock lams and for the handle. Especially for the handle... very 'oily'...

Daryl mentioned not to mix woods - originally we were going to have a paduak handle and I still think that this would have been fine but it was proving hard to get hold of and Dave came up with the 'special reserve' teak so we went with that.
 

Attachments

  • hmg_021.jpg
    hmg_021.jpg
    15.7 KB · Views: 734
  • hmg_022.jpg
    hmg_022.jpg
    44.9 KB · Views: 739
  • hmg_023.jpg
    hmg_023.jpg
    31.8 KB · Views: 743
Last edited:
  • Like
Reactions: GilbertG.
Well as mentioned elsewhere I think that making guns is mythologised too much. Go on get your hands dirty !
 
Ed, that is great! I liked the idea of glueing the handle after you finish the hole drilling and shaping of the stock.
Keep up the good work and I'm waiting for more pictures!
 
Re: Teak 80 - Part two: A bit of shape

It's nowhere near finished but I thought I'd add some pictures of the 80cm vaguely shaped...

If you have any ideas of how to improve it let me know... I am a complete beginner at this :)
 

Attachments

  • 80T_FL_03.jpg
    80T_FL_03.jpg
    69 KB · Views: 938
  • 80T_FL_02.jpg
    80T_FL_02.jpg
    47.7 KB · Views: 827
  • 80T_FL_01.jpg
    80T_FL_01.jpg
    38.4 KB · Views: 856
Some shots of the nose.
 

Attachments

  • 80T_NO_01.jpg
    80T_NO_01.jpg
    29.3 KB · Views: 805
  • 80T_NO_02.jpg
    80T_NO_02.jpg
    55.3 KB · Views: 672
  • 80T_NO_03.jpg
    80T_NO_03.jpg
    52.1 KB · Views: 661
And the handle...
 

Attachments

  • 80T_HA_01.jpg
    80T_HA_01.jpg
    60.2 KB · Views: 818
  • 80T_HA_02.jpg
    80T_HA_02.jpg
    31.4 KB · Views: 733
  • 80T_HA_03.jpg
    80T_HA_03.jpg
    32.6 KB · Views: 740
Sweet looking pictures, do you have problems with the handle connection?
I dont make guns but I can sure appericate your craftsmanship.


Anthony
 
Very nice work Ed!
I can only suggest you to cut through the band's hole like on your Totemsub so you can easily remove the band. I didn't do it on my gun and I have to remove the articulated wishbone every time I decide to re-varnish the gun.
Also I think you can reduce the lateral profile of the gun little more to improve the sideways movement. Don't worry, the teak can handle the load of the bands without any barrel flex :)
 
"Sweet looking pictures, do you have problems with the handle connection?"

Hi Anthony - no problem with the handle, maybe you thought that because there is a bit of glue underneath near the trigger ? Handle is pretty rock solid and fits my hnad well with the trigger finger in the right place etc. Maybe I could do with reducing the wood a bit more to put my hand slightly higher up so it is more in line with the shaft but that is only a minor adjustment.

Hi Dobs - thanks for the input. By the way what gear do you use for building your guns ? I was trying to buy an Abellan trigger and shaft (140/7mm) for the double band 107 project but am having trouble....

I'll cut a hole maybe but I'll be using dyneema wishbones so they come off really easily (matter of seconds - it is a special 'loose' knot/friction knot) so I won't have the same trouble as you (I think).

So do you mean reduce the width of the gun ? Or the vertical thickness ? Originally I was going to make a gun with a wide thin profile but as it's my first gun I sort of went freestyle ... ooops, the problem of carving away and not having a proper plan/design... Oh well, you live and learn and it might still turn out ok.

So Dobs - what tools do you use to shape it ? I am using a bastard file and a second cut file along with some rifflers and sandpaper - all by hand (at this stage - power tools earlier...). Just curious.
Ed
 
Hi Ed,
By reducing the profile I meant make the gun thinner reducing the vertical thickness. I'm planning to do the same on my 80 cm gun in the winter when I don't use it.
Right now it is nearly 3.5 cm thick. I plan to take at least 0.5 cm from the down side of the gun in order to improve the lateral movement. In its current shape the lateral movement of the 80 cm gun is the same as the one of my 90 cm gun when it should be significantly better.
As for the tools I also use only two or three different kinds of files and lots of sandpaper. Everything is done by hand. Takes a lot of time but I've never been in a hurry to build a gun :)
If you are going to use only dyneema wishbones you won’t need to cut through the band hole. However you should consider the fact that not every euro-style shaft can be used with dyneema wishbones. My 6mm O.ME.R shaft simply cannot hold the dyneema as the notches are just too shallow. I just had to use an articulated wishbone.
Cheers!
 
While this is totally Ed's gun I did act as advisor on the construction side.
I suspect Anthony might assume that the handle is a "butt" joint to the stock. In fact it's joined by an "open mortice" or "bridle" joint. Effectivly a part of the handle that you can't see is sandwiched inside a slot cut in the stock. This provides a mechanical fixing as well as a huge glueing surface area. In this case the joint was an absolute perfect fit so is super strong. I know - I cut the joint. :)
Old Man "Crafty" Dave.
 
DeeperBlue.com - The Worlds Largest Community Dedicated To Freediving, Scuba Diving and Spearfishing

ABOUT US

ISSN 1469-865X | Copyright © 1996 - 2024 deeperblue.net limited.

DeeperBlue.com is the World's Largest Community dedicated to Freediving, Scuba Diving, Ocean Advocacy and Diving Travel.

We've been dedicated to bringing you the freshest news, features and discussions from around the underwater world since 1996.

ADVERT