• Welcome to the DeeperBlue.com Forums, the largest online community dedicated to Freediving, Scuba Diving and Spearfishing. To gain full access to the DeeperBlue.com Forums you must register for a free account. As a registered member you will be able to:

    • Join over 44,280+ fellow diving enthusiasts from around the world on this forum
    • Participate in and browse from over 516,210+ posts.
    • Communicate privately with other divers from around the world.
    • Post your own photos or view from 7,441+ user submitted images.
    • All this and much more...

    You can gain access to all this absolutely free when you register for an account, so sign up today!

Winter Project.

Thread Status: Hello , There was no answer in this thread for more than 60 days.
It can take a long time to get an up-to-date response or contact with relevant users.

scallywag

Glass half full
Oct 7, 2010
379
56
68
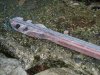
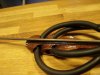
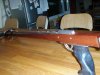
As the thread seams to have gone a bit quiet of late I thought I would share the results of my winter project. After a bit of thought i decided to make a twin band gun somewhere between 75 and 90 cm in length for hunting bass and mullet off the south Cornish coast. I wanted to include carbon fibre in the construction not so much for strength but more to provide a hard and slick surface for the open rail and to look trick!
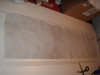
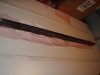
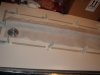
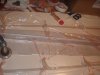
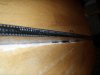
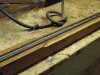
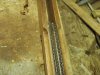
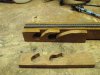
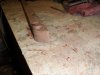
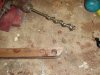
The first step was to machine the mahogony laminates to size. Why mahogony? simply because a large chunk was donated to me in exchange for a bit of guidence for my friend to build his first gun. Once to size(oversize in hight and length) the rail was routed and prepared for its carbon overcoat. Being a composite virgin, I took advice in the process from a workmate who was a bit of an expert. The following photos show the vacuum bagging process from laying out the bagging tape followed by release ply, the rail coated in west system epoxy and the carbon, covered in perforated peal ply more release film then a spear layed onto the rail to help the carbon take the shape. Finaly some breather blanket and the bag itself. Once the vacuum pump was attached and running the air was drawn out and the entire weight of the atmosphere was clamping the carbon cloth to the rail. About 8 hours later it was all done and pretty chuffed i was too with the results.
 

Attachments

  • PC290073.jpg
    PC290073.jpg
    46.9 KB · Views: 270
  • PC300076.jpg
    PC300076.jpg
    45.4 KB · Views: 272
  • PC300078.jpg
    PC300078.jpg
    51 KB · Views: 254
  • PC300079.jpg
    PC300079.jpg
    72.4 KB · Views: 263
  • PC300082.jpg
    PC300082.jpg
    60.9 KB · Views: 267
Next step was the main shaping and construction. The rail lam was cut to approximate length followed by two further laminations epoxied on the outside. More by luck than judgment the final width of the rail was the same as the trigger mech thus saving the need to mortice later!
The rest of the construction went as normal apart from the finishing.
On my last build I used 6 coats of marine varnish to finish the gun. On this one I thought I'd try Epoxy. The first coat went on ok but the second coat was a disaster so I ended up scraping it all off and went back to the varnish. The line guide is made from 1.6mm stainless welding wire and the handle was made by myself out of stainless steel and polymorph ( as detailed in a previous thread).
I'm pretty happy with the results and am looking forward to the first fish.
Addictive stuff this gun building.
 

Attachments

  • P1020105.jpg
    P1020105.jpg
    125.3 KB · Views: 231
  • P1020106.jpg
    P1020106.jpg
    104.9 KB · Views: 249
  • P1020098.jpg
    P1020098.jpg
    109.6 KB · Views: 250
  • P1020094.jpg
    P1020094.jpg
    113.6 KB · Views: 240
  • P1020093.jpg
    P1020093.jpg
    138.8 KB · Views: 243
More pics.
 

Attachments

  • P1130122.jpg
    P1130122.jpg
    154.1 KB · Views: 242
  • P1130121.jpg
    P1130121.jpg
    184.6 KB · Views: 251
  • P1240135.jpg
    P1240135.jpg
    85.6 KB · Views: 239
  • P1240139.jpg
    P1240139.jpg
    99.1 KB · Views: 273
  • P1240144.jpg
    P1240144.jpg
    131.2 KB · Views: 258
This is fantastic, I wish i had the knowledge of how to do something like this! how much would you say it has cost for the finished project in terms of both money and man hours? Did you have a set of plans your worked from or is this just purely out of your head? sorry for so many questions

regards

luke
 
I didn't keep a ledger of costs for the build but as a rough guess:-

Trigger, £35 from neptonics
carbon cloth £2 (i managed to scrounge 100mm x 1m strip from the end of a roll normally about £20 per sq m)
west epoxy £15
varnish about £10 for a tin that will last for years.
spear £25
dyneema cant remember say £2 from ebay
16mm rubber bought a length from spearit, ebay can't remember the cost but good stuff and cheap,
polymorph £5
stainless for handle frame, free off cuts
wood free
150 lb mono shooting line £2.50 ish
the odd stainless screw but thats about it.
Quite often you buy stuff that will strech to several guns. As for time it was an hour here and there after work and weekends but i doubt if it was more than 15-20.
 
I think a teak gun may be a few guns away yet. Still working out what works and what dosen't and what I want out of a gun.
I've got a few other photos that I'll dig out.
In answer to the other question, my guns just evolve as I work. I'll have a good idea of what I want and the odd sketch of the detail but apart from that its just freestyle! I'll definately do the carbon rail again though, it gives a nice detail of two black lines form the edge of the carbon that runs along the bottom of the gun.
 
DeeperBlue.com - The Worlds Largest Community Dedicated To Freediving, Scuba Diving and Spearfishing

ABOUT US

ISSN 1469-865X | Copyright © 1996 - 2024 deeperblue.net limited.

DeeperBlue.com is the World's Largest Community dedicated to Freediving, Scuba Diving, Ocean Advocacy and Diving Travel.

We've been dedicated to bringing you the freshest news, features and discussions from around the underwater world since 1996.

ADVERT