• Welcome to the DeeperBlue.com Forums, the largest online community dedicated to Freediving, Scuba Diving and Spearfishing. To gain full access to the DeeperBlue.com Forums you must register for a free account. As a registered member you will be able to:

    • Join over 44,280+ fellow diving enthusiasts from around the world on this forum
    • Participate in and browse from over 516,210+ posts.
    • Communicate privately with other divers from around the world.
    • Post your own photos or view from 7,441+ user submitted images.
    • All this and much more...

    You can gain access to all this absolutely free when you register for an account, so sign up today!

Basic gun making overview

Thread Status: Hello , There was no answer in this thread for more than 60 days.
It can take a long time to get an up-to-date response or contact with relevant users.

Pastor

Supporter
Supporter
Mar 17, 2004
3,773
698
0
59
Here's another one of those bits I had up on Spearfishing.com. Believe it or not but it did prompt a few first time builds a couple of which were very impressive.

So we might imagine that someone in this position would know exactly what it is they want to build but this isn't always the case. What are the options open to us as builders? They fall into two very basic groups - "Rear handled" and "Mid handled".
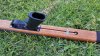
REAR HANDLED - These are the traditional styled spear guns that have the handles at the rear like the European styled gun. This gun can be easily loaded from either the hip or chest. This type is popular gun for entry level to advanced divers and scuba divers.


rearhandle.jpg


MID HANDLED - The mid handled spear guns are designed to give spear guns greater manoeuvrability due to the pivot point being closer to the centre of the gun. This is an advantage to have when tracking game and manoeuvring the gun under ledges, through kelp and around wrecks and pilings. Also, the mechanism placement at the rear enables the spear gun to have the maximum length of rubber pull and a longer shaft for a given distance from the handle to the spear tip. This equates to an increase in power and distance. This gun is usually loaded on the chest. This is popular with advanced divers who want manoeuvrability and power.


midhandle.jpg


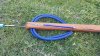
Another type of sub classification is how the spear shaft rests on the gun, these are: The "rail", the "Enclosed track" and the "Euro" style

• The rail as the name suggests is a U shaped groove that runs down the length of the barrel.

raildetail.jpg


Its purpose is to support the spear shaft both while it rests on the gun to stop it sagging and also during the spear's acceleration on firing; this helps reduce the oscillation of the shaft as the load is applied.

• The enclosed track is an elaboration of the rail like an upside-down "Ώ" Omega forming almost a tube for the spear to rest in and travel down eliminating all flexing of the shaft which is most useful on the huge guns used by those targeting large pelagic fish.

enctrak.jpg


• The Euro style provides support at the trigger and at the muzzle only. The spear is kept from sagging by having a longer than normal shaft that overhangs the muzzle by about 1/3 of its length which counteracts the natural sag over the centre of the barrel. Also the extra length helps improves the guns accuracy. The spear is propelled in straight line by having the power bands (rubbers) aligned level with the central axis of the spear to prevent pulling the back up or down.

So there are your basic choices, it’s up to you which you will choose when you make your gun.


After deciding which of the above options you are going to include in your gun I believe there are 3 major considerations you should think about next:

• What are you going to be doing with your gun? Will you be shooting small fish at close range? (A small low powered gun) or perhaps large fish at long distance? (A large high powered gun)

• Your choice of trigger. Is it readily available? Can you afford it? and can you buy spear shafts that fit it reasonably locally so that you don’t pay a fortune on shipping? and most importantly, will it do what is required of it safely?

• What are you going to make it from? Wood, metal, plastic, carbon fibre or even a mixture of these. Do you have access to tools that will allow you to do the work? Can you actually buy the material of your choice?

The first of the above points will also have a bearing on the mass of the gun. Why is this important? Put simply it is only important when the power of the gun is such that you are in danger of being hit in the mouth by the butt of the gun because of its recoil (EEK!) Basic physics tells us that as the gun is fired, energy is given to both the spear (forward movement) which is what we want and to the gun (backward movement) recoil! To cut a dull mathematical story short, the more mass in your gun, the less will be the recoil and also the power transfer to the spear will improve by a small amount

Hopefully that gives an illustration of the importance of mass to a gun, now it is a pretty cool thing to consider the balance of your gun in the water at this stage too. The buoyancy is related to the mass of the gun not its weight (trust me they are two entirely separate things). When an object is emerged in water it displaces its own mass not its volume or weight. Now if the volume of the gun is less than the volume of the displaced water the gun will float and vice versa. So we need to choose our materials with a degree of caution if we are to end up with a usable tool.

If we bring the above considerations together we can see that it would be unwise to make a five banded power house of a gun from lightweight carbon fibre because when you fire it you are likely to loose your teeth! Likewise it would be less than ideal to make a low powered gun that is used to track fast moving fish out of wood the volume of the gun will increase its resistance to sideways movement in the water.

The trigger issue is the most asked question of them all and one that can sometimes lead to heated debate. Some people want to make their own triggers, well this I think is fine for low powered guns like the Euro style but for high powered guns take my advice and forget it! You can’t guarantee its reliability and the last thing you want it to do is release when you don’t want it to, think about it! There are a good few manufactures that make trigger mechanisms for sale to guys like us and they are not expensive. There are a couple of ways to approach this, buy a complete Euro gun handle and fit your own barrel, or buy an independent trigger mechanism and make the gun fit it.
 
For this article we shall look at making a wood gun (because my engineering skills are not up to the job of making a gun out of anything else but feel free to write your own section about this).

Which is the best wood to make the gun from? Well simply put, there isn’t a "best" wood as such. Many will say Teak is the best and indeed it has many advantages: it has a strong resistance to bending, it has a very high oil content which makes it water resistant but it is horrendously expensive and not that easy to work without some skill. Some will say Mahogany or Sapele is an excellent wood as it is easy to work with; it is inexpensive, has better gluing properties than teak and has a good resistance to water which doesn’t matter because we will varnish it anyway. Others will want to use some exotic wood or other or even Douglas fir, the point is all are suitable to some extent or other. What is most important to realise, is that it must remain straight and for this we need a nice piece of "straight grained" timber that has had plenty of time to settle.

So with luck you will have all the bits you want to make your gun at hand, wood, spear, trigger etc so now is the time to start thinking about the gun itself and how we will make it. The following involves the use of sharp woodworking tools, machinery and chemicals, there are plenty of resources that cover these issues and the all important safety aspects that go with them, read them and make sure you understand fully the operation of these tools and there hazards, your safety is all important. So assuming that you are now familiar with the basic tools we shall use (read on) then we shall make a start.

First we want to cut our wood to make the barrel to length, plug the shaft into the trigger and lay them on top of the wood. Allow a good couple of inches on the ends to cut off later, place the trigger a couple of inches in from the end of the butt (further back if the handle fits behind the mechanism), measure and mark the position of the end of the muzzle and again allow a couple of inches for cutting off later, cut this to length. Cool so now we have a lump of wood just a little longer than our barrel length.

measure.jpg


In order to keep warping to a minimum we shall need to cut this wood into strips and laminate or reassemble the bits back into a solid again. If you have access to a real good sharp circular saw then great, your work will be minimised, if not don’t panic even an old circular saw will do the job fine. Now you will need to cut the wood into thinner strips, how many? Well I like to use five thinner laminates but some use three, four or six. So using a table circular saw carefully set the guide to the required thickness and with all guards fitted proceed to saw your strips.

resaw.jpg


Now examine the sawn surfaces, if they don’t have any horrible kerf marks then cool you are ready for the next step, it hey do however, then you need to plane these out, either by machine or by hand but if your using a machine take care because it is more difficult to plane thin wood safely. OK so we can assume some nice thin bits of laminate with no major lumps taken out of them by the saw or any other defects of any kind, lay these on some other thin strips of wood so as to allow a good air circulation around them and leave for a few days out of direct sunlight in a dry place.

Now it is time to reassemble our bits into the new barrel of our gun. Take some time deciding how to rearrange the strips so that the grain of the wood is randomised to a maximum along its length so as to disperse any local stress points.

reassemble.jpg


Now we need a few bits and bobs to continue: A long perfectly straight surface to clamp our reassembled barrel too. Some of that cooking film (cling film in the UK) to stop the barrel sticking to the flat surface. Enough clamps to ensure an even pressure along the barrel whilst gluing. Some epoxy adhesive such as the West Systems products which are excellent. Lastly another strip of wood to serve as a protector to stop the clamps damaging the barrel and also to even out the pressure. Now lay the film over the straight surface, mix the glue as specified, brush the glue onto both surfaces to be glued and place together, do this on all the laminates. Now lay the whole thing on top of the film, fold the film over the top of the glued stock then place on top the other strip of wood. Clamp this whole thing to the straight surface ensuring no sideways slip of the laminates and an even pressure along the length of the barrel. Now leave this like this for a minimum of 48 hours.

Clamps not shown in illustration

clamping.jpg

Yeah well we're back in the shop So we must true up our barrel, if you have the Time and the skill then it can be done by hand but if not then a surfacer is the way to go but either way we end up with a lovely squared off stock just a fraction bigger than the maximum finished size and straight as a die and we are ready to do the cool stuff.
blank.jpg


So we have decided by now if we are going to use a rail or whatever to lay the spear on, we will take a look at how to do each type in turn. First we must mark the exact centre line on the top axis of the gun from butt to muzzle. Mark with a pencil the exact position of the trigger mechanism. Now we are ready to cut:

• Cutting the rail - We can use either an inverted table router or a hand held router for this operation, the important thing is once we have aligned the "U" shaped cutter centre with the centre line of our gun we must not adjust this as we shall use the same setting for fitting the trigger (providing that the router is powerful enough to use big enough cutters to do this). The size of the cutter tool will be dependent on the diameter of the spear shaft but go slightly bigger rather than to small. To get the depth of the rail we must look at how the shooting line (unless it’s a free shafting gun) attaches to the back of the shaft, there will be a depth here that will determine your max rail depth, measure this carefully!! Now set up the tool correctly and we are ready to go. Cut the groove from the end of the muzzle through to half way into the trigger section and hey hey hey we have a rail.

track.jpg


• Enclosed track - This time we must use a ball cutter to cut the track instead of the "U" shaped one. I don’t know of any ball cutters less than 3/8" so this is the size guys. Now measure the shaft diameter of the cutter carefully and obtain a straight cutter this size. Along the centreline of the gun using the straight cutter and set to the centre depth of the ball, cut a groove from the front of the gun to halfway into the trigger section.

enclosedtrack1.jpg


Now without moving the guides change to the ball cutter and set the depth, now very very carefully cut the enclosed track, remembering that any vertical movements are going to wreck the whole thing! A vacuum set up to remove the chippings near the cutter will help a lot here. So there it is a real cool track

enclosedtrack2.jpg


If you want you can use a derlin insert in the stock before cutting the track, same sort of principle but using a dovetail cutter for this insert, the derlin will help reduce the friction of the shaft exiting the gun.

derlin.jpg

 
  • Like
Reactions: Lotsofknots
Fitting the trigger
There is no fixed method here, it all depends on the type of trigger you want to fit, measure it and plan exactly where it will lie in the gun so as to be exactly level and centre and so as the shaft lies on the rail or track. Allow 1mm 1/32 all around the mechanism to allow for some varnish and a washing clearance. This all should be very simple because we have left the router guide set at the centre of the gun. The type of line release will depend on the type of trigger and you should be able to work out how to fit it by now but now is the time whilst the stock is still square.
handle-trigger.jpg


There are two different ways to look at this, the rear handle and the mid handle and both from the point of view of wooden or a bolt on handle.

The bolt on handle - whether rear or mid handle the same principles apply, position the handle in the correct place, carefully mark around it with a craft knife. Remove wood to form a recess for the mount and screw it in place with stainless steel screws into pre drilled holes. If mid handled then you will also need to fit a remote trigger at the same time, these often come as part of the trigger kit if you order that option. Along with this you will need a slot in the wood for the push rod which again is pretty easy if your router is still set up at the exact centre of the gun.


Pushrod.jpg


Pushrod2.jpg


The wooden handle - This is a bit more difficult but still possible if you have managed to get this far (honestly). We will only consider the rear handle in depth. At the rear of the trigger mechanism, from the bottom of the stock cut a mortise with the router (still set dead centre) about 15mm 5/8" wide and within 3mm 1/8" from the top of the barrel stock and the whole depth of the handle. Using a suitable lump of wood (Rosewood is nice) mark out the tennon and with a sharp hand saw cut it out and test fit it. It should be a snug fit, not so tight as it will scrape off all the glue as it goes in and not loose enough to wobble around. If it’s to tight ease it off with a chisel, to loose then find some veneer (craft shop) and use that to pack out. Now mix up some of that epoxy resin you used for the stock and glue it in place, leave it for about 48 hours before any further work (you may want to do this at a later stage if there is shaping work to be done on the barrel). The difference between this and the mid handle is that you will need to make two much thinner 1/4" 6mm mortices with enough room between them to allow the push rod to fit into a routed groove.

midhanddetail.jpg


At this stage you will want to shape it to fit your hand, so get your diving glove and put it on. Now grip the handle (ouch those corners are a pain) mark out the bits that feel wrong and remove them with a coarse rasp or a Dremell tool. Take care here to get this right, have a look at target pistol grips and the strange but very comfortable grips they have (Google images).


So after about an hour you will have a handle that is so comfortable and will give you total gun control. Lastly find yourself a piece of Aluminium plate 6mm 1/4" thick and shape this to fit on the bottom of your handle, this can be used to hide the hole for the lead ballast (later) and also drill two holes counter bore the back and tie a loop of cord in them to act as a lanyard if you want. Screw this down with stainless steel round headed screws.


The stock of the gun at this stage is still square I hope, cool so now we must cut out our mounting holes. For this you will need a bench mounted drill (preferably) and a "Forstner" bit the same diameter as your power bands, don’t worry if it a bit smaller, they will still fit with a bit of pulling and some soap. Now this will depend on how many bands you are fitting but close to the bottom of the stock and about 1" in from the end of the muzzle drill slowly through the side of the stock. If you are fitting more than one drill some more holes and elongate them into a slot. Now we need to consider the path of both the stretched band from the slot to the wishbone and the path of the wishbone as it travels down the barrel when the gun is fired.
bandgrooves.jpg


cutouts.jpg


For the latter it is simply a matter of cutting a curved edge recess either side of the rail (if you are using a rail) from just in front of the last slot in the spear shaft to a point just about where the bands rest when relaxed. You may want to shape the stock of the gun to make this a bit more of a fluid movement and also easier to swing in the water but that is up to you, it’s your design and your gun


Sanding down


Well at this stage you will have something that looks very like a speargun. Now is the time to do the nice little bits like shaping the stock to the shape you want, do all those neat little rounding over bits or carve your name on it, whatever its your creation. Now it must be sanded smooth, start with some course paper of about 120 or 180 grit and work down to 320 grit. Now dampen your gun with a little water and leave it to dry over night, sand it with 320 again, do this a couple of times until the wood stops feeling rough after being dampened.

First finish and ballasting

Mix up some more of that epoxy resin and thin it down with a little acetone or if it’s a very warm day don’t bother it will be thin enough. Hang your gun from the ceiling and give it a coat all over, don’t worry about the occasional run, now let it dry for 24 hours. Now assemble your gun with all the bits you have, trigger, handle, pushrod, spear and power bands. Now its time to ballast your new gun, so get some sheet lead and some snips and head off down to the sea. Put the gun in the water and see how she sits, now cut a strip of lead and stick it to the gun with an elastic band, try again and keep playing around until it sits level in the water and neutrally buoyant. Make a note of exactly what lead goes where (front or in the handle). Back at the shop route out some slots in a scrap piece of wood to make a mould for the front ballast and drill a hole using the Forstner bit you used for the band holes for the ballast in the handle (if its a wooden one). Now in a pan whilst wearing gloves and goggles melt the lead for the front ballast and pour it into the mould and the same for the rear ballast, then when cool tap them out. You can now cut out corresponding cut-outs in the bottom of the barrel and fit your new ballast by epoxying them in place.

Final finishing

Take apart your gun for the last time and rub it down very carefully with 320 grit sandpaper until smooth. Now if you made your gun from teak then go no further, just give your gun a coat of Tung oil or three to give it a very durable finish. Otherwise, mix up some more epoxy and coat it again leaving another 24 hours before rubbing down again, repeat this for a third time, now your gun should be looking good The application of a good yacht varnish will give your new gun a UV proof finish, epoxy on its own doesn’t do this, three coats a couple of days apart should do the trick, rubbing down with some 600 grit wet or dry automotive paper and 1200 grit on the final coat, you can buff it up to a full gloss with some automotive paint cutting compound if you want. So now its time to put the gun back together this time fully tightening the screws for the first time. Finally now is the time to fit any final hardware like line eyes or breakaway rigs.

So there it is finished, it’s your gun and nobody else’s. So let your self go and get into the water, its going to feel a little strange for a while because it’s a gun like no other but then that’s exactly what it is
YEEHAA!!!


  • Like
Reactions: island_sands
just a note if you want get in all the cracks and crevices to keep moisture out soak the wood/gun in lin seed oil for a day or two it works as a all natural preservative then coat with varnish we us this on guns and the shafts of hand tools for carpentry work
 
Aloha Steve,

Great write up! Can you come and work in my shop? You hit all the points and then some.

Have a Merry Xmas and may spring come early for you!

Aloha,Daryl
 
Aloha Steve,

Great write up! Can you come and work in my shop? You hit all the points and then some.

Have a Merry Xmas and may spring come early for you!

Aloha,Daryl

Crap now there's an offer you cant refuse... toss up between Hawaii and Wales! Stevie????
 
Thanks Pastor..........The basics put simply....Just what I needed.........My issue is with a lack of tools.

Trying to make it happen with an entry level table saw, a belt sander, hand drills, a Dremel, and a Rotozip is turning out to be a challenge.

A rear handle with a rail seems like the easiest solution with shafts from the scrapyard. The only real money will be for the trigger mach as I refuse to try to make one at my present level of fabrication experience. Solid hardwood flooring scraps are turning out to be the perfect media for the simple guns I am planning.
 
What a great thread Pastor - a man of many talents, my only comments would be that dont expect to get a great finish on the woodwork by painting it with epoxy.
Epoxy is not an easy product to apply as a finish coat, fantastic as a glue & a base coat but if you want a really smooth finish us something else.
I have had great results using two pack polyurethane marine grade varnish, this type of varnish will set very hard & you can then "T" cut the wood to achieve a truly beautiful top coat.
 
  • Like
Reactions: island_sands
What a great thread. I'll never make a gun because I don't have the required tools (and because I'm a klutz) but this would sure be the place for me to get started.
 
wow what a thread, i am humbled pastor. i see now that imade some mistakes on my first gun, but i have alot of teak , so i will make corrections. thanks.
 
I just finished my first homemade speargun out of Mahogany, all I need to do is Ballast and Balance it, any tips or advise? also I just did a teak oil finish any other recommendations? TKS!20645365_1285312518261733_6408478935831406412_o.jpg20626112_1285312551595063_8260555951043096623_o.jpg
 

Attachments

  • 20645272_1285312631595055_4058191048942669558_o.jpg
    20645272_1285312631595055_4058191048942669558_o.jpg
    238.9 KB · Views: 304
  • 20645102_1285312688261716_344088912603672944_o.jpg
    20645102_1285312688261716_344088912603672944_o.jpg
    270.5 KB · Views: 323
Fantastic write up, I can almost see it in my mind completed already! Don't know if it's because it's an old post but I can't see any pictures??
 
DeeperBlue.com - The Worlds Largest Community Dedicated To Freediving, Scuba Diving and Spearfishing

ABOUT US

ISSN 1469-865X | Copyright © 1996 - 2024 deeperblue.net limited.

DeeperBlue.com is the World's Largest Community dedicated to Freediving, Scuba Diving, Ocean Advocacy and Diving Travel.

We've been dedicated to bringing you the freshest news, features and discussions from around the underwater world since 1996.

ADVERT