• Welcome to the DeeperBlue.com Forums, the largest online community dedicated to Freediving, Scuba Diving and Spearfishing. To gain full access to the DeeperBlue.com Forums you must register for a free account. As a registered member you will be able to:

    • Join over 44,280+ fellow diving enthusiasts from around the world on this forum
    • Participate in and browse from over 516,210+ posts.
    • Communicate privately with other divers from around the world.
    • Post your own photos or view from 7,441+ user submitted images.
    • All this and much more...

    You can gain access to all this absolutely free when you register for an account, so sign up today!

GeckoSub Mirage Evo - And Adventures in 3D Printing Speargun Parts

Thread Status: Hello , There was no answer in this thread for more than 60 days.
It can take a long time to get an up-to-date response or contact with relevant users.
They work OK as I have the tri-cut and the pencil point of these three tips, but I don't have the arrowhead. As for streamlining they fold up into a small package, although they have more frontal area than just a round shaft with a tip ground into it.
jbl breakaway tri-cut folded.jpg

Bear in mind that these breakaway tips have been around almost since the beginning and I have Undersee Mako's with the same layout that I used on my big timber guns, but I only have one left of those as they stopped making them some decades ago. There is an Undersee Mako manufactured today, but it is a fat tri-cut point tip.
 
Last edited:
Here are the Undersee offerings these days, two breakaway tips with 5/16" UNF screw threads.
undersee breakaway tips.jpg
 
What is the inner diameter of the barrel and what is the stroke of the piston?
 
What is the inner diameter of the barrel and what is the stroke of the piston?
What is the length and diameter of the harpoon?

Mostly traditional Italian sizes for the barrel and reservoir:
Shooting Barrel: 13x18mm (ID x OD)
Reservoir: 38x40.5mm (ID x OD)
Pumping barrel is 10x13mm (ID x OD).
Length of the gun: app. 140cm.
Shooting Barrel: 128cm (that's the full length, I am not sure what the working stroke is).
Shaft: 145cm
 
Last edited:
no harpoon diameter

In this case, 8mm. But I have used 7mm and 7.5mm, too on a gun 20cm shorter. I am still not sure where the sweet spot is but on this trip, I am using 8mm as we may run into big dogtooth tuna that would need some proper penetration. I am also not running the gun at full pressure yet. I think I could run it at close to 40 bar which might be enough even for an 8.5mm shaft but I am running it around 28-33bar.

Honestly, this is all speculation until I find time to properly test this in a pool with different pressures and shaft thicknesses.
 
I think 8 mm shafts are best for that gun, if you want to use 7 mm then use them out of a regular "Cyrano" with the 11 mm barrel, or something similar. I found the "Mirage" 7 mm shaft was a waste of time as striking power was down compared to the 8 mm when using the "Mirage" tip. Shaft mass is 30% higher with the 8 mm shaft. A photo is attached with my "Black Sea" gun wearing the "Mirage" tip. The "Black Sea" is a hundred atmospheres gun.
Mirage spear tip.jpg
 
Last edited:
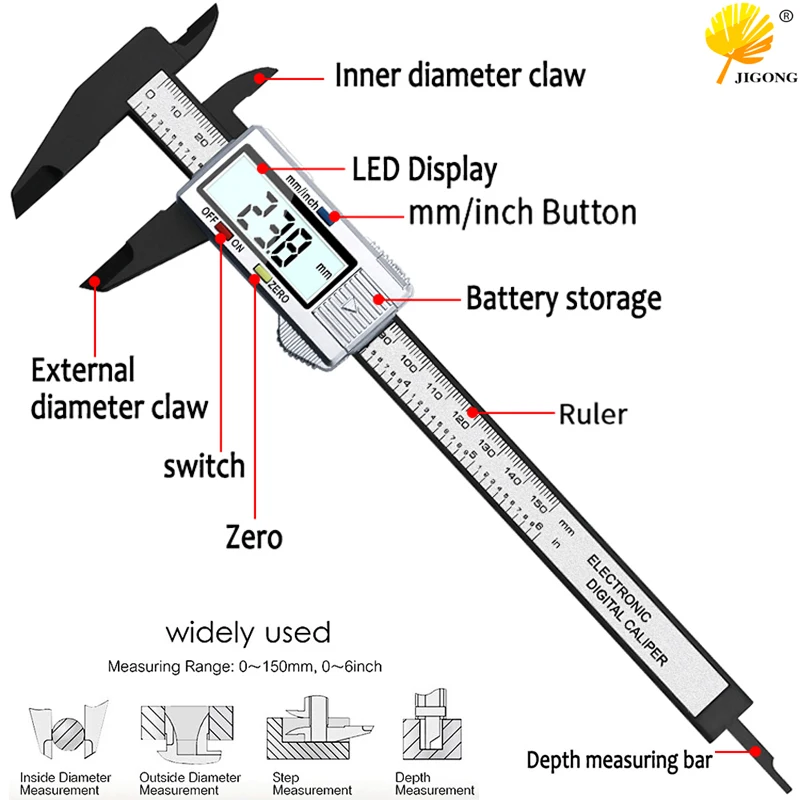
Just ordered these carbon jaw calipers that should not scratch plastic bores in things like transfer ports.
https://www.newfrog.com/es/product/...vernier-caliper-micrometer-guage-lcd-6-180894
View attachment 53390View attachment 53391
I noticed that the newly arrived set of carbon calipers had a tiny bit of plastic at the top of one jaw keeping the jaws held open, so I cut it off as it was not meant to be there. Then with the jaws zeroed I measured a 7 mm diameter shaft and the reading came up as 6.7 mm! Thinking that could not be correct I used my digital metal calipers and got 6.99 mm, so these carbon calipers are junk! With their jaws closed you can see an opening on the knife edge lower section of the jaws when they should be closed tight as the top flat and wide section is. Note the shaft measurement was taken on the wide flat upper section of the carbon caliper jaws so the zero setting was correct. I only purchased them for their less knife like edges as the metal caliper jaws can scratch things such as bore diameters in parts that you cannot afford to be scratched. But for that purpose they are pretty useless, but then they were only 6 bucks and I have seen them since for about 2 bucks. Mock calipers would have been a better description.

 
Setbacks in Indonesia - And a Warning!
So, I am still in Indonesia, chilling with local friends, spearing and doing a whole lot of repairs on the go...;-).
The gun has given me a fair bit of grief but honestly, I don't mind too much as long as I learn from it. This project was always a work in progress or proof of concept with the methods and materials I had available to me.
Anyways, enough of the disclaimer, let's get to the issues;-)

The gun worked fine for about three days or so when a small leak turned up in the nose cone (the newest carbon repaired version). As mentioned earlier, I changed the nose cone for the older version and the leak stopped. About a week later a bigger issue turned up. The Mirage bulkhead stopped working altogether. This meant, I couldn't load the gun at all. I dropped the pressure to about 20 bar and tried to use it as a "regular" gun but shooting 8mm shafts, 20 bar is far from enough power.
Back in the city I took the gun apart:
53686


Turned out a tiny piece of plastic had clogged a valve. I speculate that it could be from a thread I hadn't deburred properly and after a week of use, it had moved to the valve. Actually, it was sitting on top of the printed channel between the two valves, so I had to drill out the offending plastic.
Success, though!

For about a day... Then it turned out I hadn't managed to get all the new burrs from the drilling operation cleared out (again, speculation) and the valves got clogged again (what looks like grease to the left of this small o-ring is plastic debris):

53687


So, this time I spent quite a bit of time making sure everything was cleaned out and that the valves worked. I have a small pump that I use for my inflatable floats and I could attach that to the bulkhead and check the flow:
53688
53689


I am now fairly sure that if I use such an internal, printed air channel between the two valves in the future, it has to be much larger. A tiny piece of plastic clogged it as is probably only 2mm in diameter.

After this second bulkhead repair/service, I took the gun up to about 34 bar and went on another trip. But the spot had bad visibility, so I jumped in the water with my shorter Pathos 100 (yes, it's a bandgun...;-)) and never bothered to switch to the Evo Mirage. But unsupervised in the boat the gun snuck its way out into the sun and one of the fears I had a while back when I was printing these parts came true: After having baked in the tropical sun for hours, the plastic got soft enough that the pressure extruded the o-ring with an almost total loss of air as a result:
53690


So, I think it is fair to issue a warning. Do not use PLA plastic for parts under heavy loads that will be exposed to higher temps!

Once I took the gun apart, it was actually pretty fascinating to see how the plastic had moved around:
53691


At this point, I was ready to give up on the gun but after a few days of just leaving it in the corner, I set about making one last repair.
I filled up the front o-ring groove with epoxy glue and tried to repair the rear one as best I could with hand tools:
53692

53693

53694


Then I put the gun back together again in preparation for another hunting trip and the nose cone repair worked - the gun held air:).
But the bulkhead, now serviced twice since the latest failure, was still acting up... It wasn't clogged like the two first times, but it was leaking. I could hear and feel that the pumping action worked, but the air didn't stay put in the forward chamber - it somehow made it back to the rear chamber.
This is the worst leak in a Mirage as it is so hard to troubleshoot. With my patience low at this point and out of extra o-rings (the big o-ring on the bulkhead is actually sanded down as I forgot the right ones at home) I decided to go a different route...
 
Last edited:
No Magic in The Mirage but The Pulley Loader Saves The Day
With the Mirage bulkhead proving unstable as of late, I decided to pull it from the gun completely and have a go at using my Pulley Loader.
I took the pumping barrel out, too and used a plug I had brought with me to plug the hole in the nose cone where the pumping barrel would have gone. I didn't have to pull those parts out at all, but I wanted the improved airflow of not having the bulkhead in the gun - and I didn't mind the lighter gun from losing the pumping barrel, either (the gun now almost floats with the shaft in).

I should mention that a few weeks back, as the bulkhead first began acting up, I made a modification to my nose cone in anticipation of possibly having to use the pulley loader. In the pulley loader thread, I had talked about how it would be smart to have some hooks on the nose cone, but I didn't have that so I I made a dyneema "gooseneck" AKA a bridle instead:
53695


It has an eye splice on each end that goes around the shooting barrel and is held in place by the muzzle. But as I tightened down the muzzle, the force on the dyneema made it expand and squeeze the nose cone so much that it cracked a little. It's not an issue, there's no structural need for the plastic where it cracked, really. It's just not pretty.
I am attaching the line to the nose cone bridle with a slip knot which has worked fine but a hook system would certainly be faster.

As an aside, I have realized that I can keep the banana effect well under control by clamping down a lot on the nose cone. So far, up to 35 bar, I have seen zero banana effect, so that's a nice surprise.

The pulley loader is not yet perfect. I actually had the line slide through the cam cleat which really surprised me as I have used these on sailboats for years and never once had a line slide. Not sure what the issue is but I changed to some slightly thicker line and it seems to have become a little better. I am using Ronstan's smaller composite cleat but I think Harken's aluminum one in the same size would possibly have better bite.
Here's a pic with the newer line:
53698


And here one that shows how the sliding of the line ate into the teeth of the cleat!:-(
53699


Luckily, the cams are reversible, so you can swap them to the other side and use "fresh" teeth but as mentioned, maybe a metal Harken cleat would be better.

I first tried the pulley loader on the porch of the bungalow I was staying in the night before going spearing and managed to banana the shaft like crazy. Luckily, no permanent bend but I was nervous about using it the next day. But often, loading is easier in the water and it's the same with the pulley loader.
It's still early days with this gadget, but what works for me is twisting the line a few times around the shaft to keep it aligned with the shaft (same ideas as twisting the rubber on a polespear). That, and a hand on the middle of the shaft, seems to keep it from banana'ing.
53696


I am doing three twists so far, but will try to see if one or two is enough. As I load, the shaft does tend to untwist itself but it happens towards the end of the loading where most of the shaft is inside the barrel, so it's ok. But it does make a bit of a mess with the slip tip line and shooting line being wrapped around the shaft:
53697


As a stop gap measure the pulley loader is not half bad but it does take a while to load a gun like this. I have used it for two full days by now and have taken the gun from 24bar initially to 27bar on the second day. Both are more than I can load a regular gun at, so I am getting some bonus oomph. I haven't tried it with the regular shaft yet, only the slip tip shaft which is shorter so I guess less risky loading that one.

I store the loader by wrapping the line around the tube of the loader and just tugging the whole thing under the top of my wetsuit. It's actually a whole lot easier to do than I thought it would be.

Here's a pic of the loader next to some 1kg weights for a sense of scale. It also shows the loader in the "storable state":
53700


Also, I am finally getting fish. With the help of the pulley loader and the slip tip shaft I got four dogtooth, though nothing big yet. But I consider the whole Indonesia trip a stepping stone, learning to hunt tougher fish in more difficult environments - so I don't mind pacing myself.
53701


And it's always nice when you bump into a Mola Mola or some big eagle rays:
53702

53703


At some point, after this trip has come to an end, I will try to conclude on what can be learned from this Evo Mirage build. But for now, I am just going to enjoy my last few days here:)
 
Last edited:
It seems to me that the “Mirage Evo” is a success, the problems lie with what are in a sense sintered parts as plastic bead layers are progressively fused together and if these were injection molded parts instead then there would be no problems. As for the pulley loader, the teeth on the cleats have a higher localized loading if they are biting on a thinner diameter cord as there is not enough cord cross-sectional area to distribute the load over more of the tooth surface.

Actually now I look closer the cord you are using is already pretty thick and anything larger may not go through the nip, so metal teeth may be the best option.
 
Last edited:
It seems to me that the “Mirage Evo” is a success, the problems lie with what are in a sense sintered parts as plastic bead layers are progressively fused together and if these were injection molded parts instead then there would be no problems. As for the pulley loader, the teeth on the cleats have a higher localized loading if they are biting on a thinner diameter cord as there is not enough cord cross-sectional area to distribute the load over more of the tooth surface.

Actually now I look closer the cord you are using is already pretty thick and anything larger may not go through the nip, so metal teeth my be the best option.

I'll comment on the success (or not) a bit later when I have gathered my thoughts fully on the matter;-)
As for the cam cleat it was rated to take very thin line (perhaps 2-8mm) and the first one I used was 3mm, the white one is 4mm. I have used 3-4mm trim lines on sailing boats in similar cleats and not had any issues, hence why I am a bit perplexed. But yeah, if anyone feels like making one of these, as of now, my recommendation has to be to go for the smallest Harken cleat and possibly going to 5mm line, too. The latter will also make the pulling effort nicer on your hands.
 
Last edited:
The Verdict - The Parts and Building Method
I have left Indonesia and had a bit of time to think about what worked and what didn't in this project.
I think I will do it like a Q&A but since I am doing both the Q and the A, I might miss some Qs, so just ask if that's the case.

Can You 3D Print Functional Speargun Parts?
Yes, I feel that you can. As this thread shows, there are special challenges when it comes to pneumatic guns as it is not easy printing perfectly airtight parts. Making them airtight took for some extra time consuming steps but I think this might change in a year or two as some of the more high end plastics which prints at very high temps make it to the consumer market. It might already be possible but it would take a lot of dialing in of the material and print settings.
For band gun parts, I think it would be fine as the parts can be a bit permeable. I would say you could definitely print e.g. a roller muzzle, though you obviously need to think about the forces a lot.

What About The Strength?
I printed in PLA which is one of the easiest materials to print but also not that strong. But the nose cones and bulkhead held up fine except for when I left the gun in the sun and the plastic softened so much so that the pressure extruded the o-rings - which is the downside of using PLA. There are already materials available with better resistance to higher temps (e.g. HIPS) but they are a little trickier to print and I didn't have time to dial those in.
I did break the sleeve for the CamWing, but that was because it took a big hit when I off loaded the gun (by shooting it) over the side of the boat and the recoil (not that much) slammed the CamWing into gunwhale. Entirely my own fault. But I could also have beefed up the sleeve itself and will likely do that on the next one.

Are The Tolerances and Precision Sufficient?
Yes. It took a while with dozens of testers and a fair bit of calibration but I got my printer to hold very nice tolerances, perhaps within 1/10mm on most parts. For some reason, internal bores and holes were harder to get right - but in practice, if you are designing your own parts, you can always go back and adjust a dimension in the CAD software to make up for most calibration issues in the printer.

What About Surface Finish - And O-ring Use?
The finish depends in large part on the resolution you decide to print in. Higher resolution means that the bead is thicker and you get more "stepping". This can be a problem as for an airgun you need a good surface for the o-rings to seal against. When I first set out to make these parts, the goal was not to have to do any secondary machining but to have the seals work straight on the printed part. That, I didn't succeed in at all. Every o-ring bore or groove has been machined on my mini lathe. This is obviously a problem if you don't have a lathe.
It might be possible to make the surface smooth enough with other materials or some of the more high tech ones coming out. E.g. HIPS can be sanded perfectly smooth whereas PLA and PETG doesn't really like to be sanded much.
Again, for a band gun this is much less of an issue as you don't need perfect sealing and I think you could use most parts straight off the printer.

That Handle...
The Mares Evo handle (actually not called the Evo, but Cyrano 1.3, it seems) that I used is a mixed bag... It seems nicely made in terms of the molding and the plastic used and it feels strong but the line release-trigger design is complete crap. If there's any kind of tension on the line it puts so much friction on the trigger that I can't really shoot it consistently. I very likely lost 1-2 fish because of this. The remedy is not to have any tension on the line, which is luckily doable as we don't risk band tangles on air guns. (I have heard that shooting the stiff dyneema, which I used, can lead to bad tangles unless the line is tensioned quite a bit). Still, with a breakaway setup, the floatline can pull on the line and then you are back in "argh, stupid Mares!!!" mode...
The safety is great, though. So is how well it holds the shooting barrel from twisting when you really tighten up the gun during assembly.

Was The Build a Success?
How you answer that question depends on one's personality. I don't mind when things are not easy or work out right away - as long as I feel I learn something. Viewed like that, yes the build was a success. Not a resounding one as I had parts fail in use and ultimately had to dumb down the gun to make it work. But I had amazing days in the ocean and caught some very nice fish with a gun that had my homemade parts in it. On top of it, it might be one of very few guns in the world with 3D printed structural/functional parts and I find that a little bit cool. But most of all, I learned a lot and that's what I really like about the build.

Would I do it again And What Is Next?
Yes, I would - and I will:). But I am also beginning to think of how to combine 3D printing with subsequent carbon fiber reinforcement. I actually think it is very doable to print a whole bandgun "blank" and reinforce it with CF. Perhaps even print a cuttlefish shaped airgun barrel, cover it with a CF laminate and get rid of the internal plastic mandrel/tooling. I have given this method some thought and while it is still early days, I think there's a way to do it;-)
 
Last edited:
  • Like
Reactions: Nico66
The Verdict - The Gun and Its Performance

This one is a tricky one as I wish I could back up any statements with hard data - like pool tests but I can't. So, it's all just feel, really.

The objective was to make the longest gun I could based on an easily available barrel which is why the gun ended up this length. It has a barrel meant for a Predathor 135 and shoots an 145cm shaft.
Reason is that Indonesia offers up the possibility of getting a shaft into some fairly big dogtooth tuna and for those, you need penetration. From all the reading and research I have done, it seems there's a bit of a movement to guns that shoot heavier shafts. Perhaps they are not super long guns as some of them are rollers, but I see a fair amount of guns shooting 150-170 shafts, from 8-9mm. By that comparison, my 145cm x 8mm is still puny but for airguns it's big gun territory.

So, how does it shoot...? Again, hard to say. The first few days I had to get my aim in. I shot high to start with, but ended up with very good shot placement a few days later. Having video helps diagnose this fast. I would venture a guess, that it actually shoots quite accurately. And the power? I feel like I took some long shots on the small 10kg doggies and I think I had at least half the shaft penetrate each time, except when I strung the fish.
I did put second shots on two 30kg doggies that my friends had shot. Of course, I could close the distance on those shots but on both occasions, I shot the fish through the skull (to brain it) and strung in on the line both times. This was at pressures around 28-33bar.

When the valves in the bulkhead started playing games and I eventually had to loose the bulkhead - and thus the whole Mirage factor of easier loading - it became apparent that to power these heavier 8mm shafts, I really needed higher pressures. Personally, I can't load the gun single stage, the traditional way, if there's more than, say, 22bar in the gun. This is not enough for an 8mm shaft, I feel. I actually missed on a nice barracuda because of this as the one day I shot it with the lower pressure, I kept the aim point of when I had shot it around 30bar and even though it was a fairly close shot, I shot low and missed.
I feel like I could possibly even power up an 8.5mm shaft if I get 35-40bar into the gun and no issues develop. Then we are getting into e.g. Gladiator and Denton area in terms or shaft size/mass.
How shaft mass and pressure relate to each other in terms of performance is something I would really like to fully test in a pool one day. It would be good to know optimal pressures for each thickness of shaft.

The gun is still a whole lot lighter and a fair bit smaller than e.g. my friend's Albacore or my other friend's homemade 125cm wooden, three banded gun. Perhaps half the heft of the Albacore? It also was not as terrible to swing as I had feared. On my last trip, I took a 125 Mirage and I felt the 40mm reservoir was beginning to limit my ability to track a fish. Despite the new gun being 20cm longer, it didn't feel that bad. Maybe it's just me getting used to bigger guns or that the doggies actually tend to swim slow. Perhaps it's a combination. If we were shooting YFT or Mahi Mahi, I might be in trouble.
I still consider making a custom barrel with a much slimmer front as it couldn't hurt and would be a good challenge. Whether I can make one that can hold 40bar is the question. But that's for a whole other thread.

Would I make a gun like this again? Not sure, but mostly because the handle was a bit of a disappointment and also, I feel like the next step up would be that homemade cuttlefish reservoir.
I def think there's a bit of room for improvement in airgun design and I think a bluewater airgun still makes sense. Whether it is something fancy in carbon with cool shapes or a long Sten/Predathor powered way up with an Easyloader or a pulley loader matters less. Anything that can shoot a 150cm long, +8mm shaft at high pressure should be a powerful weapon.
What I know is that if I am to continue with big airguns, then there needs to be a partitioning of the loading effort because I need to get +30 bar to power the shafts I want to use. Whether it is a Mirage system or something else, I am not fully decided on. Time will tell:)
 
Last edited:
Vlanik wrote:
"You need a gun like this, 50 bar ..."

What size piston does this gun that I supposedly "need" have?

Besides that please don't tell me what I need. I like to make my own, informed decisions. The vast majority of what I have posted lately is about how I like to make at least part of my guns myself and this thread is very much about that, so I am not really looking to buy something ready made. Also, unless that gun shoots at least a 145cm, 8mm shaft and is completely neutral in the water when loaded it's definitely not a gun I would consider buying
Finally, could you please show the forum readers the simple courtesy of translating your messages before you post here?
 
Last edited:
Vlanik wrote: "This pistol has no piston. Designed for shafts 8 mm. And he does not care how long they are. If only you could charge it. Whether you want it or not depends on you ..."

(Vlanik, This was the last time I translated your message and as such, the last time you can expect a reply from me unless you post in English.)

Your argument that I should change to that gun for my needs is strange.
I am not saying the gun you proposed is bad but it doesn't live up to main requirement I had clearly stated. Which is a gun that allows me to partition the loading effort and run it at higher pressures than a normal single stage gun can be loaded at.

Your gun has an 8mm barrel? If so, that is an area of 0.5cm2. At 50 bar, that puts 25.5kgf on the shaft.
A 13mm piston has an area of 1.33cm2 and at 30 bar that puts 40.7kgf on the shaft... Even if a 13mm piston has a bit more losses due to friction and the mass of the piston, there is still a whole lot more force on that shaft resulting in a lot more powerful gun.
(At 37 bar it would have twice the force of your gun).

[EDIT]
Thinking about more about it, the gun in question might have a 10mm barrel, not an 8mm one.
But if the gun is a single stage gun, then it will still not do what I need it to do in terms of power. There is nothing wrong with a single stage air gun, most of us use them gladly. But once we start talking bluewater and heavier shafts, I personally can't load a single stage gun at the pressures I think the heavier shafts need.
 
Last edited:
Forget about Vlanik and his gun, he always seeks opportunities to cross promote his gun and pops up anywhere he thinks there is an audience. Now I think your gun has been very successful. Remember that in the fifties and sixties pneumatic guns usually shot 9 mm diameter shafts and those guns only disappeared when the floating rear handle pneumatic guns took over because they floated after the shot. For example Nemrod mid-handle pneumatic guns all used 9 mm diameter shafts. If you use your gun for intercept shots then you don't have to track your quarry as you arrange to have him swim through the shot. This requires knowledge of species habits and behavior and with this you can anticipate and “read” the fish. Super Stens have bowled over plenty of big fish and there have been guns up to 150 cm, Pippin had a big one made especially for him by Mares, but you need to be a big guy to load a gun like that.

Releasing valve guns using 14 mm diameter inner barrels also have the necessary horsepower for taking large fish and the Mirage operating principle means that a normal Earthling can load it, i.e. you don't have to come from Krypton so to speak. If your prototype parts and drawings are taken to a mold maker then you could probably get a quote on the cost of making the guns on a production basis, not necessarily by you as the hard part has already been done. Prototype sintered parts are not really going to be practical for pneumatic spearguns when molded products can be pumped out in their hundreds if not thousands in hours rather than days.

Before the plastics era pneumatic guns had alloy bulkheads and handles, but none of these guns were designed to float. In the Eastern Bloc where injection molded parts were more of a rarity for spearguns, then floating after the shot guns were fully constructed of alloy with only the handles made of plastic and cast matrix materials built on a frame core.
 
Last edited:
My write up on the barrel/piston diameters and the force was probably flawed as I made the mistake of thinking Vlanik's gun had an 8mm barrel. It might have a 10mm one, but if it is a "single stage loading" gun it wont work for my needs and that was the whole basis of my argument.
[EDIT] I have since read up on how the gun works and the first assumption of using 8mm as the basis for the force calculations was correct.
Now, it's important that I don't sound like normal or single stage airguns are no good. They are great! It's just that I now want to try to make a bluewater airgun and my takeaway from the last two trips is that I need heavy shafts and to power those, I need higher pressures than I can load at the "old" way.

I have long thought about going up in barrel diameter, mainly so that I can lower the pressure in the gun which might help me if the next reservoir will be homemade. I know there will be a slight penalty, but I think it will be OK. Also, if the next gun is to be longer, I will need to make my own shooting barrel for the first time and it's quite difficult getting 13mm ID tubes. But go to 14-15mm and the selection in pretty much all materials (polished SS, titanium and alu) increases.

My dream in terms of DIY and gear has long been to get myself a little desktop CNC router. They have come down in price substantially and a few of them are well thought out. The best of them can machine alu. If this happens, between the CNC router and my lathe, I should be able to make all the internal parts. E.g. bulkheads could be machined from Delrin or alu. Nose cones could be 3D printed or machined in Delrin. Other parts, e.g. the handle, could be either made in a 3D printed or machined mold or CF laminated on a 3D printed shell.
We will see if I do get a router. I might be relocating this year, too and if that happens I will not be making anything any time soon. No matter what, I also need to make some money for a toy like that first;-).
 
Last edited:
The gun should be OK with the 13 mm diameter inner barrel. All early guns were 0.5 diameter which is basically 13 mm and you know the "Mirage" can operate at 40 bar, so the main improvement is better internal breathing and the "variator" plug provides that, hence the gun should be OK, as is, if you just use non-printed parts. As we know LG-Sub machines all their plastic parts out of black Delrin, so that is the way to go. 3D printing allowed confirmation of the shapes, now you need to machine them out of Delrin, or some other light tough plastic like Nylon, which is what Delrin is anyway.

Vlanik's guns never got used on Tuna, that sort of shooting is way out of their league. Those guns don't have an inner barrel at all, the spear is weakened by the annular notch in the shaft for the forward latching mechanism in a gun design 40 years old and water in small amounts enters the gun each time you load it and small amount of oil comes out because of the detachable spear cap on the shaft tail. Of course Vlanik will deny this, but it is just him talking up his gun. In small sizes they are OK, but don't mention them in the same breath as Bluewater hunting.

Anyway someone who styles himself as “captain of the pirate brig”, as he does, then you can discount him immediately.
 
DeeperBlue.com - The Worlds Largest Community Dedicated To Freediving, Scuba Diving and Spearfishing

ABOUT US

ISSN 1469-865X | Copyright © 1996 - 2024 deeperblue.net limited.

DeeperBlue.com is the World's Largest Community dedicated to Freediving, Scuba Diving, Ocean Advocacy and Diving Travel.

We've been dedicated to bringing you the freshest news, features and discussions from around the underwater world since 1996.

ADVERT