• Welcome to the DeeperBlue.com Forums, the largest online community dedicated to Freediving, Scuba Diving and Spearfishing. To gain full access to the DeeperBlue.com Forums you must register for a free account. As a registered member you will be able to:

    • Join over 47,943+ fellow diving enthusiasts from around the world on this forum
    • Participate in and browse from over 531,990+ posts.
    • Communicate privately with other divers from around the world.
    • Post your own photos or view from 7,455+ user submitted images.
    • All this and much more...

    You can gain access to all this absolutely free when you register for an account, so sign up today!

GeckoSub Mirage Evo - And Adventures in 3D Printing Speargun Parts

Thanks - its good to be back and great to see some of the old threads from 10-15+ yrs ago are still active. Amazing really.

My 110 one air went first - the rear transfer valve started leaking and on inspection I assumed it had been doing so for some time - the inner surface was badly corroded , trigger pin was similar to yours, piston was corroded etc. I salvaged parts out my Airbalete but there was too much damage done. Interestingly the transfer valve out the Airbalete had the same issues and it ultimately failed. The BB surface was pitted as was the valve where the BB sits.
My 70 One Air shortly went in exactly the same way - internals corroded. Id changed oil in those guns every year too. I have a salvimar from over 15 yrs ago that I used for 5 years at least before I ever serviced it and I opened up last year just for a look and it looks almost new in comparison to the One Air.
Id literally buy two One Airs again if they were to remake them though - i found them very nice to use. I think their higher mass contributed a lot to their accuracy and minimal recoil - they were proper sniping tools.

The One Air was my only ever second gun. I had a 120 and I thought it was amazing - because I was new and didn't know much yet. I shot my very first mack with it. And plenty of red snappers and a few groupers. But then I started nerding out big time and I realized it was a weird gun and that it wasn't actually as optimized as I once believed.
On the weird side, the handle is detachable which gives up a lot of piston travel - making the gun "shorter". The barrel has sealant filled side chambers - they aren't used for adding more air volume. What?! And why did the end caps have to wrap over the tank, why couldn't they have made them be flush.
It's heavy (though neutral).
It's free shaft only, and people don't trust that those can be accurate. I only ever shot it with a 7mm shaft though I think somewhere I might have had the extra seal and bushing for 7.5mm.
The line release was too short, the white ergo grip more yellow than the inside of a 70s dive bar and I bet I started thinking more things were wrong with it.

So, the more I started knowing the more I fell out of love with it. But here's the thing... it WAS a great gun...! I just got obsessed with this Mirage thing and the power potential. But the One Air was dialed in. It shot a 7mm shaft extremely accurately and it was bulky for an airgun which I agree with you on - but that's likely what gave it that quiet, scalpel-like, sniper-feeling shot with no noticeable recoil. And that detachable handle that ate into "all" that piston travel? Well, it's the highest handle ever on a modern Italian oleo which later became a pet peeve of mine and which also must have added to the great recoil control. And that ergo grip that yellowed if you dared looking at it wrong...? It's by far the best grip I have ever had on a factory gun.
So, yes, it was a slightly strange gun but it was such a pleasure to use. And I think that's why I finally dug it back out and wanted to give it some TLC, but by then it was too late.

I am sorry My One Love Air, I should have shown you more appreciation whilst you were alive...
 
Last edited:
  • Like
Reactions: grantl
Sliders - Materials - Weights - Confusing Myself (And Some Thoughts On Heat Treating)
@Zahar
Just the other day I stated that the UBL sliders I had were titanium or at least I thought so because they are so crazy light! The five I weighed are on average 2.36g, ranging from 2.1 - 2.7g in various sizes and styles. But they are made in stainless steel, not titanium.

It's strange I would even say they were titanium because just two weeks ago, I wrote a private message to another forum member stating that they were steel and how it was amazing that they were lighter than the titanium offerings of one of the kinda famous Italian builders... So, in two weeks, I managed to forget what I have known for years, haha.
Actually worse than that as only a week ago, I even posted here that my steel slider was 1g heavier than the orignals but that I knew where I had left more material on my slider compared to the original :ROFLMAO:.

Maybe I just hated machining the unhardened 17-4PH so much that my brain really wanted the originals to be titanium because that was much more pleasant to machine.

Dima also told me that he doesn't like the friction of titanium against steel.
The muzzles I have from him are titanium but they have an alu insert for the female thread which must have been done to protect the alu barrel. I think there's a very strong threadlocker or maybe epoxy used to lock that insert in place and possibly isolate the insert, too.

I may need to get serious about getting a heat treating oven. Perhaps counter-intutively, it's much nicer to "hard mill" the steel on my CNC. So, the idea would be to heat treat some smaller pieces of rod before machining and then also, I wouldn't need to worry about the dimension changing in the heating. Though supposedly one of the advantages about 17-4PH is that it holds dimensions very well even during the heating.
I could have some 17-4PH rod heat treated in China before it gets sent to me but the minimum cost to run the commercial ovens for one batch would be around the same as if I bought a small, secondhand oven.
But at least I now know where to buy 9mm 17-4PH rod in 2.5m lengths and get it heat treated for when/if I ever want that thick, heavy tuna shaft...;)
 
Last edited:
  • Like
Reactions: tromic and Zahar
A Small Quality Of Life Improvement And Other Updates
I like to make my gadgets as small and light as possible but with the pressure gauge I have been using the most it was always a bit of struggle to screw it in and out - because the oil-filled gauges I am losing don't like to be turned by their outer casin. After a while, they will become loose, just spin on themselves and they will actually start to leak.

So, I have often had to resort to putting a vise grip on the adapter which was kinda uncool (and heavy to travel with). This screenshot shows it pretty well:
Screenshot 2026-02-07 at 15.45.07_1600pix.JPG


So, since I finally have a working printer again - and have been printing smaller things to get to know it, I finally made a knob for this thing:
Manometer_Grip_B0866_1600pix.JPG


I can live with the 15g additional weight:)
EVO_MIRAGE_2026_B0913_1600pix.JPG


I just glued it onto the knurled/marred part of the adapter at a time when I had the epoxy out anyways and it works well:
EVO_MIRAGE_2026_B0915_1600pix.JPG


The filament itself is new to me: ABS-GF. So, ABS for more heat and UV resistance which PLA kinda sucks at and then fiber filled for some texture - it's debatable whether you get more overall strength. I bounced it up and down on my tile floor (without the gauge, haha) and no damage at all, so I think this will serve me well and I intend to print a lot more practical, structural parts with this filament. Sadly, it's not like the glassfibres make it sandable and it also seems the work against vapor smoothing with acetone. Anyhow, that's just cosmetic anyways.

Still need to dial in the printer, I got it second hand and it's mostly doing well, but I think I can get it to do better. When you get it just right, the fibers hide the layer lines and minor artifacts almost perfectly but I am not there yet.

Cool Kids Pistons
Also, I just got some PEEK in. I want to try to make my own pistons and was told this is what the cool kids use...
EVO_MIRAGE_2026_B1110_1600pix.JPG

Last time I looked into buying PEEK, maybe 5-6 years ago, it was too expensive but it's come down in price. And for this first try, I bought a handful of scrapped cylindrical parts from a CNC shop for for about 2 bucks each and there's enough length in one of these for two pistons.
In the pic above Here, I am testing if the grip on the very small nipples on Dima's tangs are ok. I pushed the tang into the dummy piston and let it sit for an hour at a time to try to sense if it the bore would creep and loosen. So far, so good. But PEEK is less ductile than POM/Acetal/Delrin so I think it's a little bit less forgiving in terms of getting the bore size right. With POM I think you can undersize it more, it will grab harder and still let go fairly easily. With PEEK, the sweet spot is much smaller. And I think the tangs have to be perfectly matched in size, too which not all mine are, but it's been OK with the Delrin pistons.

The piston side project is A). because I need a backup piston now that I will be taking the Mirage as my "daily driver" and B) to see if I can make them strong enough - in preparation for possibly going to a 15mm shooting barrel for which I would like to be able to make my own pistons.

Trying To Polish Titanium Tube...
A small update on that 15mm tube idea. I have mentioned I have two short titanium test tubes. One is 14mm and pretty decent inside, the other is 15mm which I'd prefer but a bit rougher.
So, had a quick go with some of these:
EVO_MIRAGE_2026_B0930_1600pix.JPG

EVO_MIRAGE_2026_B0932_1600pix.JPG
Pretty nice to be able to just set up a power feed cycle to do this on the ELS. I have what I think is 320 and maybe 600 grit so I polished with some diamond paste afterwards:

EVO_MIRAGE_2026_B0951_1600pix.JPG


Honestly not a very impressive result but also, the pics are worse than real life:
EVO_MIRAGE_2026_B0970_1600pix.JPG

Still, I feel like I may only have taken off a surface layer and revealed some rougher ridges underneath. Or maybe the piston bore sanding thingmajig did it. Not sure. I will probably have another go pretty soon, I probably spent less than 10 mins on this test.

The Chinese "heavy industry" is on holiday for almost a month now and I didn't get to ask yet if this vendor has some better surface finishes but I'll try when they get back. And then I will also order a polished stainless barrel.
The reason I am still interested in making the titanium work is mostly for weight saving reasons - I could probably just about make it neutral with a with a 40mm CF reservoir and not have to get into adding extra floatation to the gun.

Anyhow, those were the updates:)
 
Last edited:
Piston Design Questions/Thoughts

I will try to make my own piston pretty soon and overall, I'd like to optimize for performance but especially weight on this part which means short and light.

My basic thinking if that if we can reduce weight, the piston can possibly take more of an impact though release friction must play a part too. But also, is there a risk that the piston becomes so short that there's no longer enough plastic in it to even "absorb" the impact?

Let's get started with a repost of one of my older pics.
(Distances are from the tang flange to the front of the piston).
VARIOUS PISTONS.JPG


The old Mirage pistons, though heavy is even shorter than my shortest UBL. The UBL pistons are generally around 9-12mm shorter than anything else apart from the old Mirage and the weak STC which I broke early on.
They are also the lightest.

I have 3-4 UBL pistons and they have taken some very big hits in the various Mirages they have been in. One is leaking but I think it can be solved with a slighty different o-ring size or just newer seals as it's otherwise still in decent condition. The only real breakage so far was on one that had a flange break off on the o-ring groove - there were two front grooves close to each other on that piston. It was either an experimental design from Dima or I cut an extra groove for some reason (can't recall). Either way, the flange between the two front grooves broke.
Besides that, his pistons are the only ones which have generally survived repeated use in my Mirages. But also when we get to these pressures and impacts, unless you go to a metal piston, it would probably be wise to consider the piston as a wear part that may need replacing once in a while. Which is one of the reasons, I want to learn to make my own.
All that just to say, that I think there's a case to be made from shorter pistons - with the reduced tangs and chamfered fronts, too.

I am aware that some builders like longer ones and the argument I have heard is that it aligns better in the barrel. Not sure, I agree... It's also sometimes stated that it's the two o-rings which does the alignment - in which case, it's the distance between the grooves that matters - e.g. the STC in the pic is not very optimized in that sense. Notice how whilst it's longer than the UBL, the grooves are actually closer to each other on the STC. And whilst I don't have that piston on hand, it looks like there's rubbing on the front part of the plastic. So, in reality perhaps the very edge at the front of the piston is actually doing some the alignment (at least for that piston). Surely the same for the stock Mirage.

And here's a "funny" one from LG:
Pistone-LG-revolution.jpg

Not sure what their reasoning behind the knurling is. Maybe that it holds oil/grease and has less surface area/less friction.
But this is also a good time to mention that I want double o-rings. It's a tad more friction but way more peace of mind.

I also had a look at some of Duccio's pistons. I guess they range from ~50-54mm long so maybe in the Mares/Salvi territory and at least on some of them he seems to have spread the o-ring grooves as far apart as he dared - I think you wouldn't want the front groove too close to the front face.
Duccio seems to be making various lengths - maybe according to the customers requests or just trying out various stuff sometimes - but here's one from him with fairly spaced out grooves.:
DUCCIO PISTON_1600pix.JPG

Compare that to the STC above that is of similar length but without the spaced out grooves.

To sum up my thoughts, it's actually pretty simple:
  • A short piston (41-43mm from front face to tang flange)
  • Two o-ring grooves spaced "far" apart
  • OD slightly reduced between the grooves to save a bit of weight and hold oil/grease
  • PEEK front
  • 17-4PH tang made from a shaft cut-off
  • Made to work with my existing UBL parts, so small tang bore and chamfered front
Here's something that almost caught me out in my quest to make the piston as short as possible;)
Screenshot 2026-02-08 at 08.12.38.png


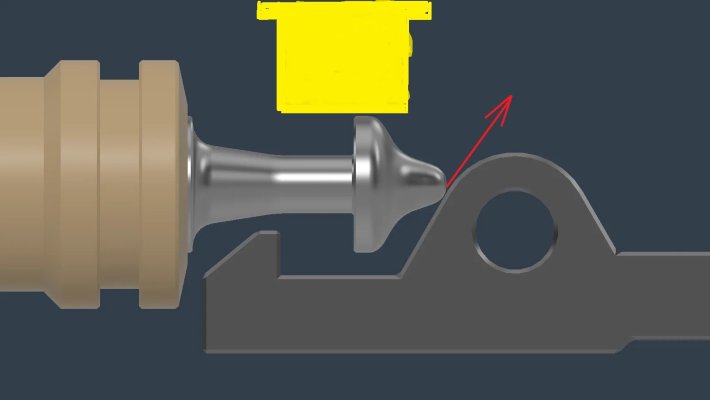
It would probably be smart to make sure the very end of the tang hits the that boss around the sear pivot point before the front of the sear can even touch the rear of the plastic part of the piston.
So, a quick adjustment to the CAD:
Screenshot 2026-02-08 at 08.21.03.png


I haven't decided on the final shape of the end of the tang. Maybe a simple taper, maybe a little boss, maybe something more fancy/3D'ish since I may cut the tang on the CNC:
Screenshot 2026-02-08 at 08.35.30.png


Oh, one last constraint to remember. There's a risk you can make your tang so short or the rear o-ring groove so far back on the piston that the rear seal starts popping out into the cutout in the barrel for the sear.
 
Last edited:
  • Like
Reactions: tromic and rollerGR

I like this idea of constraining the tang so it can't be racked when loading. That said, I don't actually know if this is a real world issue?
That sear is a modeled precisely after a stock Mares one and so is its pivot point offset from center (2.35mm below the center of the barrel). I admit it doesn't look great but I think that's how almost every Italian gun has it it for 40 years?
But just because it has always been like this, doesn't mean we can't improve on it.

[EDIT - see the post below, I think the 2.35mm offset statement is wrong, sorry!]

Maybe I can find a way to add a small Delrin insert in the handle/barrel which I intend to make from scratch later this year.
Or since I will be making my own sear, too I could modify the shape at the front of the bore so it's not so sloped. That might reduce the issue and be the easiest.
 
Last edited:

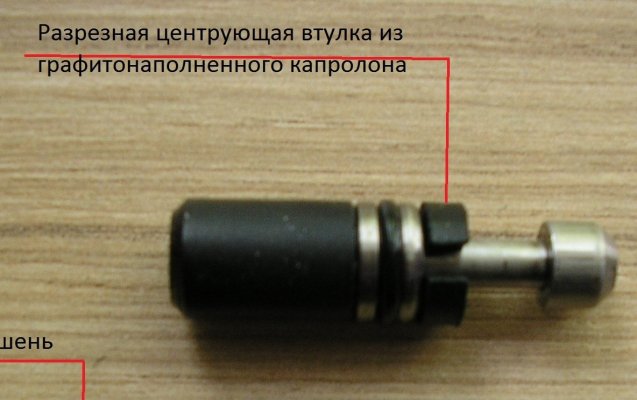
Ah, that piston looks a little bit like the original Mirage. It looks really short, which I like. And then it doesn't have that cuff seal that is not used much anylonger except for in some stock OEM pistons.
And you also have the alignment/sliding sleeve at the rear instead of the front.
I looked it up and it's made from a graphite-filled Nylon and is widely used as a bearing material.

I honestly am not sure the pistons with two o-rings, even the ones spaced far apart only "rides" on the o-rings. I would think the front edge of the piston also touches the barrel wall. Especially if you are moving the gun sideways during the shot. In which case, having a low friction material is probably an advantage. But Delrin is already pretty slippery. I think PEEK is less so, though.
But I will start simple and just make it with two o-rings and keep an eye on how the piston wears.

Also, I prefer two o-rings. I think one o-ring would be fine for a very long time, but just in case it gets cut/worn out it would be nice with a backup. When I am on my little island with easy access to my workshop, a failing o-ring is not a big deal but if I am traveling in e.g. Indonesia and spending money on flights, hotels, boats, etc and may not have many chances to see good fish, I don't want to lose a whole day of spearing:).

Now, there's one use case where I think your graphite sleeve could work for me... When I go to a 14/15mm piston, if I can't make the plastic ones strong enough, I may have to make a metal one and in that case, I think a plastic sleeve does make sense - unless I have somehow proven that two o-rings is enough to keep the piston away from the barrel wall...
 
Last edited:
  • Like
Reactions: tromic and Zahar
Trigger Sear Pivot Point Offset - A Standard (Or Two) To Be Found?
Yesterday, I stated that the trigger pivot point in classic Italian barrels was offset by 2.35mm from the center of the barrel but I think I was wrong on that - apologies!

I think the 2.35mm was an estimate I made back in 2015-16 just with some calipers, maybe on an old Mirage barrel, and it stuck in my notes, drawings and brain but yesterday, I found this note of mine:

Screenshot 2026-02-09 at 18.40.41.png


I can't really recall doing this measurement but I think I had the barrel chucked in the vise for some other machining at the time and the note does seem to to suggest that I should check more in depth.
And despite still not having my 3D probe up and running (I need a whole new CNC controller for that to work) I had a go at checking some more barrels.
Spoiler alert, that 1.85mm was also a bit off too and I can't seem to find any common standard between the four different barrels I checked.
But also, I was reminded that it's not as easy as it sounds to "just" measure this offset.

Here's the setup:
EVO_MIRAGE_2026_B1224_1600pix.JPG


Basically, it's impossible for me to mount the barrel completely plumb/level/square/whatever in the machine so I had to resort to also measuring whatever tilt and angle I ended up with. I think I got it fairly ok. I also accounted for how some of the barrels have oversized bores and others are a tight fit.
A surface plate and some nice big set of precision gauge blocks would have been easier but I don't have that kind of gear.

Anyhow, here's a sketch which might make sense to some of you. This the barrel as seen from behind and the one with the worst rotational angle in the setup:
Screenshot 2026-02-09 at 12.12.24.png


There was also a fore-aft tilt on some of them, but it should all be accounted for.

But let me list the four barrels I measured with some notes added.
  • Older Mirage 80: 2.10mm
    • This is the largest offset of them (the pin sits the furthest away from center). I think this barrel is very old. Maybe it was an older standard or done more manually (I think it's the latter as the bore is not even perpendicular to the barrel on this one)
  • Predathor 135: 1.94mm
    • Not much to say other than the setup in the vise was almost spot on, just 0.1-0.2 degrees out of square but I still included it in the measurements
    • It's ~0.1mm different from the 1.85mm I found in my notes which spurred this whole undertaking but I trust the 1.94mm more as the setup was better this time
  • SEAC Hunter 90: 1.78mm
    • Perhaps the same offset for an Asso as I think the Hunter is just a facelifted Asso
  • Newer Mirage 80: 1.65mm
    • This is the least offset of them all and I think it's a newer one judging from the barrel and it's "anti-twist" cutouts at the rear

This leaves with me with two somewhat frustrating conclusions.
First of all, that 2.35mm offset I have been using in my head - and CAD for a while - could not be verified. It may have been a mistake on my part. Let's disregard it going forward.
On the plus side, an offset that large is worse for the trigger sear engagment as we will see in a bit.
Secondly, I can't see a unified "Italian Standard"... Would have been nice, though.

But I realized I am hampered in not having measured any stock OEM pistons in terms of flange and stem diameters. I have been using the modified ones and maybe 7mm tang flanges are smaller than the original pistons of old and the stem diameters are also not super consistent.
I have been focusing on sear engagement/overlap but that may not have been the right way to do this and there may actually still be a very simple geometry to this. We will get to that:)

But first, allow me a short detour with some of the measurements I took.
An assumption is that I modeled the sear correctly and that the sear hook face is indeed at the same height as the pivot center and that the old Italians designed the mechanism so that the sear sits fully horizontal under load.

If we use the offset from the newer Mirage of 1.65mm, then it looks like we have 1.85mm engagement on a 7mm tang (3mm stem, only):
Screenshot 2026-02-09 at 12.53.51.png


But let's look at the Predathor as those barrels have been the go-to for my longer Mirages:
Screenshot 2026-02-09 at 12.52.54.png

Down to 1.56mm engagement as it's a deeper offset for the sear pivot.

Thanks for bearing with me - we now finally come to the very simple and possibly correct way to look at this.
Maybe, just maybe, it's a simple as this - IF an older, stock piston had an 8mm flange and a 4mm stem, then a round 2mm offset would get us this:
Screenshot 2026-02-09 at 19.11.04.png


We would get the sear all the way into the corner of the flange and maximum engagement.

If that's the case, then the stem diameter simply dictates the offset. This is what we see in the example above where a 4mm stem leads to a 2mm offset.

Same if the OEM stems are 3.5mm in diameter, then we get a 1.75mm offset:
Screenshot 2026-02-09 at 19.33.56.png


And then just maybe we have a standard, well two standards actually, as the 2mm offset example is enticingly close to the 1.94mm I measured and probably within manufacuturing tolerances and my error of margin. Even that first older Mirage at 2.1mm is kinda close enough now.

But also, the second example of a 3.5mm stem with the 1.75mm offset is getting really close to the Seac and Mares measurements of 1.78mm and 1.65mm.

So, maybe, in the end there are two standards: 1.75mm or 2mm offsets?
To verify this, I guess I would need to measure some piston stems but the only thing I may have is a newer stock Predathor. Will check that in a few days.

No matter what the offset is we still have the potentially less than stellar design where the very tang end will hit a sloped face which will give it a racking moment but as I mentioned this must have been the case for decades by now so maybe not the end of the world.
 
Last edited:
  • Like
Reactions: tromic
Bits and Bobs - No Airgun Stuff
So, life happened again, haha. Nothing bad, but had to do some real work. Part photography but also did a new batch of the freedive product which pays my rent (and also helps pay my machines).

Custom Shelves For The Dry Box
I live in the tropics near the ocean so things in my workshop tend to rust. So, I have dry boxes that I store electronics and now, tools in.
And I finally cut a custom shelf for some of my measurement tools:
IMG_1770_1200pix.JPG


This plastic warps when you start cutting it which lead to the fluffy edges on the outside as the final contour pass was done at the end - when the plate had lifted up.
Anyways, it works well enough:)

A New Knob...
MVD reels are everywhere. I guess they are OK for the price. I don't like that you can't take them fully apart - the pins on the cage/frame seem to be welded after the spool is inserted(?). Maybe you can use some force to get the spool out - I didn't try that hard.
Anyways, my friend has an older model with a regular drag knob but the knob could do with some more "grip". It's too hard to get a proper handle on:
IMG_1850_1200pix.JPG


The orginal to the left and my version to the right. The latter is way more grippy, easier to use and fine adjust and also, I found I could make it a bit taller - which also helps with more thread engagement and should make the thread overal stronger though the original one was fine in that regard.

The size was decided by the POM/Delrin/Acetal rod I had on hand:
IMG_1830_1200pix.JPG


The final result looks alright but I would have made the knob a bit bigger if I had some larger rod. This one is 45mm "diameter".
IMG_1845_1200pix.JPG


And yes, a homemade reel is on the long list of stuff I want to make one day so seeing how others do it is always interesting. E.g. pretty much every reel I see has been "lazily" made in that the screw holding the drag knob sits on a standard thread pitch screw (in this case an M8x1.25) which is too coarse for my liking. I am pretty sure this is why so many reels out there have such a small sweet spot - between locked and draggy is often just 1/8-1/4 of a turn...:(.
Once I get around to making my own, the first improvement will be a much finer thread pitch though of course that means I may not be able to get away with a plastic knob.

Carbon Fiber Belt Reel Plate
I like belt reels and I like carbon fiber so for no reason other than wanting to, I made a new carbon fiber belt reel plate. The reel is a very cheap no-name Chinese reel. However, it's ok for this use with one important fix that I will get to in a bit.

Anyhow, some pics though not enough of the lamination itself - I always forget to take pics when I have the epoxy out. But I used a simple 3D printed mold. An upper and lower mold with packing tape for release:
IMG_2035_1200pix.JPG

I also used the poor man's pre-preg where I place the precut fiber patches on some plastic sheets, then add the resin to the fiber, squeegee it out, then add another plastic sheet on top and squeegee/roll some more. You can let the resin kick a bit before you start adding the patches but overall, the whole process takes a bit more setup work but it's less messy.

After curing, I held the lower mold in the vise and drilled the four holes that will be used to attach the reel to the plate - but until then, screws will be used in these holes to keep the plate secured to the lower mold:
IMG_2056_1200pix.JPG


Here I have added screws and is machining the rest of the features:
IMG_2061_1200pix.JPG


One annoying issue comes from having to cut into the plastic a bit but PLA melts if you look at it wrong so it constantly gums up the cutting tool which is probably half the reason why the edge frayed. The other half is that I was impatient so the plate wasn't really fully, fully cured yet...

Anyhow, after a bit of hand sanding it looks alright:)
IMG_2072_1200pix.JPG


I made the grip larger then the one on my orginal steel plate. The idea being that in an emergency you can pull the whole reel off of your belt so I thought it would make sense enlarging this as it was too small on the steel one.

The reel was mounted with some standoffs - 3D printed as once again, my lathe is temporarily down;)
IMG_2089_1200pix.JPG

IMG_2091_1200pix.JPG

Those two vertical lines on the back of the plate is because I wasn't super careful when I added the tape (release "agent") to the lower mold so there was a tiny gap between the strips which, of course, epoxy will happily seep into. It's only a cosmetic issue and since this plate is for my own use, I don't really care:)
I actually had some teflon film made for these kinda things and large enough to cover the mold but it's a bit pricey so didn't want to waste it on this little project.

Oh, as for the fix needed for these cheap reels:
Glue the two halves of the spool together with a strong glue. If you don't, the line will expand as it absorbs water and it will push the halves apart and jam the reel against the drag. Depending on the line, it do this to an extent where the drag wont work at all.

That was it for the update. No work on the guns for a while - I am heading home to Denmark for a month or so.
 
Last edited:
  • Like
Reactions: rollerGR
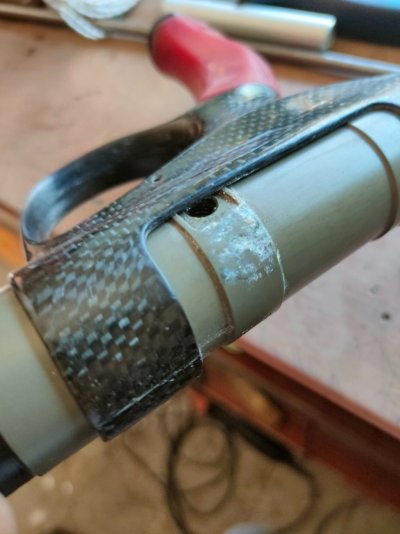
The carbon trend sometimes overshadows common sense! Be careful! Carbon forms an active galvanic couple with metals! Combining carbon and aluminum is especially dangerous!
 
No idea what went wrong on the speargun you posted a pic off.

While it's not easy, carbon fiber and alu can be used close together but they need to be isolated from each other. Often with what is referred to as a barrier coat.
A lot of research has actually gone into this since aerospace engineers like to mix the two (many modern fighter jets, rockets, satellites, etc have alu and carbon in them but it's also been used for about 30 years in fire fighter air tanks and thousands of high end bicycles. I am sure there are many examples where it didn't work, but it can.
As mentioned, a barrier coat/insulation layer is needed. It can come in many forms. Sometimes the coat is just the epoxy resin coat, sometimes it's a thin layer of fiberglass or sometimes specialized primers/paints are used - often in combination with good anodizing on the alu part.

E.g. in bicyle manufacturing when gluing aluminium lugs or bottom brackets to a carbon frame a known technique is to use a structural epoxy glue which contains "micro balloons" which are tiny hollow glass bubbles. The microballons come in different sizes, so the manufacturer will use a size that fits the gap between the alu part and the CF tube and as a result, the alu parts will be centered and isolated from the carbon by the glue.
Mind you, we are not talking about loading up a resin with microspheres to make a lightweight, easily sandable putty - but rather, a minimum of glass beads only to space out the parts in a contolled manner and thus aid in "bond line/gap control".

So, whilst it's pure speculation, perhaps if that CF handle on the gun in your picture had a layer of fiberglass between the CF and the alu, that might have worked.

Anyways, in my case I have four stainless screws holding a cheap plastic reel to a home made CF plate. Worst case scenario, the screws will rust. I doubt it will affect functionality for the next 5 years or so. Let's see. Would I sell this to anyone? No. Would I give it to a friend without much worry? Probably. Will I use it myself and not care about some potential rust? Certainly.
 
Last edited:
  • Like
Reactions: tromic and Zahar
This grip is made of carbon fiber and coated with epoxy resin! But when adjusting the size to fit the receiver, a layer of epoxy was sanded off in one spot, causing contact between the carbon and the duralumin. Even though the duralumin is anodized, contact still occurred. This was in fresh water. If it had been seawater, electrolysis would have already punched a hole in the gun's receiver!
 
This grip is made of carbon fiber and coated with epoxy resin! But when adjusting the size to fit the receiver, a layer of epoxy was sanded off in one spot, causing contact between the carbon and the duralumin. Even though the duralumin is anodized, contact still occurred. This was in fresh water. If it had been seawater, electrolysis would have already punched a hole in the gun's receiver!
Thanks for the explanation, I was indeed thinking some sanding for final fitment could have been the cause. And it's a very good reminder of how careful we need to be if mixing these materials.

For my carbon fiber reservoirs, I do have a very thin layer of fiber glass on the inside on most of them - but since I am now beginning to use alu parts for the nose cone (and hopefully a handle later this year) it's something I really do need to keep an eye on, too.
 
  • Like
Reactions: Zahar
POOL TEST CONT.
Screenshot 2026-04-02 at 14.14.55_1600pix.JPG

More of a note to self post but I had another short session in the pool the other day:
- The gun still shoots massively left. Even with less pressure in it
- It does so even for my friend
- It does so even with the shaft turned 180d, so flopper on top which is opposite of how I normally have it

I did not have time to try another shaft, it looks straight as an arrow though. But that will be the next step.
Also, will try without a shooting line. If that doesn't change anything, then I will start suspecting my custom handle was "built" wrong and is not doing a good job of controlling the recoil.

Speculating...
My prevailing theory right now, based off of some freeze frames from earlier shooting is that the recoil moves the handle back and to the left and thus the muzzle to the right. Now, you would think that would make the gun shoot to the right but I think what could be happening is that the muzzle moves just as the shaft is about to exit the barrel, so the muzzle drags the tail of the shaft to the right - and the shaft leaves the gun at an angle pointing to the left. And then as it flies through the water at this angle, it gets pushed sideways towards the left.
As I said, it's a theory - will try to get some proper diagnostic video of it next time.

I Did Learn Something Though
Now, I also shot my friend's locally made 130 bandgun with two rubbers on it. It was not super powered up but still kicked a bit, but it shot straight, though with a bit less penetration than I would have expected. It's pretty nicely built and not too skinny at 2.9kg.

And what I immediately noticed is that is was so, so easy to aim. Yes, it's well balanced but the mass of it really did a lot to dampen "micro vabriations" from my hand and the small currents in the pool. Sometimes the muzzle would drift slowly to one side, but by pushing the handle opposite, you could easily line the gun up on target again.
On my gun however - though nicely balanced in the water - the muzzle would simply not stay put. Every tiny shake or movement in the water would translate to the muzzle. The best word I can find is that it was "nervous", it would just bounce around constantly whereas the woodgun was stable and "quiet". It actually felt a tad stressful to keep the airgun on target as I was always fighting the "jumpiness".

I have in some older notes that perhaps a bit more volume and mass and in an airgun would be OK and now, I know for sure. My obsession to keep things as light as possibly over the past years doesn't may not always make for the best in-water capabilities and this is one such example of this, I now think.

Also, Sliders Don't Stay Put...
Whether the slider gets shot out of the muzzle during the shot or stays put until it gets pulled along by the tail end is something I always wondered about.
This is only one data point, but in this case it got pushed out before the tail end got to it:
SLIDER MOVING_800p.jpg
SLIDER MOVING_CLOSE.jpg

Maybe by the water in front of the piston?
 
Last edited:
  • Like
  • Sad
Reactions: Zahar and tromic
This slider issue will be solved using vacuum barrel. Also the recoil would be lower, and you can go will lower pressure too to lower the recoil even more.
I remembered that I had previously seen a rifle that has wings in the front part that reduce the movement of the rifle to the side due to recoil.
I think it was Vlanik's speargun..?
 
This slider issue will be solved using vacuum barrel. Also the recoil would be lower, and you can go will lower pressure too to lower the recoil even more.
But this is a vacuum muzzle:)
I was just wondering if it's friction or the tiny bit of water at the end that pushes the shaft out. But I don't think it's a big deal if the slider stays put as long as it seems to have done in that shot.
If the slider gets pushed out right away, I don't think the shaft will stay centered and the tail end will probably hit the edge of the shock absorber.

I remembered that I had previously seen a rifle that has wings in the front part that reduce the movement of the rifle to the side due to recoil.
I think it was Vlanik's speargun..?

I remember seeing wings on big wooden guns and I honestly thought it was an inelegant solution. I think modern guns with much higher handles have done a lot to reduce whip.

What's curious is that I have had other Mirages at even higher pressures shoot very accurately. Both shorter and longer ones. So, I think this is "luckily" only an issue with this particular gun. Just have to figure out what causes it.

At least it was nice that my friend brought his gun and that I shot it enough times to establish that I still know how to aim and shoot a gun;). And he shot mine enough times to replicate the exact issue. Whilst frustrating, there's comfort in removing myself as the cause of the problems,haha.
 
Last edited:
The slider should be installed in the muzzle with a slight tension on the O-ring. This will be enough to ensure the spear exits with sufficient speed for hydrostabilization at the point where the spear's center of gravity leaves the muzzle. It's good that the slider is imparted with speed before the spear strikes. Recoil adjustment is also achieved by shifting the speargun's center of gravity. To do this, you need to create a weight for the receiver and experimentally move it from the handle to the muzzle in the water. A Cobra float on the receiver also helps. The Archimedes force also plays a role in the speargun's recoil when there is no reaction force between the muzzle and the spear!
 
  • Like
Reactions: Diving Gecko
DeeperBlue.com - The Worlds Largest Community Dedicated To Freediving, Scuba Diving and Spearfishing

ABOUT US

ISSN 1469-865X | Copyright © 1996 - 2026 DeeperBlue Global Media Limited.

DeeperBlue.com is an independent digital media platform dedicated to Scuba Diving, Freediving, Ocean Advocacy, and Dive Travel.

Since 1996, we’ve been informing, educating, and inspiring the global diving community through trusted news, features, and shared community experience.

ADVERT