Sometimes a pneumatic speargun will be difficult to disassemble easily because the parts are a tight fit (like in a Mares "Mirage"!). I have found this method useful on most rear handle pneumatic models.
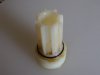
First release all the air with any power selector set to "maximum" as this ensures that all the air chambers in the gun are connected to each other, that way you will not leave any compressed air inside the gun. Then take the spear or a blunt ended rod of similar diameter and push the piston back so that it just disappears into the inner barrel and leaves a clear view through the muzzle's relief ports. Using a metal rod, or a screwdriver that is a reasonably close fit in the relief ports, pass it through opposing relief ports to provide a handle whereby you can unscrew the muzzle by hanging onto each end of the rod or screwdriver (round shaft Phillips head type, not a blade tip screwdriver). Sitting down on a chair you can trap the grip handle between your feet as you apply a twisting torque to undo the muzzle while holding the gun vertical between your knees. Generally the muzzle will come off easily after only a few turns, so you can unscrew it the rest of the way with your fingers. Put some fresh grease on the exposed muzzle threads and then screw the muzzle back on. When the muzzle contacts the nose cone, you will feel the muzzle stop turning, back the muzzle off a number of turns to leave a gap. Now take the gun's handpump and screw it into the rear of the gun. With the muzzle pointed downwards and resting on a rubber surface like an old thong (the "flip-flop" footwear type) begin pumping using slow strokes and watch the muzzle nose cone. A small amount of air pressure in the gun will cause the nose cone to slide down the inner barrel tube and out of the tank, the reason that you only unscrewed the muzzle by three or four turns was to make sure that the nose cone did not come right out of the tank or you would have oil everywhere, plus you want the piston to stay in the inner barrel bore without the piston seals emerging for the exact same reason.
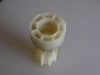
Now remove the handpump and release any air from the gun as before, there will be very little pressure with only a small number of pump strokes. Unscrew the muzzle and remove it, then twist and pull the nose cone and slide it up over the inner barrel threads. You will find that the "O" ring on the inner barrel tube has chased the nose cone part way up the inner barrel threads, that is why you greased them earlier. Make sure that the nose cone has its outer "O" ring, sometimes it falls off and will be inside the tank, in which case you will need to retrieve it later. Pull the piston out of the inner barrel and up end the gun over a clean container like a glass screw top pickle jar to collect the oil. Leave it for a while to fully drain the oil out of the gun, then return the gun to the barrel up position and screw the muzzle back on to about half distance on the screw threads. Now hold the gun by the front of the tank in one hand and strike the muzzle nose with a soft faced hammer (preferably a nylon faced, double sided hammer like a "Thor", that is what I use). A few good hits and the barrel and handle will drop out of the tank tube, make sure that it does not have too far to fall and then the rear of the muzzle will not hit the front end of the tank. I hold the gun just clear of the floor with a rubber thong directly underneath the grip for the back of the handle to fall down onto, that way there will be no damage to anything. Unscrew the muzzle, put it to one side and carefully lift the tank clear of the inner barrel and place the tank on a level table or bench surface with something resting against the tank to stop it rolling off and falling onto the floor. Modern speargun tanks are light and roll very easily!
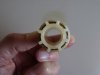
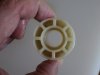
Find somewhere clean to place the very oily inner barrel, power regular block and rear handle assembly. Now you can see all the inner "works" and can carry out whatever you had to do which required getting inside the gun. A large plastic laundry bucket makes a good container to sit the dismantled gun in, you can buy inexpensive ones and just use them for your speargun work, that way it will offer a clean container which is easily washed out afterwards to remove any oil. If you cap the glass jar then you can re-use the oil poured out of the gun, especially if it is very clean and has no obvious contamination.
If you want the tank tube to line up in the same position as before with respect to rotation on the gun (for sticker alignment) then mark the front sight position on the nose cone end of the tank tube with some adhesive tape and do the same for the rear end adjacent to the rear sights on top of the grip handle. Putting the gun together push the tank on with the rear end correctly lined up as it is often hard to twist the tank around afterwards due to the two or three main body "O" rings at that end of the gun. It is a different story with the nose cone as once pushed on you can line it up by twisting it. Remember to tip the oil back into the gun before replacing the nose cone, then screw the muzzle back on and you are ready to re-pressurize the gun.
Use clean newspaper to make a temporary work surface (floor and bench top) that will catch any spilt oil and have some cloth rags for wiping parts clean, cotton garments that have worn out make good rags as they are lint free as they have lost most of their surface fuzz, hence are as the saying goes, "threadbare". Do the work where you will not have any dust or dirt blowing around as the oily parts attract such things like a magnet and then you will have to wipe everything clean of any oil before reassembling the gun. With pneumatic speargun maintenance cleanliness is everything as seals are unforgiving of contaminants getting between them and the seating surfaces they sit on or abut against.
First release all the air with any power selector set to "maximum" as this ensures that all the air chambers in the gun are connected to each other, that way you will not leave any compressed air inside the gun. Then take the spear or a blunt ended rod of similar diameter and push the piston back so that it just disappears into the inner barrel and leaves a clear view through the muzzle's relief ports. Using a metal rod, or a screwdriver that is a reasonably close fit in the relief ports, pass it through opposing relief ports to provide a handle whereby you can unscrew the muzzle by hanging onto each end of the rod or screwdriver (round shaft Phillips head type, not a blade tip screwdriver). Sitting down on a chair you can trap the grip handle between your feet as you apply a twisting torque to undo the muzzle while holding the gun vertical between your knees. Generally the muzzle will come off easily after only a few turns, so you can unscrew it the rest of the way with your fingers. Put some fresh grease on the exposed muzzle threads and then screw the muzzle back on. When the muzzle contacts the nose cone, you will feel the muzzle stop turning, back the muzzle off a number of turns to leave a gap. Now take the gun's handpump and screw it into the rear of the gun. With the muzzle pointed downwards and resting on a rubber surface like an old thong (the "flip-flop" footwear type) begin pumping using slow strokes and watch the muzzle nose cone. A small amount of air pressure in the gun will cause the nose cone to slide down the inner barrel tube and out of the tank, the reason that you only unscrewed the muzzle by three or four turns was to make sure that the nose cone did not come right out of the tank or you would have oil everywhere, plus you want the piston to stay in the inner barrel bore without the piston seals emerging for the exact same reason.
Now remove the handpump and release any air from the gun as before, there will be very little pressure with only a small number of pump strokes. Unscrew the muzzle and remove it, then twist and pull the nose cone and slide it up over the inner barrel threads. You will find that the "O" ring on the inner barrel tube has chased the nose cone part way up the inner barrel threads, that is why you greased them earlier. Make sure that the nose cone has its outer "O" ring, sometimes it falls off and will be inside the tank, in which case you will need to retrieve it later. Pull the piston out of the inner barrel and up end the gun over a clean container like a glass screw top pickle jar to collect the oil. Leave it for a while to fully drain the oil out of the gun, then return the gun to the barrel up position and screw the muzzle back on to about half distance on the screw threads. Now hold the gun by the front of the tank in one hand and strike the muzzle nose with a soft faced hammer (preferably a nylon faced, double sided hammer like a "Thor", that is what I use). A few good hits and the barrel and handle will drop out of the tank tube, make sure that it does not have too far to fall and then the rear of the muzzle will not hit the front end of the tank. I hold the gun just clear of the floor with a rubber thong directly underneath the grip for the back of the handle to fall down onto, that way there will be no damage to anything. Unscrew the muzzle, put it to one side and carefully lift the tank clear of the inner barrel and place the tank on a level table or bench surface with something resting against the tank to stop it rolling off and falling onto the floor. Modern speargun tanks are light and roll very easily!
Find somewhere clean to place the very oily inner barrel, power regular block and rear handle assembly. Now you can see all the inner "works" and can carry out whatever you had to do which required getting inside the gun. A large plastic laundry bucket makes a good container to sit the dismantled gun in, you can buy inexpensive ones and just use them for your speargun work, that way it will offer a clean container which is easily washed out afterwards to remove any oil. If you cap the glass jar then you can re-use the oil poured out of the gun, especially if it is very clean and has no obvious contamination.
If you want the tank tube to line up in the same position as before with respect to rotation on the gun (for sticker alignment) then mark the front sight position on the nose cone end of the tank tube with some adhesive tape and do the same for the rear end adjacent to the rear sights on top of the grip handle. Putting the gun together push the tank on with the rear end correctly lined up as it is often hard to twist the tank around afterwards due to the two or three main body "O" rings at that end of the gun. It is a different story with the nose cone as once pushed on you can line it up by twisting it. Remember to tip the oil back into the gun before replacing the nose cone, then screw the muzzle back on and you are ready to re-pressurize the gun.
Use clean newspaper to make a temporary work surface (floor and bench top) that will catch any spilt oil and have some cloth rags for wiping parts clean, cotton garments that have worn out make good rags as they are lint free as they have lost most of their surface fuzz, hence are as the saying goes, "threadbare". Do the work where you will not have any dust or dirt blowing around as the oily parts attract such things like a magnet and then you will have to wipe everything clean of any oil before reassembling the gun. With pneumatic speargun maintenance cleanliness is everything as seals are unforgiving of contaminants getting between them and the seating surfaces they sit on or abut against.
Last edited: