
Hello everyone after reading and re reading many forum posts on gun builds I have decided to finally upload an ongoing build I am currently working on.
All my gun builds start with a computer model. I go through many many many iterations to come up with something that I like and find worthy of building. During the computer process im looking at what im building (this one is a inverted roller with rear roller) and how i can make it. Everything is scrutinized and re imagined to work with a 3d printed optimized for a carbon fiber process.
All those little lines are different versions of spearguns i go through to create a final design. This is only 1 file of many.

With a design chosen i can mock up bands, rollers, handle, screw holes, trigger, muzzle, line guides and anything that need some thought before actual building begins.

With the design finalized i can finally make some physical stuff.
First is the mould for the body, because my 3d printer is not 1200mm long i have to chop the mould up into several bits and join them post printing i had the brilliant idea of adding a location hole for a wooden dowel to be inserted into but later found out this would be to difficult to pull off as the dowel was not consistent size, a bit bendy and glue would all get pushed off when inserting into the hole.


so I decided to place them all in a line and epoxy them together.
For people following along 3d printed in PLA .6 nozzle, .3 layer height, enclosure (important) a lot of time took almost a week to print it all!
POST PROCESSING is written in caps as it is literally the most most most i repeat most important part when it comes to a carbon fiber mould (in my opinion)
First glue all the pieces together mine was done on top of two shafts to keep the with the spearfishing theme and they seemed pretty straight.
After the epoxy is dry (24 hours no excuses) the plastic is sanded with 40 grit to take of high spots, imperfections and better adhesion to epoxy top coat.
Epoxy is then applied with a black die so when i sand it back i dont go to deep into the plastic. This epoxy coating is used to help demould the carbon from the mould if this epoxy coating is not there the carbon will stick to the mould and you will have to destroy the mould (ask me how i know).
Next is wax, i use a my hands with glove to apply the wax leave it on for 10 mins then buff it off do this 5 times or you will have problems (with me)
I also applied PVA (not the glue) for this first use but for my next builds i can just use wax.
Weight each mould so you know exactly how much carbon to epoxy ratio you will use


Carbon Fiber, please wear a mask
For the people who are interested in the process i am doing a WCM (wet compression moulding) process this process is usually reserved for high pressure high heat steel moulds but i have plastic some clamps and a dream.
Carbon used 200 gsm twill 300 gsm uni directional.
The layup is different for the top skin and bottom, because this is an inverted roller most of the bending forces are applied to the top skin thus more carbon for the top.
layup for top is twill x4 uni x1 twill x1 uni x1 twill x2
layup for top is twill x3 uni x1 twill x1 uni x1 twill x1
I also add local reinforcement layers to trigger area, bolting areas and muzzle.
The carbon is layered on using spray adhesive and pressed into all the corners for each layer.
I compress each layer with the male mould to compress and also test that im still able to push the fibers without messing up the side walls.
The last layer of twill i try to keep a good amount of over hang as this allows the side wall to not be squished from the male mould pressing down.
Now its time for epoxy if you remembered to weigh your mould after the post processing stage you can get the perfect 50 50 ratio of carbon to resin, I like to do 60 resin 40 carbon as spearguns dont have to be that light weight and need good compression strength (epoxy).
I recommend not using west but a good carbon fiber laminating resin as west can be to thick. Pour the resin in small amount at a time and press the resin into all the corners with a brush. No photos as resin laminating is stressful af.
After the resin has fully saturated the carbon slap your male mould on and clamp it up!


after 24 hours because of all that beautiful post processing your mould will pop off with with minimal effort.
trim it up (wear protection please)
and see if the skins fit together.

i am currently up to this stage of the gun and will post periodic updates as i go!
if you have any questions please ask and ill try answer to the best of my knowledge!
All my gun builds start with a computer model. I go through many many many iterations to come up with something that I like and find worthy of building. During the computer process im looking at what im building (this one is a inverted roller with rear roller) and how i can make it. Everything is scrutinized and re imagined to work with a 3d printed optimized for a carbon fiber process.
All those little lines are different versions of spearguns i go through to create a final design. This is only 1 file of many.

With a design chosen i can mock up bands, rollers, handle, screw holes, trigger, muzzle, line guides and anything that need some thought before actual building begins.

With the design finalized i can finally make some physical stuff.
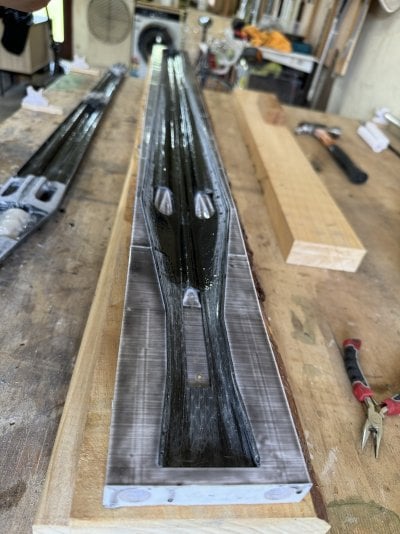
First is the mould for the body, because my 3d printer is not 1200mm long i have to chop the mould up into several bits and join them post printing i had the brilliant idea of adding a location hole for a wooden dowel to be inserted into but later found out this would be to difficult to pull off as the dowel was not consistent size, a bit bendy and glue would all get pushed off when inserting into the hole.


so I decided to place them all in a line and epoxy them together.
For people following along 3d printed in PLA .6 nozzle, .3 layer height, enclosure (important) a lot of time took almost a week to print it all!
POST PROCESSING is written in caps as it is literally the most most most i repeat most important part when it comes to a carbon fiber mould (in my opinion)
First glue all the pieces together mine was done on top of two shafts to keep the with the spearfishing theme and they seemed pretty straight.
After the epoxy is dry (24 hours no excuses) the plastic is sanded with 40 grit to take of high spots, imperfections and better adhesion to epoxy top coat.
Epoxy is then applied with a black die so when i sand it back i dont go to deep into the plastic. This epoxy coating is used to help demould the carbon from the mould if this epoxy coating is not there the carbon will stick to the mould and you will have to destroy the mould (ask me how i know).
Next is wax, i use a my hands with glove to apply the wax leave it on for 10 mins then buff it off do this 5 times or you will have problems (with me)
I also applied PVA (not the glue) for this first use but for my next builds i can just use wax.
Weight each mould so you know exactly how much carbon to epoxy ratio you will use


Carbon Fiber, please wear a mask
For the people who are interested in the process i am doing a WCM (wet compression moulding) process this process is usually reserved for high pressure high heat steel moulds but i have plastic some clamps and a dream.
Carbon used 200 gsm twill 300 gsm uni directional.
The layup is different for the top skin and bottom, because this is an inverted roller most of the bending forces are applied to the top skin thus more carbon for the top.
layup for top is twill x4 uni x1 twill x1 uni x1 twill x2
layup for top is twill x3 uni x1 twill x1 uni x1 twill x1
I also add local reinforcement layers to trigger area, bolting areas and muzzle.
The carbon is layered on using spray adhesive and pressed into all the corners for each layer.
I compress each layer with the male mould to compress and also test that im still able to push the fibers without messing up the side walls.
The last layer of twill i try to keep a good amount of over hang as this allows the side wall to not be squished from the male mould pressing down.
Now its time for epoxy if you remembered to weigh your mould after the post processing stage you can get the perfect 50 50 ratio of carbon to resin, I like to do 60 resin 40 carbon as spearguns dont have to be that light weight and need good compression strength (epoxy).
I recommend not using west but a good carbon fiber laminating resin as west can be to thick. Pour the resin in small amount at a time and press the resin into all the corners with a brush. No photos as resin laminating is stressful af.
After the resin has fully saturated the carbon slap your male mould on and clamp it up!


after 24 hours because of all that beautiful post processing your mould will pop off with with minimal effort.
trim it up (wear protection please)
and see if the skins fit together.

i am currently up to this stage of the gun and will post periodic updates as i go!
if you have any questions please ask and ill try answer to the best of my knowledge!


.jpg")


