• Welcome to the DeeperBlue.com Forums, the largest online community dedicated to Freediving, Scuba Diving and Spearfishing. To gain full access to the DeeperBlue.com Forums you must register for a free account. As a registered member you will be able to:

    • Join over 44,280+ fellow diving enthusiasts from around the world on this forum
    • Participate in and browse from over 516,210+ posts.
    • Communicate privately with other divers from around the world.
    • Post your own photos or view from 7,441+ user submitted images.
    • All this and much more...

    You can gain access to all this absolutely free when you register for an account, so sign up today!

GeckoSub Mirage Evo - And Adventures in 3D Printing Speargun Parts

Thread Status: Hello , There was no answer in this thread for more than 60 days.
It can take a long time to get an up-to-date response or contact with relevant users.
I just did a "quick and dirty" diagram to see how the "Saetta"View attachment 52369 handle would fit.

I think the Saetta handle could be a very good option - but would need to confirm how large the offset really is. I think I know someone I can ask, just for the sake of knowing. As mentioned, when I tried to measure it on the drawing, I got a 4-4.5mm value which is very, very close to the Mirage. And it should give you that extra bit of space to beef up the thin walls.
I don't particularly like the line release but if that white grip is detachable, I think it would be easy to modify the grip of that handle, too if so inclined.
 
Last edited:
Connector Bushing for Pumping Barrel - V1 (Non-functional Draft)
On the original Mirage power regulator bulkhead, there's a small peg at the front that the pumping barrel slides onto.
YIQOpQJ.jpg


I could quite easily design that feature into my new bulkhead but printing it would be another matter actually printing it as there are some limitations to how a 3D printer can actually print. First of all, you can't print in free air and if you want to print without a lot of "supports" you need to orient the part so there's a flat facing the build plate.
In reg. to a bulkhead, that flat would be the front face of the bulkhead and if there's a protruding peg there, it complicates things a bit.

So, for now, I think I will just drop the peg and make a bushing that inserts into both the bulkhead and the pumping barrel. It can be done fairly simple, actually. And it helps there's plenty of space in that part of the bulkhead since the bushing can be made smaller in OD than the barrel. If inserting the barrel itself into the bulkhead, you run into exactly the same issues as at the nose cone where you are running of side wall thickness fast. It might be doable but doing it with a bushing seems a safer way for now.

Here's a first sketch of what I will be doing:
5OnfTda.jpg


I need to work on the bottom of the one-way valve a bit as in this first version, that o-ring will get squished pretty badly very fast. I need to use a smaller o-ring and add a recess which the o-ring sits in. That way, when the ball presses onto the o-ring the edges of the recess will stop the ball from traveling too deep into the o-ring. Too much travel and you reduce the life of the o-ring, too little and you wont get a seal.

If you have to 3D print the bulkhead boss separately then why not just glue it into the bulkhead?
 
  • Like
Reactions: Diving Gecko
I think the Saetta handle could be a very good option - but would need to confirm how large the offset really is. I think I know someone I can ask, just for the sake of knowing. As mentioned, when I tried to measure it off the drawing, I got a 4-4.5mm value which is very, very close to the Mirage. And it should give you that extra bit of space to beef up the thin walls.
I don't particularly like the line release but if that white grip is detachable, I think it would be easy to modify the grip of that handle, too if so inclined.
I think that the "Cyrano" handle is your best option, but the "Saetta" could be a back-up option. I also don't like the "Saetta" handle either for that matter.
 
  • Like
Reactions: Diving Gecko
An Early Stab at A Bulkhead - Proto V1 (Non-functional)
I spent a bit more time calibrating the printer and a 40x40mm test piece printed at 40.03 x 40.03mm...! So, I feel like I have gotten the printer dialled in well enough that I can start printing real parts:)

I designed a bulkhead just to check the measurements and see how they correlate with the final part, which is being printed right now. No outer o-rings for now and there's a few other features missing. BTW, I don't think I will bother at all with an over pressure relief valve.

Here are some screen grabs from the CAD work:
gpP8aIV.jpg


From the CAD program (I use the amazing and free Fusion 360) you export an STL file which is then imported into the slicer of your choice (slicer is the 3D printing world's word for the CAM program which outputs G-code to run the printer). I am in between Cura and Simplify 3D, but here is a pic of how it looks when you drop your part into Cura:
b3OhfNk.jpg


Now, there are some really nifty features in these slicers. For example the option to look at each layer and how the "bead" is laid down. You can actually turn on a feature to see exactly how the extruder head moves. This is cool since it allows me to see exactly how it forms the inner walls and o-ring seats that need to be as smooth as possible.
That said, in this screen shot, that feature is turned off, but you can see how the layers are built and how many layers of bead a given wall is made up of:
lDNLILx.jpg


You can also check the travels in free air of the print head. This relates to "retractions" which is a term used to describe when the printer has to leave a spot, stop printing and then move somewhere else to resume printing. The problem is that it's very hard to avoid slight amounts of filament oozing out of the nozzle during these travel moves, so it's interesting to see how exactly they are being done.
E.g. in the pic to the left, the printer actually stays away from any outer perimeters during the blue travel moves, so even if there's a bit of oozing it shouldn't end up on the walls of an o-ring bore. To the right, the printer chooses the shortest route but in that area, it's actually OK:
540t5yz.jpg


And finally a snap of the part being printed:
cT6ruxi.jpg
 
Last edited:
  • Like
Reactions: tromic
If you have to 3D print the bulkhead boss separately then why not just glue it into the bulkhead?
Oh, will edit the post about that part - I think I will turn it on the lathe in brass:). That way, I can control all the tolerances and finish a whole lot better. One less thing to worry about.
 
Can you machine that 3D printing stuff, say as in cutting the outer "O" ring grooves later in a lathe. I realize that you can print the necessary grooves in later editions, but maybe for some quick trials you could still use these blank outer versions without discarding them. Is the stuff porous, or does it need sealing, say with a thin coat of paint or lacquer?
 
  • Like
Reactions: Diving Gecko
Well I am back to my old self once I directed the password recovery email to another email address. Evidently popgun pete R and myself having the same email address was too much for their system!
 
  • Like
Reactions: Diving Gecko
Can you machine that 3D printing stuff, say as in cutting the outer "O" ring grooves later in a lathe. I realize that you can print the necessary grooves in later editions, but maybe for some quick trials you could still use these blank outer versions without discarding them. Is the stuff porous, or does it need sealing, say with a thin coat of paint or lacquer?

Stay tuned. Good news on that front;-)


Sent from my iPhone using Tapatalk
 
I'll elaborate on this a lot more later, but just a teaser and I'm really pleasantly surprised about this!
2c876f08fe7350a824db6b2055bc582d.jpg


Sent from my iPhone using Tapatalk
 
I'll elaborate on this a lot more later, but just a teaser and I'm really pleasantly surprised about this!
2c876f08fe7350a824db6b2055bc582d.jpg


Sent from my iPhone using Tapatalk
It seems to machine up OK judging by the surface. Maybe stick it in some light oil and see if the stuff slurps it up. I don't think it will, but the stuff may have micropores like a microscopic honeycomb. If so a sealant like epoxy may fill it up on the surface. Does it glue with solvents and will epoxy stick to it?
 
An Early Stab at A Bulkhead - Proto V1, Continued...
Just a few posts above, you saw the CAD drawings of the bulkhead and the printer at work.
One hour and fifty minutes later, it was done:
VSNa1WK.jpg


in this next pic you can clearly see the layer lines:
Mg0r12o.jpg

The harsh lighting exaggerates it a bit but even though each of these layers are only 0.2mm tall, you still notice them. I actually think that as long as they are in the same direction as an o-ring you could still obtain a good seal.

But did it even fit on the gun?
Hell yeah, haha!
Vp04FGo.jpg

GZKT0vB.jpg

E5eximF.jpg


The Cyrano bulkhead sort of sleeves over the front of the handle and that "lip" is a little too thick in my printed part. If I reduce the diameter by 0.15mm it should be spot on. But the dimensions of the bores seem good.

And what about the outer dimensions, you ask?
Yup, fits as a foot in a sock (as the Danes say...):
wVNST7R.jpg

FT0Kcbh.jpg

BTW, Blue... Really Mares, blue...?:(. That grip will never see the ocean in my hands. And the angle is horrendous, too. Somewhere in between a Mirage handle and a Sten handle. If you get used to it - good. But for instinctive shooting it wont work for me.

And here's a funky brand conflict:
Z1ICFNh.jpg

Yup, a Salvimar reservoir on the Mares handle. Why? Well, one reason is that Salvimar actually sell their spare parts at really reasonable prices.

BUT the main reason is this - drum roll....:
R2acO2t.jpg


Kapow! This is the longest reservoir you can get off-the-shelf. Mares doesn't even make a gun that long anymore. And though I can't recall the precise numbers right now, a Salvi 130 is longer than a Mares 130 would be. I think something to the tune of it being a 137, if it was a Mares;-).
There's a doggie waiting somewhere in Indonesia for an 8-8.5mm shaft from a gun like this some day. At least I hope so, haha.
 
Last edited:
Machining Printed Parts
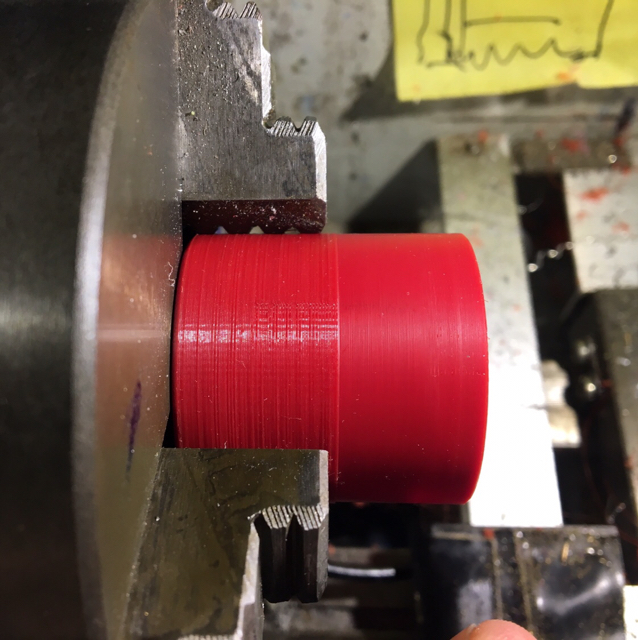
Pete asked if I could possibly machine these parts given that I have a lathe. And I was one very, very tiny step ahead of him as when he asked, I had just pulled the part off of the lathe;-).
I wasn't actually too hopeful on this matter as some weeks back, I had tried to clean up an o-ring groove on the very first grey nose cones which I showed earlier in this thread. They were made from a material which is supposedly a bit stronger and has better heat resistance but I couldn't get a good finish on it on the lathe. It was a bit too gummy and it seemed to melt more than cut.

So, given that the red material is supposed to have a lower melting point I didn't have high hopes. But it machines so much nicer than the grey nose cones did:
N3TGEyy.jpg


I cut this really slow, with a brand new, very sharp cutting insert and used a bit of WD-40 and I have to say this surface was far beyond my hopes. It is more than smooth enough for a good seal, I think.
As for why the material machines better, I think it is because it is actually stiffer - as in a bit more brittle. Whereas the other might be stronger because it is tougher and perhaps a bit more ductile (in case anyone wonders, the red material is PLA+ from Esun and the grey is a PETG but can't recall the manufacturer).

I faced it off, too and though the pic doesn't show it that well, it turned out quite OK, too:
K8qPx2F.jpg


I don't think I need to do more on these, as in coating them. When I cut them down, I felt I could actually see that the layers have bonded really well. The "separation" that you see in the earlier images is just the bulging edges of each layer (think about stacking sausages or the Michelin Man). Once I cut those bulges off, the plastic seemed to really have fused. Not porous, not about to split at all. I have tried my best with both hands to crush or crack this part - no dice!

Now, I don't think I will cut the full outer o-ring grooves this way (I still think deep cuts are risky in terms of heating the plastic and making it gummy) but there's another option. I could design all the features like the outer and inner o-ring grooves and bores a few 1/10s of a mm undersized and then put the part on the lathe afterwards to take it to final dimensions and a smoother finish. Since I have an independent four-jaw chuck for the lathe I can do all the off-centered bores, too. That, I think, is actually a very viable method.
 
Last edited:
Good, you can now clean up parts from the 3D printer and obtain the smooth finish required when parts need sealing, particularly the transfer port bore hole.
 
  • Like
Reactions: Diving Gecko
Bulkhead - Proto V2
I drew up the next iteration of the bulkhead - largely based on the stock Cyrano 1.3 bulkhead and there are some funky solutions I haven't seen elsewhere.

Here's how my version looks, but the Mares one is very similar:
dzPccMi.jpg


What I found strange when I first saw the Mares bulkhead is how the o-ring groove is at the front of the main body of the bulkhead. It's like Mares extended a lip forward pretty much only to have a place to put the o-ring groove. After having looked at the design and dimensions for a while, I think I know why. Since Mares made the air transfer bore (the one the power regulator bushing sits in) bigger in the Cyrano Evo I think they ran out of wall thickness between that bore and the bottom of the o-ring groove. So, they had to move the groove. They could possibly have moved it backwards where there's only the ø4mm rod of the power regular to contend with. But the groove needs to not get in the way of the bushing when it is being moved backwards as when the regualror is in the full power position. So, the groove would have to sit all the way at the back, but there - when the power regulator bushing is at its most rearward position - there's almost not enough space between the rear of the bushing and the front of the handle.
So, I think Mares moved it to the front out of necessity.

A handy side effect, if I am not mistaken is that there are less forces acting on the o-ring groove now (I think). The groove is now exposed to the pressure in the front part of the reservoir on both the inner and outer faces of the groove. As far as I can tell, there shouldn't be any force trying to push the outer walls of the groove inwards like there would be if it had the sometimes lower pressure of the rear part of the reservoir on its inside.
Anyways, let's move on;-)

I have mentioned that you can't really 3D print in free air - each layer should ideally be supported by the layer below it. But this new design violates that rule. This is why you sometimes have to use "supports". These are pillars that gets printed to support the parts of the print that would otherwise have to be printed in free air.
You see the wavy supports here:
rPmzxs2.jpg

(the part was printed with this face down on the build plate)

They should snap right out if pulled with pliers or otherwise helped along, but the surface on that first layer after supports aren't really something to write home about (perhaps I can dial in things a bit better in the printer slicer, though):
Sk0qPpE.jpg


It doesn't really matter in this area of the print, and 1-2 layers deeper, the plastic is well fused again.

The part fits really well as I adjusted a few other dimensions by 1/10mm or so:
BkxqTZ6.jpg


I then took it over the lathe to see how well I could clean up those inner bores. This is the first time I really used an independent four-jaw chuck but I bought it for exactly this application in mind. First up is the bore for the shooting barrel:
hsVSgPe.jpg


I used a boring bar and the same super sharp inserts as earlier. I think they are made for cutting alu. It cleaned up really nicely.
For the smaller bores I will be using reamers and I did a quick test on the bore for the pumping barrel bushing - it worked fine, too:
uABcyrl.jpg


I didn't do the air transfer port as this was just to see if I could make this work and I think I can.

While I had printed one o-ring groove, I gave it a skim cut and then tried to cut one to full depth from "virgin" material. I was worried it wouldn't work, but it it did. So, as Pete suggested earlier, I might not even have to print the grooves. Though I think I will print them partially, at least to know where they should be placed when I turn them to depth on the lathe later.
The pic doesn't do a good job at showing the difference, but basically there is none (front one; printed + skim cut. Rear one; fully cut on the lathe):
YQ242Cr.jpg
 
Last edited:
If allowed by the administration, I can give a link to the topic on 3D printing.
I opened it, because I really liked the idea.
For the needs of underwater hunting and weapons print on the printer.
But for today I have refused it.
Because it turns out either bad or too expensive.
 
I think the "O" ring positioning at the front of the partitioning bulkhead is more about assembling the gun at the factory. They drop the tank over the pre-assembled rear grip section and bulkhead and main barrel and the first thing is to wiggle the tank over the leading "O" ring, which is the bulkhead "O" ring. Then they push the tank on further until they hit the next body "O" ring. Thus the length of bulkhead helps line up the tank for that next "O" ring, as the bulkhead OD was a snug fit in the tank bore.

I have only seen it in drawings, but that "variator" used in the "Cyrano Evo" which moves on a spring on the control shaft may require some design changes compared to a fixed plug. Until someone photographs the gun's innards I only have that Mares 3D animation to go by.
 
Last edited:
Good work is shown!
But why a printer?
You just need to take the POM and make this detail!
 
If allowed by the administration, I can give a link to the topic on 3D printing.
I opened it, because I really liked the idea.
For the needs of underwater hunting and weapons print on the printer.
But for today I have refused it.
Because it turns out either bad or too expensive.

I know there is a guy on spearboard.com who printed 1-2 functional guns. It wasn't cheap. But there is a way - and I think someone will do it soon - to make cheaper, cool guns incorporating this technology: You could just print the shell of a gun (bandgun) and then cover it in carbon fiber. If I was into band guns, this is what I would be using my printer for these days.
As for price. For the parts I have made so far in this thread, including all the ones for calibration and the early silver parts, I have probably spent less than USD 10...!;-)
 
I think the "O" ring positioning at the front of the partitioning bulkhead is more about assembling the gun at the factory. They drop the tank over the pre-assembled rear grip section and bulkhead and main barrel and the first thing is to wiggle the tank over the leading "O" ring, which is the bulkhead "O" ring. Then they push the tank on further until they hit the next body "O" ring. Thus the length of bulkhead helps line up the tank for that next "O" ring, as the bulkhead OD was a snug fit in the tank bore.

[EDIT]
Haha, I guess you can disregard this post. I was wrong and it seems even the Sten guns have the o-ring forward on a lip like that;-). I only have one Sten but it's not with me now and haven't looked at it for years but I have been looking at the age-old Mirage bulkheads for too long...

But I will leave the original post up. Here it is:

Could be but I am not sure. They have been assemblying guns for 40 years with the o-ring in the usual place without problems;-).

I just had a quick look in the CAD to check this.

In the Cyrano bulkhead the groove sits about here:
zmuOF7F.jpg


But remember, Mares enlarged the air transfer bore a few years ago. If they had kept the o-ring groove next to it, in the normal way, this is how it would have looked:
9gBjvDB.jpg


Not a healthy tolerance...:
a1kjX51.jpg
 
Last edited:
What I found strange when I first saw the Mares bulkhead is how the o-ring groove is at the front of the main body of the bulkhead.

Are not the partitioning bulkhead body "O" ring always positioned at the front of the bulkheads rather than at the rear?
 
  • Like
Reactions: Diving Gecko
DeeperBlue.com - The Worlds Largest Community Dedicated To Freediving, Scuba Diving and Spearfishing

ABOUT US

ISSN 1469-865X | Copyright © 1996 - 2024 deeperblue.net limited.

DeeperBlue.com is the World's Largest Community dedicated to Freediving, Scuba Diving, Ocean Advocacy and Diving Travel.

We've been dedicated to bringing you the freshest news, features and discussions from around the underwater world since 1996.

ADVERT