• Welcome to the DeeperBlue.com Forums, the largest online community dedicated to Freediving, Scuba Diving and Spearfishing. To gain full access to the DeeperBlue.com Forums you must register for a free account. As a registered member you will be able to:

    • Join over 44,280+ fellow diving enthusiasts from around the world on this forum
    • Participate in and browse from over 516,210+ posts.
    • Communicate privately with other divers from around the world.
    • Post your own photos or view from 7,441+ user submitted images.
    • All this and much more...

    You can gain access to all this absolutely free when you register for an account, so sign up today!

Nemrod Mid-Handle Classic Layout Pneumatic Spearguns

Thread Status: Hello , There was no answer in this thread for more than 60 days.
It can take a long time to get an up-to-date response or contact with relevant users.
Hi Pete

Many thanks for your detailed reply... while I'm inclined to agree with you about leaving certain vintage parts complete (I also restore old pressure kero lanterns and stoves) but in this case all the seals are shot and there was some rust on internal metal parts that needed attention. So a total strip, clean and rebuild is required.

The hot water technique certainly helped but still did not free things up till I used a butane torch applied very sparingly to heat it above 100C then quickly applied a mix of acetone and light oil to try and seep into the join between the outside of the cylindrical barrel and seal carrier block. I was creful to not get any of this mix onto the plastic handle. In the end this worked in conjunction with a couple of sharp taps from behind using a wooden rod fed up inside the cylinder... the o-ring had become dry and welded itself to the cylinder, but luckily no white corrosion like I was expecting. All good so far...

However I have now struck a new problem... I cannot remove the trigger rod from the sear block after removing the axis rod, return spring and seat. No amount of jiggling and repostioning the sear in the barrel will let the hooked end of the trigger rod unhook.

Stumped...
Is there a special technique involved?!
 
The pull rod screws into a sliding block that you can see in my photos of that gun. The plastic trigger has a metal peg on top that fits into a slot cut in that block which engages it in order to pull the trigger rod forwards when your finger pulls the plastic trigger. Trigger adjustment is achieved by varying the number of turns of the rod (relative to the block) until the catch (sear tooth) releases at the amount of trigger pull you wish to apply. Has that sliding block come out? From memory it has a screw driver slot accessed from a channel in the front of the handle just below the barrel which you can use to adjust the trigger externally by rotating the block after first removing the trigger to withdraw the peg from the slot in the block.

Guns that have had water inside them that has contaminated the oil can have spots of corrosion which make parts very difficult to extract, however if you use a penetrating type of oil this will weaken the deposits. Unfortunately aluminium oxide is hard to budge and any chemical that will remove it will also remove the anodizing.
 
Yes the trigger connector block has been removed as well as the trigger and pivot pin.

The pull rod now moves freely as does the sear block (after the pivot pin was removed... there is come corrosion present but not enough to prevent its removal. Just seems the pull rod can't be moved far enough rearward to clear the handle so the hooked end can be swung clear of the sear block. Equally, the sear block can't move far enough rearward in the barrel cutout.

The barrel and handle are co-moulded and form one part according to the Nemrod exploded view... so the barrel can't be slid further to allow more clearance either.
 
I just had a thought... the cranked end of the trigger rod is cut off parallel to the axis of the rod, not at right angles to the rod.
This could mean the end of the rod is actually bent over and trimmed off after passing through the sear block to hold it captive without an E-clip or lock nut?
Nemrod Clipper Barrel LHS.jpg


Nemrod Clipper Barrel Bottom.jpg
 
No, the end is pre-bent to form the hook and should just pull free by pivoting it to disengage from the sear lever. So there is something else still holding the pull rod from moving right out. My similar gun shown on the first page was simple to pull apart and I did not have to bend anything to dismantle it. The pull rod should move either way freely, but of course can only be removed by pulling rearwards due to the hook. These guns were designed to be assembled very quickly with a minimum of parts, hence if there are any hidden fasteners then they may be a user fix for something they had damaged, but I doubt it.

Maybe you can manipulate the sear lever in its slots by tilting it enough to spring the hook free with the bottom of the sear lever biased forwards to move it away from the tip of the hook. I did the dismantling job so long ago I have forgotten the details, but with the sear pivot pin removed the sear lever is able to be slid around and change its attitude with respect to the barrel.
 
Last edited:
OK quick update...
I recently bought another Clipper 1, and started to strip this one down too... a glutton for punishment you might say, but this has been bugging me for a while!
All went well, no stuck o-rings this time and the trigger connector rod was able to be easily disconnected with a little jiggling once the sear pivot pin and spring were removed. The original Clipper II is still resisting all attempts at disassembling yet seems to be identical to this Clipper 1 which only took a few minutes... no evidence of Bubba-fixes or non-factory parts.

So now I am in the process of reverse engineering the o-rings, piston and sear... I'm determined to get these both running again.

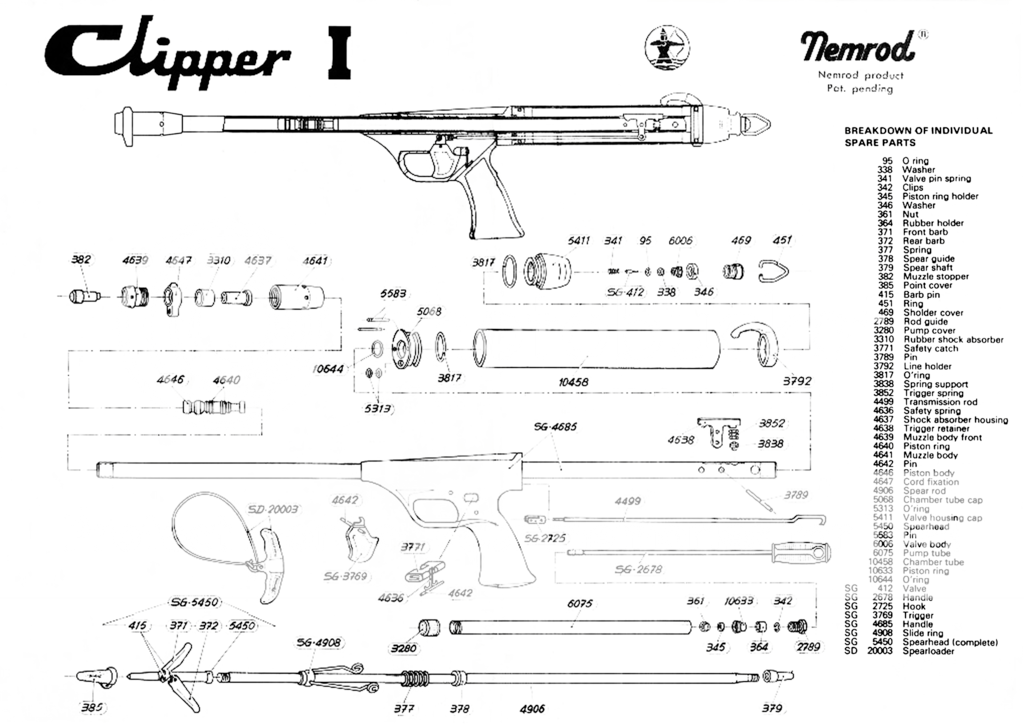
I have downloaded a copy of a Clipper 1 exploded view, very useful but I'm keen to know of any more information that may be out there?
http://nemrod77.jimdo.com/fotos-de-...iento-y-despiece-de-fusiles/nemrod-clipper-i/
 
  • Like
Reactions: Diving Gecko
I spent some time in Photoshop cleaning up the Nemrod Clipper 1 file, adding the Parts List off another page and combining into a printable A4 size page... also attached as a PDF.

Hope this is useful to Deeper Blue Forum members!


Attachments

  • Nemrod Clipper 1 Exploded View and Parts List A4.pdf
    789.5 KB · Views: 408
  • Like
Reactions: Diving Gecko
I have had a request for info on the Nemrod "Galeon" pneumatic gun series, so here we go:

The Nemrod “Galeon” was the mid-handle model that came immediately after the Silver Series concentric, full length tank models, in fact it was sold alongside them and incorporated many of the same parts and had a similar grip handle except for its upper bracket where it joined onto the mid-body section that connected the front barrel tube with the now larger diameter rear tank. The “Galeon” was a nice looking gun with contrasting moulded parts of black and grey combining with the traditional Nemrod electric blue anodizing. Unfortunately its good looks saw it turned into a ray gun prop in the “Star Wars” movies and many have since succumbed to being transformed into duplicates of those sci-fi weapons that enthusiastic fans saw on the big screen.

I am attaching the parts diagram for the “Galeon I” and you can see that it follows much the same internal arrangement as the preceding Nemrod models and has a relatively large number of sub-sections which were soon to be dispensed with when Nemrod introduced the “Clipper” with everything greatly simplified, yet performing exactly the same service.

The composite piston is the same as the Silver Series piston. Nemrod never intended the end user to dismantle it, but if the peened over end on the extreme tail was ground or machined away then you could dismantle the piston. The two ribbed cone rubber seals work like rubber packing pieces and are squeezed between metal end caps to cram down onto the piston's metal spine and create a seal there. No doubt spare rubber piston seals can be found behind a bin marked "hen's teeth"!! I have never tried, but maybe a letter to Metzler, if they are still in business, may provide a lead as in later years "Nemrod-Seamless Rubber" was "Nemrod-Metzler".
Nemrod Galeon I parts diagram R.jpg
Nemrod Galeon I parts list R.gif

My thanks to Mel Brown, AUF (now USFA) historian, for the supply of these rare documents.
 
Last edited:
That's great thanks Pete... very interesting to see how the Nemrod pneumatic speargun design matured and progressed to the Clipper.

While they did change the piston and seals from a multi-piece crimped non-serviceable factory piston assembly in the Galeon to user-changeable seals on a one-piece machined piston in the Clipper it would seem not ALL of the new design philosophy transferred to the new gun. Some parts are still not designed to be user serviceable.

I now have three Nemrod Clippers... two II's and a I.
On one of the II's I was able to remove 4499 Transmission Rod easily (with a little jiggling once the pivot pin was removed) and remove 4638 Trigger Retainer from the hooked end of the rod... the other two guns resolutely refused to co-operate despite being stripped to exactly the same level.

These guns have obviously not been tampered with, the orange handled clear anodised barrel one was full of oil and almost new inside, no rust or blemishes or tool marks. The end of the rod has definitely been bent over after assembly, then trimmed off parallel to the axis. This would explain anecdotal stories of Clippers requiring special tools to service the other seals... that 3mm stainless rod would require some effort to bend straight enough to clear the pivot hole in 4638.

I looked more closely at the one I could disassemble... it was obvious a previous owner had simply levered it away from 4638 then altered the angle and trimmed off the end.

Nemrod Clipper Trigger Rods compared.png

This explains a LOT...
 
That's great thanks Pete... very interesting to see how the Nemrod pneumatic speargun design matured and progressed to the Clipper.

While they did change the piston and seals from a multi-piece crimped non-serviceable factory piston assembly in the Galeon to user-changeable seals on a one-piece machined piston in the Clipper it would seem not ALL of the new design philosophy transferred to the new gun. Some parts are still not designed to be user serviceable.
-----------------------------

This explains a LOT...

Back in the day the manufacturers wanted to control the servicing of their pneumatic spearguns, but often the guys in their distribution network did not want the job, they just wanted to sell you another gun if they could do so. Also reusing parts from earlier models kept manufacturing costs down, but against that was the labour involved in assembling them and simpler constructions were always sought, such as one-piece pistons replacing a piston of half a dozen small parts. If you look at early pneumatic guns from other manufacturers then you will see that they often took a lead from each other and a number of guns originally had a piston built-up from small pieces installed on a separate metal spine, e.g. the Technisub "Jaguar", but they all soon looked for something simpler to make.

The main impetus was to produce guns that were less costly to manufacture and that could be assembled quickly by ordinary production line workers rather than by skilled workers who in a sense were "gunsmiths" who had to tweak every weapon for it to work properly. Once that was done then they could churn them out to meet growing demand at what were becoming more affordable prices. Bear in mind that for decades a pneumatic speargun was twice as expensive as a band gun that performed a similar job, and sometimes even more for the elaborate versions with surcompressors (e.g. Nemrod "Crucero").

As I said earlier I unhooked my "Clipper" and reassembled the pull rod on the sear lever without having to bend anything at all, however the "Nemrod" workers may have had their own ideas for assembling the later guns which were the orange handle and silver metal parts models. Ideally on a production line you want parts to just click into place, not have items cut or bent, but maybe rather than have a stock of different length pull rods all ready for the various length models it was decided to cut a "universal" piece of rod to length in later production as basically that rod just has a thread on one end and the workers added the hook and then fitted it to suit. A backward step if that was the case!
 
Last edited:
Here is the earliest gun much as it would have looked in use, I expect that the supercharging lever would have changed shape fairly early during gun development even though you don't sight along the barrel with these guns, you use "point and shoot" instead. Spring guns were fired from over the shoulder (like a "Bazooka") if they were very long (some were 2 metres in length), so such an arrangement was not considered unusual in those early days. Inset shows a spring gun handle from Nemrod, note that the handle shapes are not exactly the same as patent drawings are seldom engineering drawings or blueprints.View attachment 38394

Nemrod spring gun handle.View attachment 38401View attachment 38412
Here is a photo of the spring handle based gun taken from the Jimdo web-site. This is a series II model and it is then called the "Admiral", but everything matches the schematic diagram shown earlier except for the curve in the supercharging handle which is now the other way around and would continue that way until the "Crucero" ceased production.
Nemrod with surcompressor R.jpg
 
I suspect that the Nemrod "Dragon" is a re-use of many of the parts used in the earlier "Galeon", but with a black pistol grip and yellow centre section instead of the grey and black parts as used on the "Galeon". You can see a "Dragon" here:-

http://www.todocoleccion.net/materi...pneumatic-spear-gun-pesca-submarina~x31902057

The rear inlet valve cap on the "Galeon" was a ribbed cap moulded in yellow plastic which was exactly the same as the black version used on the "Silver" series guns. The "Dragon" has a simple black cap with a more cup-like appearance to which the usual metal hanger clip is attached. "Dragon" models were never sold here and may have been the last models from Nemrod along with the third all-black iteration of the "Clipper". Anyone looking for a Nemrod Classic Mid-handle speargun with low usage would be best to search out the later "Clipper" models.
 
Last edited:
Nemrod could have produced something like this in 1967 (after the Mares "Sten" appeared) from their existing stock of parts, but it would have been a sinker with its nearly all-alloy components. However this gun would have been only a short step away from producing a rear handle gun with plastic end caps (the pressure bulkheads) and plastic handgrip with a larger tank diameter that did float after the shot. By staying with heavy and sinking guns they opted for fore-aft balance in their designs, hence that requires a mid-handle position to achieve it. Throughout Nemrod's long pneumatic speargun history they at first provided "balance bar" rear extension rods and then progressively more elongated rear air tanks to achieve that fore-aft balance, especially with a spear loaded in the gun, but that ultimately was the wrong way to go. Of course everything is much easier to see with hindsight!
View attachment 38613
The gun that Nemrod could have made, but produced by Copino, a Spanish contemporary of Nemrod that followed what Nemrod did sometimes a bit too closely. Copino made an error with what is a clone of the "Sten", although it is also like the Cressi-Sub "SL" in terms of the high mounting of the inner barrel. Photo is a composite of images on the Jimdo "museum" site for Spanish spearguns. Gun is of 1973 vintage.
Copino 73.jpg
 
Last edited:
The error that I referred to above, but apparently no one is going to venture a comment, is that the muzzle relief ports are in the wrong place! Muzzle relief ports have to be behind the face of the shock absorber anvil that stops the piston so that water enclosed in the inner barrel can jet out of the ports rather than try and squeeze through the muzzle constriction that keeps the piston inside the gun. If the latter happens then the piston travel is slowed by hydrobraking. Here the ports are right at the front end of the muzzle, in fact they are just there to give the rubber shock absorber sleeve somewhere to expand into and are not "relief ports" as such. Nemrod made the same "error" in their own pneumatic spearguns for many years as their muzzles had these front located "ports" until they changed them in the "Clipper" guns and moved the ports further back on the muzzle body.
Copino 73 muzzle ports.jpg
 
Last edited:
As a general principle if something on an old pneumatic is giving no problems then it is best to leave it as is because disturbing that item can cause damage to a part which is not easily replaced. However now that you have gone this far I guess that there is no turning back. The rear tank should just pull off the large “O” ring sealed boss at the rear of the mid-handle plastic body section as the trigger pull rod should not affect it. A possibility is that there is corrosion on the inner lip of the tank just forwards of the “O” ring or a build-up of deposits there that are stopping the tank sliding easily past the “O” ring. What I do on any old pneumatic speargun is spray WD40 or place oil drops on the tiny join between the end of the metal tank and the adjacent shoulder of the plastic body. The lubricating fluid is sucked down into the gap and penetrates to lubricate the space between the end of the tank and the “O” ring sealing position as there is always a narrow annular gap where the tank and plastic boss overlap and is directly exposed to seawater. If guns are not routinely soaked in a freshwater tub after a dive then the saltwater can stay in there and over time promotes corrosion or a build-up of deposits as it dries out. The application of WD40 or oil will soften these deposits and you should then be able to to pull the tank off after allowing an hour or so for the stuff to work. Warming the tank up can help the situation by pouring boiling water over it while holding the gun so that the water does not get on any other part of the gun, of course you do this while working outside and exercising extreme caution. That makes the tank expand slightly compared to the rest of the gun and will help it to be removed. Use a towel to wrap over the tank if is too hot to handle, however aluminium cools off very quickly and it should be possible to handle it once the water film has evaporated off the metal surface.
I eventually found the patent for that later version, here it is.
View attachment 39292
I like to get another one ....
 
All the later Nemrod guns use the same hand pump from the late sixties "Silver" series onwards, however the ribbed and grooved rubber pump seals usually fail through old age. All my Nemrod hand pumps have failed now, so I replace the pump piston and use an "O" ring instead for the seal. You will find old Nemrod pumps on eBay, but even if they work initially the seal soon gives out and I don't know of any replacements. The youngest hand pumps will be the ones used on the final "Clipper" guns (black colour scheme), but good luck with finding one of those. My "Mariner" hand pump worked until recently, but it just conked out two weeks ago when I was re-pressurizing the "Clipper" that I had shown on this thread, after repairing it (that is why the gun was in pieces).
the new O rings use from a hydraulic shop. The O rings for old model nemrods and pump,7.6x2.4mm and get a new machined piston and pump adapter to fit the new O rings .
 
the new O rings use from a hydraulic shop. The O rings for old model nemrods and pump,7.6x2.4mm and get a new machined piston and pump adapter to fit the new O rings .
Could you please clarify where these new o-rings fit?
The barrel ID is 13mm and the pump ID is 12mm?
 
It will fit the old model, barrel size and the pump for those nemrods. fragata,crucero ID 12.29mm

Aha... thanks.

BTW I'm really struggling to find replacement piston seals for the Clippers... I've pored over online hydro-pneumatic U section seal catalogues for weeks and can't find a seal that even comes close to the originals. O-rings are apparently not too good for maintaining a seal under dynamic pneumatic loads... which is why you still see modern piston designs with a U section cup seal at the rear and wiper o-rings at the front to clear the water vs the original reversed cup seal. The wear patterns on all three Clippers show that the front seal was not expanding much at all vs the rear one which display significant wear patterns.

I also contacted some specialist seal suppliers (both in Australia and the US) who claimed they could CNC machine any seal profile out of bar stock... which they can indeed. Trouble is the bar stock material is usually 85-90 Shore A Duro which is way to rigid to pass over the piston bosses during installation... the pump seals are no problem, being installed on a separate carrier cup secured with a staked 'nut' plate.

So if anyone has any leads I would be eternally grateful... the Clipper restoration project has stalled for now :banghead:
 
DeeperBlue.com - The Worlds Largest Community Dedicated To Freediving, Scuba Diving and Spearfishing

ABOUT US

ISSN 1469-865X | Copyright © 1996 - 2024 deeperblue.net limited.

DeeperBlue.com is the World's Largest Community dedicated to Freediving, Scuba Diving, Ocean Advocacy and Diving Travel.

We've been dedicated to bringing you the freshest news, features and discussions from around the underwater world since 1996.

ADVERT