• Welcome to the DeeperBlue.com Forums, the largest online community dedicated to Freediving, Scuba Diving and Spearfishing. To gain full access to the DeeperBlue.com Forums you must register for a free account. As a registered member you will be able to:

    • Join over 44,280+ fellow diving enthusiasts from around the world on this forum
    • Participate in and browse from over 516,210+ posts.
    • Communicate privately with other divers from around the world.
    • Post your own photos or view from 7,441+ user submitted images.
    • All this and much more...

    You can gain access to all this absolutely free when you register for an account, so sign up today!

Nemrod Mid-Handle Classic Layout Pneumatic Spearguns

Thread Status: Hello , There was no answer in this thread for more than 60 days.
It can take a long time to get an up-to-date response or contact with relevant users.
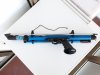
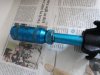
I like the quick-detachable handle and housing on the Technisub Jaguar... easy to clean and lubricate.
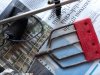
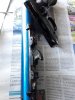
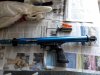
The upper part of the Jaguar barrel was co-moulded to the handle like the Nemrod Clipper... the main problem with this practice is differential cooling causing internal stress in the moulding that eventually cracks through.
Sadly this Technisub Jaguar Piccolo will remain a wall-hanger with a large crack propagating through the upper housing and again into the pressure bulkhead :(

Still impressed with the balance of the mid-handled Nemrods, but for me clipping it off just meant even more of a tangle vs letting the floating gun drift away and take up some of the slack. I may revisit when I have finished converting one of mine to an 8mm shaft with Delrin low friction piston.

53560


53561
 
I have the full size "Jaguar" and it has no cracks, but the multi-piece piston has lost the gripper part that grabs onto the spear tail ball and the piston end is damaged that held all the parts together. As for hanging the gun you can always clip it to your tow float if you have one. A float is a necessity in some places to minimize the chances of being given a propeller haircut, however it is no guarantee when some boats are being piloted by yahoos!
 
Some years back I got into an argument of sorts here about the "Comando" and that being its name and not “Fusil” as the guy thought it was, the name sticker having disappeared from his gun, as it did rapidly on all of them and he was reading the lettering molded into the black plastic handgrip. Now to absolutely dispel any doubt here is a "Comando" virtually new out of the box.
View attachment 53543
Originally the rear clip was yellow plastic instead of the black shown here, however it was not for wrapping the shooting line as that went around the laterally disposed two rubber horns on the front sight molding just behind the muzzle and the passive rubber line hook at the front of the mid handle. I used the rear clip for attaching the yellow plastic loader which was connected to a doughnut size cork float by a blue cord when one day to my dismay I found that it had silently un-clipped itself and simply floated away. My exclamation at this discovery is unprintable here, but it could be summed up as a WTF moment!

Hi everybody, I read some posts about Nemrod Comando, and I'm interested in how to open for service, because it's more than 40 years that it sleeps in a closet (it was of my father).
Obviously I started from the nose, but here is the first problem: I can't uscrew the part in front of the rubber part.
Trying and trying again, I ended up that the "nose" with the inner tube (i think the inox core) can turn some degrees and stops turning with a spongy feeling. I here a little noise in the area of the trigger. Any advise and may be instructions scheme would be appreciated. It wolud be great to make it works again and may be I can try to use it, as I'm newbe to free diving.
Thanks in advance for your help (and sorry for my poor english)
 

Attachments

  • 20190914_144331.jpg
    20190914_144331.jpg
    1.5 MB · Views: 360
  • 20190914_144830.jpg
    20190914_144830.jpg
    1.6 MB · Views: 327
  • 20190914_152810.jpg
    20190914_152810.jpg
    1.5 MB · Views: 304
  • 20190914_152819.jpg
    20190914_152819.jpg
    1.1 MB · Views: 331
The "Comando" is the smallest of the Silver series pneumatic spearguns from Nemrod and is a single power gun like the "Bucanero" which is the next size up. They are simpler in construction, but all guns use the same basic layout. Corrosion on the screw threads make parts hard to undo, so you need to use multigrip pliers on those items. In order to protect the anodized surface finish a trick is to take emery cloth, not paper, and wrap it on the part with the grit facing outwards. The grit will not affect the jaws of the pliers, but will create high friction to stop the jaws slipping on the part. Use oil to help the process, only a few drops on the screw threads, don't get oil on the part you grip with the pliers.

All dismantling starts from the front end, so you are doing it correctly. A sub-frame affixed to the inner barrel comes out as a unit, screws in the handle support frame hold that sub-frame in place. The procedure involves removing the muzzle and backing ring, then pulling the front bulkhead out which will come free when you pull on the barrel tube. You can use the muzzle screwed back on temporarily as a handle to hang onto while pulling on the barrel. The gun is pull rod operated, but all these parts are mounted on the sub-frame and when it and the inner barrel are yanked out of the gun they all come out with it.
l
Nemrod Silver series handle pneumatic.jpg

Nemrod Silver series piston in barrel pneumatic.jpg

Nemrod Silver series pneumatic muzzle.jpg

Nemrod Silver series rear end pneumatic.jpg

Note that the "Comando" does not have the section behind the sear lever, part 40, just a rear inlet valve and a much simpler tail cap in black plastic.
Also being a short gun the rubber grip section (part 16) behind the muzzle is omitted and there is just the rubber component holding the line winding hooks that project out each side. Line wrapping on the gun involves wrapping loops side to side running back to a rubber hook at the front of the handle support frame shown in white on the drawing and forwards of the trigger finger guard.
 
Last edited:
Here is the whole gun shown in one diagram. Models are "Comando", "Bucanero", "Corsario" and "Filibustero", the latter two guns have the rear mounted power regulator that rotates a series of three varying size ports that act as throttles.
Nemrod Silver series handle pneumatic complete (1024x262).jpg

Although non-floaters after the shot and firing a heavy shaft (9 mm), I consider the Silver series guns as Nemrod's best effort as they use full length tanks. My thoughts are that the Mares "Titan" models, which were also non-floaters, looked like claiming the concentric full length tank market with their big diameter tanks, hence Nemrod went back to classic layout guns with slim front barrels and larger diameter rear tanks. That market was underpinned by scuba spearfishing and once that sport was closed down it took the mid-handle classic pneumatic gun with it. Now a freediving spearfisherman can certainly use a classic layout pneumatic, I have done so many times, but the ability to throw the gun aside and seize your victim is so much easier if the gun floats nearby on the surface.
 
Last edited:
Hi popgun pete, I was waiting for your reply, thankyou.
Now muzzle and support ring are locked together on the barrel.
Backing ring have a small hole , may be is for a special tool for disassembling?
It is worth building it?
Can you show me what you mean with "emery cloth, not paper", I found like in picture.

What about the movement the barrel have when i try to unscrew muzzle? Can I damage something inside?
First time I tryed, was blocked, after some force it starts to twist a little bit (some degrees, less than 90°) with handle grip on. The same with handle off but barrel hold blocked with 2 screw from trigger part.
I also try to extract the barrel, you have to force by stroke it?
Emispheric front cap is just pressed in?
Thanks a lot
 

Attachments

  • panno.jpg
    panno.jpg
    11.5 KB · Views: 267
When you unscrewed the sub-frame screws that are accessed from the grip handle support running under the tank you freed up the frame so that it can slide around in the tank. Because you had already taken the grip handle off the trigger transmission pin part 27 would no longer be forced up against a paddle inside the gun that when tilted upwards moves the pull rod part 34 that operates the sear lever part 40. Parts 22 and part 23 are all one-piece which is the gun’s sub-frame. Grub screws hold the inner barrel tube in the sub-frame, so you will not have stuffed anything up. It is a good idea to pull the trigger transmission pin out once the grip handle comes off and it should be the last thing you add before putting the grip handle back on.

Emery cloth is sold in rolls and is the sort of thing you see on linishing or sanding belts for metalwork. Unlike emery paper it will not tear and pressure from plier jaws will not push the grit through it as otherwise it would tear up the anodized finish. Another thing you could use is scraps cut from a 2 litre polyethylene milk bottle as something for the pliers to grip onto, however I have found that the plastic sheets thus formed can tear and the plier jaws can bite through it. Inevitably you may damage the surface finish, but it should be only minor. Once the screw thread starts to move you will find it much easier, but it is getting it to start that is difficult. A spanner to engage the small hole would work when the gun was new, but those rings are hard to budge once the parts corrode and I never had any luck using such spanners. With regular two yearly services these parts were intended to be lightly greased each time the gun was dismantled, but many guns were never checked out and that made the threads freeze up with aluminium oxide corrosion over time and with use in the ocean.
Nemrod Silver series handle pneumatic annotated.jpg

The end bulkheads are just pressed in, but early guns use rubber packings rather than "O" rings which can be hard to get out. A rubber packing is a square cross-section ring like a fat doughnut without any curved surfaces, being flat front and rear. You can replace them with "O" rings which is what Nemrod did in the later versions of the guns.
 
Last edited:
  • Like
Reactions: Zahar
Popgun pete,
you are better than an encyclopedia.
As soon as I found some time I'll try to unscrew the front part of Comando, thankyou so much.
 
You will need to unscrew the rear end to take the inner barrel and sub-frame out. By first pushing on the muzzle you can push the rear bulkhead free of the tank tube and then undo the rear end. After that is free you can pull the inner barrel and sub-frame forwards out of the front end of the gun. The rear end of the “Comando” is similar to the “Galeon” as they share many of the same parts, this "Galeon" diagram shows the rear components.

Like many pneumatic guns the inner barrel tube holds the gun together and is clamped at either end by the muzzle and the inlet valve body. You can undo the latter by using a spanner on the flats cut into the body shown on the diagram below.
Nemrod Galeon I rear end detail.jpg
 
Now I have doubts. I was convinced that I could pull the barrel out from the front. But if I can unscrew the front parts (muzzle) it is perhaps easier to pull out from behind.
In my case the parts 3774/1 and 4472 seem a unique piece. I'll have to find 2 dice to loosen it
 
You can remove the barrel assembly either way, front or rear. When I reassembled my “Comando” many years ago I pressed the rear bulkhead into the tank tube first and then inserted the innards of the gun from the front end. I then screwed the inlet valve body into the rear of the gun, pressed the front bulkhead into place and screwed on the other parts, last of all I replaced the grip handle after putting the trigger transmission pin back in.
 
Nemrod have always done great patent diagrams that illustrate their guns very accurately. Here are the innards of their "Mariner" big banger with an enormous 50 mm diameter rear tank. The biggest "Mariner III" is a whopper to swim with and shoot, and then you have the unenviable task of reloading it. Bring on the monsters! I saw one of these equipped with a powerhead for the express purpose of blowing away problem sharks that could not be dissuaded from swimming near beachgoers. That was back in the day when people took action and did not ruminate on whether this was an appropriate action, they just went ahead (fortunately for swimmers) and did it.
Nemrod Mariner patent R.jpg
 
  • Like
Reactions: Pabloc13 and Zahar
These photos show the big Nemrod Mariner III alongside the more recent Seabear MAK 103, both of which are now out of production. The Russian gun went to another factory, they dropped the larger 103 model for the other 72 and 45 models and now seem to have finally quit making them entirely. The stainless steel inner barrel made the Seabear a very heavy gun to carry after a couple of hours in the water, especially as the gun is of all metal construction except for the handgrip scales which are plastic.
Seabear MAK 103 & Nemrod Mariner III R.jpg

Seabear MAK 103 & Nemrod Mariner III 2R.jpg

Seabear handle.jpg
 
Last edited:
Hi, I give gun to my brother who work in an officine, but nothing changed, the nose is blocked.
May be it con have better use if someone whant it for parts?
 

Attachments

  • 20200119_131819.jpg
    20200119_131819.jpg
    1 MB · Views: 278
  • 20200119_131223.jpg
    20200119_131223.jpg
    694.4 KB · Views: 268
  • 20200119_131233.jpg
    20200119_131233.jpg
    887.3 KB · Views: 272
  • 20200119_131801.jpg
    20200119_131801.jpg
    722.9 KB · Views: 258
  • 20200119_135342.jpg
    20200119_135342.jpg
    1.3 MB · Views: 289
The front bulkhead (part 14) is a press fit in the tank tube, it can be hard to remove as the outer rubber seal may have expanded if it is of the rectangular cross section packing type. On my "Comando" that is what was used and I replaced them with "O" rings which were used in the later production models.

It may require some sharp blows with a nylon faced hammer to knock the inner barrel forwards and drive the front bulkhead out. Once it begins to move the bulkhead will come out relatively easily because the rubber over time bonds to the alloy tank interior and you need to break that adhesion. "O" rings don't have this problem, but require smooth seating surfaces. Packings are not so fussy and will tolerate scratches as they work like a stuffing box, but will not seal if they have become unable to conform to a new alignment if they are replaced at a different orientation to that in which they were first installed.

It is important that all the radial screws are removed that hold the internal sleeve (sub-frame) in the tank, as well as removing the trigger transmission pin, before any hammer blows are struck because only then will the inner barrel and everything attached to it be free to move inside the gun.
 
Last edited:
Thank you Popgun Pete, but I have problem in part 15 disassembly. I tried to figure out If was possible for me to fix it in a simple way, but the problem are bigger than expected, so I think is better if someone else take care of it (or use for helping others Comando). I think is better to tell here before try to sell on internet.
thanks
 
DeeperBlue.com - The Worlds Largest Community Dedicated To Freediving, Scuba Diving and Spearfishing

ABOUT US

ISSN 1469-865X | Copyright © 1996 - 2024 deeperblue.net limited.

DeeperBlue.com is the World's Largest Community dedicated to Freediving, Scuba Diving, Ocean Advocacy and Diving Travel.

We've been dedicated to bringing you the freshest news, features and discussions from around the underwater world since 1996.

ADVERT