• Welcome to the DeeperBlue.com Forums, the largest online community dedicated to Freediving, Scuba Diving and Spearfishing. To gain full access to the DeeperBlue.com Forums you must register for a free account. As a registered member you will be able to:

    • Join over 44,280+ fellow diving enthusiasts from around the world on this forum
    • Participate in and browse from over 516,210+ posts.
    • Communicate privately with other divers from around the world.
    • Post your own photos or view from 7,441+ user submitted images.
    • All this and much more...

    You can gain access to all this absolutely free when you register for an account, so sign up today!

Custom spearguns pictures

Thread Status: Hello , There was no answer in this thread for more than 60 days.
It can take a long time to get an up-to-date response or contact with relevant users.
Hi fellaz.. im back with progerss...

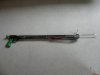
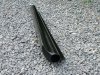
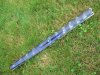
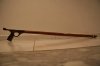
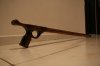
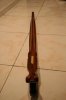
Gun is laminated, shaped and done... now left with finishing an accesories. Its soo beooootifull.. at least i think so hehe.
icon_biggrin.gif


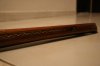
The problem with my delamination before was wrong mixture of west system.. So now solved.

So now im wondering a couple things..

1st... whats best and nicest looking thing to use for holding the mechanism in place? Use a SS nail and cut the end off or what?

2nd... What shall i use to finish the gun? Few coats of epoxy with sanding in between or just tung or teak oil? If i was to use the teak oil which i think id prefer.. then whats the right way of using it?

Last.. If i want to paint my gun camo... will the epoxy or tung oil hold on the paint.. or do i have to paint over the epoxy/tung oil? Whats the process?

Thanx again for all the help... really appreciated.

Zane...
 
Hi Zane,
1) The easier way to hold the mechanism is to use SS dowels with the same dia. as on the mechanism holes. They are stronger and harder that the nail, or you can cut it from the unthreded part on marine grate SS bolt. The nicest looking will be to use so called "barrel nuts". They are available in most Marine Stores in their SS hardware section- made by Truss Co (part number 2987) cost about $ 2.50 ea.
2) If you are using tung or teak oil, that finish is not going to last and stay forever when exposed to the salt water. You have to redo it constantly from time to time. Using several coats of good quality finishing epoxy will not only protected the wood from salt water, but will create protective shield/skin agains scratching and damaging the stock. It will also allow to show the beauty on the wood grain.
3) To paint over the epoxy, you will need to use special paint for epoxies made for boats. Oiled wood does not hold paint very good. If you decide to "camo" paint, first see what colors dominate in the under water area you dive mostly - brown/green or blue/grey. For the first use brown, green and yellow spray paint. For second -use blue, black and white paint. The technic is to spray the colors on patches and then using large feather (goose, turkey) to wiggle on the painted spats (before they dry) and try to blend it into the different colors. This technic is known as "marbleizing" or painting a fake marble. I will hate to cover the nice wood grain with paint, so if you really like the camo -maybe you can paint only the lower/bottom half on the gun. This way you will benefit a lot when swimming on the surface. I hope that your gun turn to be really nice looking and excellent hunter.
Jordan
www.hamiltonspearguns.com
 
Hey thanx for your help Jordan!! By the way i just noticed your website.. i must say im very impressed by the quality of those guns! Good work.

What is the correct way to use epoxy for finishing the gun and have a nice even shiny layer?

Thanx again
Zane...
 
Here are a few examples of paint over epoxy, the second & third pictures are mamba sleeves.
 

Attachments

  • P1020514(1).JPG
    P1020514(1).JPG
    147.2 KB · Views: 349
  • P1020541(1).JPG
    P1020541(1).JPG
    293.3 KB · Views: 344
  • P1020668(1).JPG
    P1020668(1).JPG
    355.9 KB · Views: 370
Ya camo is nice but i think im just gonna stick with epoxy and show the beautifull wood grain. Thanx Fox!!

Zane...
 
Hi Zane,
Before applying the final coat I suggest you seal the wood stock with Clear Penetrating Epoxy Sealer (Multi Wood Primer) product of Smith& Co. (www.star-distributing.com) Remove all the hardware first. This epoxy sealer soaks deep into the wood fibers to protect and reinforce them. Because of that, the wood becomes even stronger and also heavier. In some cases the gun would not need any additional weigth or very little for balancing. For best results it should be done 3 times with 24 hrs between applications. Give a day or two after the last application then lightly sand with fine sand paper. Clean the stock from any dust particals very carefully. Hang the wood stock from a hook or bar (with rope) from the ceiling in a clean - free of dust work shop or room. Do not apply the finishing coats outside in the open, because the wind will blow all kinds of dust, sand and bugs on the surface. You also need very good ventilation (from the fumes) so this could be done inside a garage with open doors. It helps if you water the floor,so the dust doesn't fly up when you work there. You can use West System 105/207 (3:1) and applying it with 2.5 -3 inch brush. Start from the top on the hanging wood stock and cover about 12" down as you rotate/ spin the stock. Then work the next length down and let the epoxy flow down. Work very fast so the epoxy does not start to cure. Higher the temp. faster the epoxy will cure. You can do it in the evening when its cooler. Do not be discourage if the first coat does not turn perfect. It will partially penatrate in the wood and show all the imperfections in the wood which were not noticeable before - the clear coat acts like a magnifying lens. Sand it after it fully hardens and apply another coat in the same manor. Usualy takes good 2-3 coats to accomplish nice finish. When applying, apply heavy coat- thin coats do not cure smooth.
I hope that this will help you in your finishing task.
Jordan
www.hamiltonspearguns.com


edit: URL
 
Last edited by a moderator:
  • Like
Reactions: seaman and foxfish
Hello all.. im back with some more progress... here im at the second coat before sanding. Now can i after putting the final coat sand it down then use somthing other than epoxy? i dont really like that glossy look!

Also.. how many rubbers do u think this gun could handle? Its got 6 teak laminates 140cm tip to butt and 5.5cm at the widest part which tapers down to 3.2cm at the muzzle and around 5cm at the trigger mech... As for the depth.. its 4cm at the deepest and tapers to about 3.5cm front and back. What do u think?

Thanx
Zane...
 

Attachments

  • IMG_3259.JPG
    IMG_3259.JPG
    40 KB · Views: 368
  • IMG_3260.JPG
    IMG_3260.JPG
    41.6 KB · Views: 366
  • IMG_3265.JPG
    IMG_3265.JPG
    40.7 KB · Views: 350
  • IMG_3267.JPG
    IMG_3267.JPG
    33.2 KB · Views: 361
Hi Zane,
Looks like it took a lot of work and your gun turned out very nice. The epoxy coating is not only for looks but for protection of the wood. Glossy finish will help protect and makes it more slippery in the water. If you do not like the look, it may be dulled by lightly sanding it with fine "syntetic" steel wool # 0000. You probably shoud do this treatment especially on the handle to prevent from sliping. With these dimentions the gun will probably function the best if equiped with 2 bands. Over powering the gun like this, with many bands, will only increase the recoil force and work against the accuracy on the spear. On this gun you do not have the mass needed to withstand the recoil force caused by the multi-bands, like the ones with the larger heavyer body guns. Congratulation and keep up the good work!
Jordan
www.hamiltonspearguns.com
 
Thanx Jordan.. glad u like!

So u say two bands.. Definetly 2x16... but will 2x18 also be ok?
I know its a pretty stupid question and that i need to actually try it in the water, but im thinking thru experience and a trained eye one can sort of tell.

Also, if i sand down the final coat of epoxy, can i then use tung or teak oil or will that not really work as the wood grain has already taken the epoxy in?

Last thing... With the U shaped line anchor.. Do i shape an SS rod into a U shape and hammer it in or should i drill teo holes first then hammer it in? Also should i drill the holes facing the back of the gun, put the U then bend it so it faces to the front of the gun? How is it best done??

Thanx
Zane...
 
Last edited:
Re: different wood lamination

Re: Laminating different woods
Here are some wood barrels made with mahogany outter lavers and a maple inner. They were made in the late 60's still going strong, no delam, still nice and straight.

i didn't have many tools then so i laminated the maple lower than mahogany to create the groove and shapped the round by hand with a rasp.
files will not upload.
 
Try unloading the pictures to photobucket.com and then you can paste the link here.

I'm keen to see this mahogany and maple gun, sounds like a ripper
 
Hi
I'm not an expert with computers. I am having difficulties posting the pictures. Can anyone help me. I have an apple. I can email the pictures to anyone if you would like until I figure out how to post these pictures. If anyone wants to see them just provide me your email. Sorry guys
 
i ask help from deeper blue net i getthem in my in my photo library but in order to send i need a valid e mail i try some of the deeperblue net but nothing happen
 
hi i am making a spear gun at school for technology studies and was wondering if there are any particular timbers that are best for the barrel. also i was considering using a sea hornet trigger mech and maby handle is this a wise move or should spend a few more $ and get somthing else.
 
DeeperBlue.com - The Worlds Largest Community Dedicated To Freediving, Scuba Diving and Spearfishing

ABOUT US

ISSN 1469-865X | Copyright © 1996 - 2024 deeperblue.net limited.

DeeperBlue.com is the World's Largest Community dedicated to Freediving, Scuba Diving, Ocean Advocacy and Diving Travel.

We've been dedicated to bringing you the freshest news, features and discussions from around the underwater world since 1996.

ADVERT