
Not enough clamping pressure, I would put it down to experience & scrap that one!
As Will points out - it might be a good idea to start your own thread")
As Will points out - it might be a good idea to start your own thread
Welcome to the DeeperBlue.com Forums, the largest online community dedicated to Freediving, Scuba Diving and Spearfishing. To gain full access to the DeeperBlue.com Forums you must register for a free account. As a registered member you will be able to:
You can gain access to all this absolutely free when you register for an account, so sign up today!


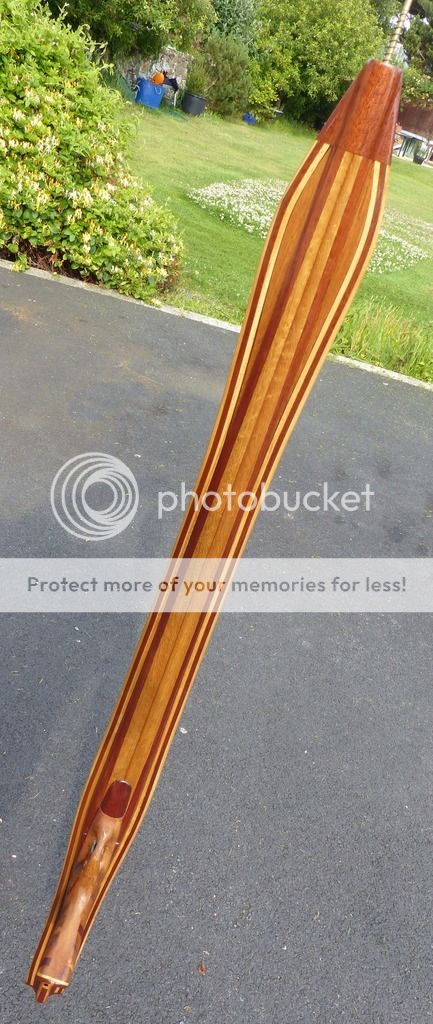
Having had chance to get out with my gun, it is as I feared nose heavy quite severely. I thought about epoxying some teak wings on the front to counter this. My other thought was router out a void at the under side up near the front and fill it with polystyrene and cap it over with some teak. Just didn't want to add more wood which will make the gun harder to swing about underwater. Any one tried anything like this?Thanks Will but I will stick to epoxy & poly two pack for the time being although your finish does look effective.
I like to grain fill my work with epoxy & I don't think the semco will stick to the epoxy.

Nice gun, yes that's a very valid point, I will add some wood and try and achieve a better balance that wayOne of the benefits of a wooden gun is high mass! In other words a buoyant gun that requires quite a lot of ballast to get it sitting just right in the water. High mass, stabilises the gun & reduces recoil but often at the expense of fast tracking !
Of course we strive to get a perfect compromise.
I quite often use wings on my guns ......
Nice gun, yes that's a very valid point, I will add some wood and try and achieve a better balance that way


Hi WillIve just bought some nice Teak with a view to making 1 laminated gun and hopefully a short solid teak gun. Ive done a fair bit of research and am gradually building up a process of the bits/tools I need and techniques for this process. I have a couple of questions that are bothering me . Number 1 - I am worried about the alignment of the shaft in its track and the trigger mechanism . The left to right issue seems fairly easy ,just change router bits and don't move router so the centre of the mechanism pocket is exactly centre of your track . The bit that concerns me is the height of the mech against the shaft track ,I guess there is not much room for tolerance and the shaft must enter/exit the mech at just the right place in terms of the height up and down . Is there a specific technique for getting this right ? Also should the mech be floating in the pocket on the pins? or wedged in the pocket tight and pinned ?
Number 2 - any screws I fix into the stock for hardware , do I need to drill a hole and epoxy it then put the screw in , to stop water getting deep into the stock?
Number 3 What tools do I need , obviously in an ideal world I would have a full workshop at my disposal but I want to know what I can get away with . My list for things I feel I definitely need are ; Table saw for taper cuts(I will make a jig) Router for mechanism pocket and shaft track and rounding the blank edges and cutting band holes , Decent mortice chisel and paring chisel for squaring corners of my routered pockets , Dremmel multi tool with sanding attatchments and palm sander for finishing , Pillar drill for drilling holes to pin the trigger mechanism. And lastly a belt sander to shape the stock around the butt to make a kind of loading pad fluke tail sort of thing , I don't know how feasible it would be to remove 10mm from each side of the blank with a belt sander in terms of how long it would take and accuracy ,?? Would I be better rough chiselling these concaves and then sanding . Idealy id buy a bandsaw but im already spending a couple of hundered on tools so I can justify everything,i have a jigsaw but im thinking it may be a bit thick and hard to get through?, these guns will cost me twice what I could buy them for likely !
All advice graciously accepted , Thanks , these are not going to be big bluewater cannons with 3 or 4 power bands but slim manoeuvrable guns , most likely a 78cm and a 92cm roughly with single bands and 6.5mm shafts for typical light uk fishing in North wales .
oops my advice may have been a bit late but it may help someone else. The gun looks great Will. It looks very functional and sturdy it should give you years of enjoyment.Hi Will
I have made about 8 timber guns over a 40year period. I find running hot wax into the screw holes works really well, it soaks into the wood and does not crack like epoxy when you drive the screw. I just light a candle and let the wax drip into the hole. It must be done after the gun is epoxied otherwise it would effect the coating. I cut my tracks with a table saw made from an upside down power saw bolted to sheet of chipboard with a couple of pieces of timber clamped on for guides. I make 3 passes to form the U shape and clean up with a 6mm tent peg wrapped in sand paper. This may save you buying a router. I think a pillar drill is a good investment Igot mine for the cost of a drive belt, some one put it out on hard rubbish day and it just needed a new belt! The tool I use the most is my belt sander turned upside down and bolted to a bench. It is great for shaping timber and finishing stainless components as I make my own spears, floppers, rollerheads, trigger mechs and clusterheads. good luck with the build, looking forward to seeing some pics.


