• Welcome to the DeeperBlue.com Forums, the largest online community dedicated to Freediving, Scuba Diving and Spearfishing. To gain full access to the DeeperBlue.com Forums you must register for a free account. As a registered member you will be able to:

    • Join over 44,280+ fellow diving enthusiasts from around the world on this forum
    • Participate in and browse from over 516,210+ posts.
    • Communicate privately with other divers from around the world.
    • Post your own photos or view from 7,441+ user submitted images.
    • All this and much more...

    You can gain access to all this absolutely free when you register for an account, so sign up today!

GeckoSub Mirage Evo - And Adventures in 3D Printing Speargun Parts

3D-printing A New Nose Cone
The new nose cone is resin printed which should eliminate those nasty porosity issues I had the last time around (when I used traditional FDM printing) which took quite a lot of work to fix. The precision of resin printing is nuts compared to FDM, but still I didn't fully print the o-ring grooves nor the bore for the pumping barrel. One thing I think resin does worse is shrinkage and wasn't sure how this one would behave so I will turn the grooves on the manual lathe tomorrow and I CNC'ed the pumping barrel bore already.

For holding the nose cone I used the same simple square fixture as I did for the bulkhead, but I screwed it into a 1-2-3 block and held the block in the vise. Indicated with a dial test indicator (can't wait to get my probe hooked up) and then machined the pumping barrel bore:

EVO_MIRAGE_2025_3432_1200pix.JPG

EVO_MIRAGE_2025_3433_1200pix.JPG


Pic is from before I did the actual machining, though:
EVO_MIRAGE_2025_3435_1200pix.JPG


I also chamfered the bores. But I should have touched up the big bore for the shooting barrel. The front end is fine but the part has shrunk a bit more in the middle and rear (it has more material there) and it's tight. Well, I might just hand sand it. Tomorrow will tell.

So, with those updates, we are now up to date so to speak.

Next up, when I am back in the workshop - yes, I no longer have a lathe in my living room as before - I will be finishing the mods needed for the Predathor shooting barrel to work in the Evo handle and whip up a pumping barrel and a piston for it.
 
Last edited:
The ball valve is a problem with all Italian guns! I don't see the point in using it in the new concept! The mushroom valve will help!
 
Some Good Progress:)
Today I ticked off quite a few small jobs on the to do list.

As mentioned, the resin nose cone was too tight in the shooting barrel bore so I put it back on the CNC to cut that to size. I don't have a 3D proper for setting work coordinates so I am using this simple wiggler which for most things is precise enough:
EVO_MIRAGE_2025_3469_750pix.JPG


But I must have made a small math error as the bore ended up off center by a bit. Luckily towards the top where there's more meat and not towards the already thin wall between this bore and the smaller pumping barrel bore.
But I think I saved it. That said, I think I found a bigger potential issue. The nose cone print has shrunk to a degree where I worry that the gap to the reservoir is so large, the o-ring can extrude into the gap and I'll have a big leak. Time will tell - this was only supposed to be a stop gap thing anyhow. But it does mean, I may draw up a really simple nose cone that I can machine in Delrin or alu early next week. This build is supposed to be functional, not a beauty contest.

Anyhow, after the (half botched) attempt at taking the shooting barrel bore to size, I moved onto the lathe to cut the o-ring grooves. Double grooves as I tend to do whenever it makes sense:

EVO_MIRAGE_2025_3476_750pix.JPG


Despite being on the brittle side, this resin print machines really nicely. But I should probably have used another resin that I have that's slightly tougher - more nylon-like.

By now, I had also cut the pumping barrel to size, so a quick test fit was in order again:
EVO_MIRAGE_2025_3478_750pix.JPG


Yes, the gun has shrunk!
Last time around, this Evo Mirage - as I dubbed it - was supposed to be my big blue water gun, so I based it on the longest Predathor stock barrel I could source which is for the model which Salvimar calls a 130. In modern Mares Sten language that would be called a 138. Anyways, I have no need for a gun this big on this island but of course I still wanted to finish the project and actually use the gun, so I am basing it off the barrel (and possibly reservoir) of a Predathor 100 - a much better allround gun for here.

A close up of the business end:
EVO_MIRAGE_2025_3480_750pix.JPG


You can kinda see why I don't trust a printed surface to seal with an o-ring as circular faces are a bit angular or polygon shaped - you may be able to spot the flat narrow faces on the boss at the rear. The pixels in the printer are square, but I thought the resolution would be high enough for this not to happen.
There are some print settings I could play around with if I really wanted to that should smooth this out but I'll probably move to a Delrin nose cone soon enough.
 
Last edited:
Shooting Barrel Modification - And A Hole In The Wall...
Next up was some work on the shooting barrel and the pumping barrel.
The Predathor barrels are not a drop in replacement in a Mares Evo handle as the bore for the transverse trigger sear pin isn't in the same place. On the Salvi barrel it's 45mm from the end of the barrel and on the Mares it's about 49mm. I have never had the stock Evo barrel so that's what I settled on after various ways of measuring it and it works (49.5mm actually works, too).
So, to make this mod, you need to drill a new 4mm bore for the pin 4mm forward of the old bore. Which leaves no wall between the two bores. So, I lopped off 3mm of the rear of the barrel and then drilled the new bore - which gives me 3mm minimum distance between the old and the new bore. (Maybe less would be alright as all the force should be on the front of the new bore as the piston pulls on the sear)

The only real challenge was the workholding and making sure the barrel was rotated correctly.
I didn't want to bother with making another fixture for this and I had some small V-blocks which could hold the shooting barrel firmly. But I also didn't wanna turn my vise 90 degrees as it takes me quite a while to get it squared up when I do so and then to do it again when I set it back along the X. So, I left the vise as is and drilled a hole in my machine instead... Well, just in the side wall of the "tray" so it's no biggie:
EVO_MIRAGE_2025_3498_750pix.JPG

Actually, this makes good sense as if I use the same V-blocks and keep the vise in the same spot, barrels will always line up in the same place for mods like these so the hole will see more use.

I then indicated along a relatively straight piece of 4mm rod inserted into the old pin bore:
EVO_MIRAGE_2025_3501_750pix.JPG

Yes, my dial test indicator is a shameless Mitutoyo ripoff. One day, I will get the real one:)

Then onto the drilling itself. Not any interesting pics of this. I did it in manual mode using the handwheel pendant and while I said I "drilling" I was using a 4mm end mill - these always works better when trying to drill on a curved face.

The holes lined up nicely:
EVO_MIRAGE_2025_3505_750pix.JPG


I then deburred with my nice, new little grinder but I still need more practice. This burr is a diamond one which did ok and then I used some polishing ones afterwards and the pin goes in nicely with an ever so slight friction fit:
EVO_MIRAGE_2025_3508_750pix.JPG


Since the trigger sear now sits 4mm more forward, the slot had to be elongated, too. I could have programmed that in CAM but I just did it manually.
I used a broken 4mm endmill to indicate off of this time and make sure the rotation of the barrel was correct:
EVO_MIRAGE_2025_3510_750pix.JPG


Here's the rear end of the shooting barrel and the front of the pumping barrel. Whilst the orginal Mirage uses a 14x10mm tube, I went with 13x10mm to save a bit of weight:
EVO_MIRAGE_2025_3518_750pix.JPG


I also cut double o-ring grooves at the front of the shooting barrel on the lathe:
EVO_MIRAGE_2025_3516_750pix.JPG

The eagle-eyed ones amongst you will notice there's chatter on the right hand one whereas the left is smooth. When I cut the right hand one I was a tiny bit off final depth so I had to go in and touch it up but it didn't like that. On the left one, I hit the right depth in one smooth go, no stopping and going and it came out perfect. Like I said, the lathe needs some TLC because something is a bit loose in the carriage somewhere.

I did another test fit/sanity check with the nose cone. I am aiming for 25-27% compression on these static seals, btw and it "felt" fine:
EVO_MIRAGE_2025_3515_750pix.JPG

(This pic also shows the diffence in surface finish between the turned o-ring grooves and the printed surface a bit better).

Anyhow, the shooting barrel is fully done now and I only need to finish a few smaller items before first assembly.

Need to finish the pumping barrel "sleeve valve", a pumping barrel piston and then make a little line hook for the nose cone. I think that's about it.
Also, need to see about borrowing a scuba tank so I don't need to hand pump.
My high pressure compressor pump doesn't work these days - but fixing that is a project for future me...

Here's an old pic of that very useful pump from the "Shanghai days":
874 - AIBleON.jpg

The issue may be one of frequency. Philippines is "weird". It has 220V which is normally 50Hz and what this compressor is rated for, but here they have 220V/60Hz. I may try to put a new capacitor on the compressor to see if that helps any.
 
Last edited:
All in all, good and interesting work David!
Thanks Tomi,

I have actually designed my own handle from scratch to be cut in alu, but milling deep features is tricky and I need more practice so it made sense to resurrect this build, make a working gun and hopefully learn something on the way:)

There was a bit of progress yesterday and one set back, which was the one I was the most unsure of in the first place, so no surprise there. Will update more later.
 
  • Like
Reactions: tromic
Finishing The Mirage Pumping Barrel
As mentioned, instead of having a check valve deal with letting the air out of the pumping barrel like I had on the first attempt of this build, I am going with the much, much simpler and original Mirage way of doing it: A simple rubber sleeve covering vent holes at the rear of the pumping barrel.

The dimensions are pretty much exactly the same as the original, too:
EVO_MIRAGE_2025_3521_750pix.JPG


Some deburring:
EVO_MIRAGE_2025_3528_750pix.JPG


This is after the first polishing bit, I have a super fine one which I used later.

I am using silicone tubing for the sleeve, but it's too thick - there's only 1.125mm between the outer walls of the shooting and pumping barrel, so I made a simple mandrel the same size bigger grooves on the real pumping barrel, slid some tubing over it and turned it down on the lathe:
EVO_MIRAGE_2025_3530_750pix.JPG
EVO_MIRAGE_2025_3536_750pix.JPG

EVO_MIRAGE_2025_3539_750pix.JPG


And then the only thing that was left was to make a very simple piston for the pumping barrel out of Delrin:
EVO_MIRAGE_2025_3547_750pix.JPG


That's the pumping barrel done:)

Actually, I totally forgot that there's a washer at the front of the pumping barrel, in between the barrel and the nose cone. So, the barrel ended up being 2mm too long. But I just shortened it on the lathe real quick.
 
  • Like
Reactions: tromic
First Assembly!
With all the parts made, it was time for the assembly:
EVO_MIRAGE_2025_3548_750pix.JPG

You can see evidence of some past corrosion at the rear of the trigger sear slot in the shooting barrel.

I used two o-rings to stop the pumping barrel from flopping around too much and to set the spacing between the two barrels to make it easier to get the nose cone on:
EVO_MIRAGE_2025_3549_750pix.JPG


Which is when this happened...:
EVO_MIRAGE_2025_3638_750pix.JPG


Who would have thought that 1mm wall thickness in a super brittle 3D printed plastic would break that easily...?;)
Not me, right? Not when the exact same thing happened back in 2018 with the FDM printed nose cone, right...?!
Here's a reminder of that from way, way earlier in this long saga of a thread:
GECKOSUB_EVO_MIRAGE_387_800PIX.jpg


Back then, I fixed it with a carbon fiber sleeve which worked well:
GECKOSUB_EVO_MIRAGE_394_800PIX.jpg


Anyhow, I am not even beating myself up over this. I knew this was a real risk and when I heard the crack during assembly I wasn't too surprised. Especially not since I used some left over resin - which was left over from previously exactly because it's so brittle.

But yes, I pumped it up and it leaked right at the nose cone as fast as I could hand pump it.
 
Last edited:
The World's Strongest Mirage Nose Cone...!;)
So, since I really want this gun to shoot some fish as soon as possible - and prove that my bulkhead and check valve works - and since I am willing to make compromises I wasn't before, I drew up a very simple nose cone to be machined in alu:
EVO_MIRAGE_2025__750pix.JPG
EVO_MIRAGE_2025_A_750pix.JPG


It really doesn't get any simpler than this. Or... much heavier. And for a guy who used to be obsessed with having completely neutrally buoyant guns, that will hurt a bit. But I needed this done fast so it'll be OK for now. Will try to make it in POM/acetal later on, I just need some proper end mills for plastic and a better POM instead of the no name Chinese stuff I have which is on the soft side.
Or, just work a lot more on "light weighting" the design.

Also, I could have made this faster in a 4-jaw chuck on the lathe but I decided to do it on the CNC for the practice. I did turn a blank down to size and cut the o-ring grooves on the lathe - like I did with the bulkhead.

Anyhow, here's the first op in the CNC:

EVO_MIRAGE_2025_3562_750pix.JPG

The grooves on the bigger diameter of the blank are from some test cuts I did on the lathe trying to figure out which grooving insert to cut the o-ring grooves with. This material will be removed anyways.

Some of the biggest chips I have cut so far:
EVO_MIRAGE_2025_3566_750pix.JPG


Here, the inner shooting barrel bore has been cut to size and I am testing with a piece of stock Salvimar barrel:
EVO_MIRAGE_2025_3576_750pix.JPG


You can tell the surface is crap and almost faceted, but that's supposedly normal in the adaptive roughing strategy I used. It will be (mostly) cleaned up in the finishing passes:
EVO_MIRAGE_2025_3586_750pix.JPG


This was looking good until I ran out of flute length. Meaning the cutter wasn't long enough for the feature. I knew this but I wondered how bad any rubbing would be when the shank started getting engaged - the answer is seen a few mm from the top:
EVO_MIRAGE_2025_3588_750pix.JPG


I went back to the laptop and changed the design to have a very slight taper, less than half a degree to solve the rubbing issue. But since I used a flat end mill and not one with a radiused edge I got a bit of stair stepping instead. Anyways, not a biggie for something that's already lacking severely in the aesthetic's department;):
EVO_MIRAGE_2025_3591_750pix.JPG


I only have one shot of op 2 which is from the beginning of the shooting barrel bore:
EVO_MIRAGE_2025_3604_750pix.JPG


Here's the finished part:
EVO_MIRAGE_2025_3617_750pix.JPG


While guarenteed to make the gun nose heavy, I do hope and think that it will have zero potential for leaking;)

BTW, the little bent piece of stainless rod is for the line hook at the nose cone - you can see two pre-drilled holes for on the nose cone bottom. It's not even very straight, but once again we are going for functionality only this time around.

P.S.
Forgot to say, I am not too worried about these parts not being anodized. First of all, it's 5083 marine grade alu which in itself is one of the more corrosion resistant ones. Secondly, the bulkhead will be bathed in oil and finally this nose cone will be swapped out for something lighter down the road.
 
Last edited:
Mares - What Were You Thinking?!
So, with my caveman club of a nose cone done, I did a quick assembly though only one pic:
EVO_MIRAGE_2025_3623_750pix.JPG


I put about 200 hand pump strokes in the gun and dunked it in a bucket of water. The nose cone is leak free, yeah! But... the trigger and power regulator rods were leaking. Which makes sense. They haven't been changed since 2018 at least. I think I ordered the handle in '18, but not sure when it was made. While it hasn't been under high pressure for that long, the o-rings have been compressed nonetheless and they were indeed pretty squared.
On the plus side, early indications were that the Mirage pumping system worked, too;)

So, I changed the power regulator seal but when I went to change the ones on the trigger I was surprised, or honestly rather shocked.
I will add more pics later, but Mares has a two-piece trigger bushing in order to be able to use a 1.5mm trigger pin. That's fine, there are aftermarket products doing the same thing. And I have even made them myself.
Here's a pic of an older one of mine here (a traditional bushing with a thicker pin on the left and mine with a two-piece bushing and thinner pin on the right):
616 - LhWq48G.jpg


In these systems, there's a smaller o-ring inside the bushing that seals the pin to the bushing. And then a larger one at the top of the bushing insert which seals the bushing to the handle. So, I assumed this was how Mares had done it, too. But no, they left out the bigger o-ring completely. The one inside the bushing is there, alright. But there is no o-ring sealing the bushing against the handle. What they do is rely on tighteting the bushing firmly against a little raised plastic lip (which I marked in blue)...:
EVO_MIRAGE_2025_3628_750pix.JPG


As always, the big disclaimer here is that I am not an engineer, but I think this is a bad design choice. Potentially one that can wreck any gun with this flavor of handle, whatever their marketing peeps call it at the time of reading...

Granted, most air guns seal the air inlet valve at the rear of the gun the exact same way - metal against a plastic lip - but the big difference is that the inlet valve threads into a very hard aluminium barrel and you can really clamp down on that connection and easily ensure a tight seal against the plastic.
But in the case of the Mares trigger, you are threading a small bushing with small threads into plastic, not into a metal... So, while they may get it torqued just right at the factory, what happens when an owner may have to change the o-ring one day? I honestly think the risk of over tightening and stripping that plastic thread is very high. If you design o-ring grooves the correct way, it's really hard to mess up so I have no idea why they did it this way.

I am am open to hearing other thoughts on this, but I am sceptical to say the least.

Keep in mind, Mares have had quite a few issues with these handles. Here are the ones I can remember, Pete identified the design flaw behind the line releases getting ripped off the guns.
I have personally stated that I I don't like the metal parts in the trigger as they have really high friction if you keep your shooting line wrapped a little bit tight.
Also, the power regulator bushing is 1mm too small for the bore (meaning a 0.5mm gap all around for the o-ring to get extruded into) and there's zero free space for the o-ring to expand into in its own groove - both are considered bad design practices as far as I understand. You want a minimal gap and you want proper free space for the o-ring as it gets wider when compressed. You aren't supposed to ever over constrain them.
And now this find of using sheer force to seal a trigger bushing:(
Anyhow, rant over...

On a happier note, this gun is now assembled but I couldn't be bothered to hand pump it again, so I brought it home and will try to find a scuba shop tomorrow and borrow a tank. I think I'll put about 30 bar in it to start with. I find that a happy medium of being able to Mirage load easily and still get that extra oomph out of it:)
 
Last edited:
So Close But A Setback...
EVO_MIRAGE_2025_3646_750pix.JPG


I got the gun filled to 30 bar this morning in a dive shop in the touristy part of the island which is not always as easy as it sounds. But the vast majority of Filipinos are cool with spearing, so no one bats an eyelid if you bring a gun to a scuba shop.
Once filled, I went to the workshop where I tested the Mirage loading and it worked! The air transferred and after about 10 strokes or less, I could easily insert the shaft into the shooting barrel though of course, I did not cock it fully. I left the gun in the pre-loaded position for an hour as I worked on other stuff and then checked again and from feel, nothing had changed (I should just have used a pressure gauge). So, I flicked the power regulator back to open, which of course happens with a serious kick and you really don't want a thumb near it when it happens. I have an idea for a valve design which I hope will solve this issue, but that's for my scratch built gun coming later this year;)

Then lunch and then on to shoot guns in my friend's freedive shop's pool. And... the Mirage Effect had sadly become an illusion by now. As in, it simply didn't work. There's now a big internal leak somewhere. So, I dropped the pressure in the gun to a normal ~22 bar and shot it like a regular airgun which still impressed the heck out of my friend who shoots a nicely tuned double banded 125 wood gun.

Not sure what's going on, but I will take it apart tomorrow. I hope it's something obvious as there are a few different ways the gun can leak internally within the Mirage system.
If I had to guess, I would say the power regulator bushing is leaking. I feel like the o-ring groove design was good, perhaps a tad high on compression but maybe it just doesn't insert deeply enough into the bore. Also, I don't have a stopper - like a C-clip or a Delrin sleeve - on the shooting barrel keeping the bulkhead from moving forward. I was hoping the pumping barrel could do that job but actually, if I got my measurements right, I cut the pumping barrel 1-2mm short on purpose, which I consider better than having it too long as if it is, then the nose cone/handle wouldn't be able to be clamped fully onto the reservoir. But it being short, would also mean the bulkhead could move forward the same distance if the power regulator bushing is pushing hard enough on it...

IF this is indeed the issue, then it should be a fairly easy fix. Fingers crossed...

On the plus side, the two external leaks from the trigger pin and the power regulator rod seem to have been fixed.
 
Last edited:
  • Like
Reactions: tromic and Zahar
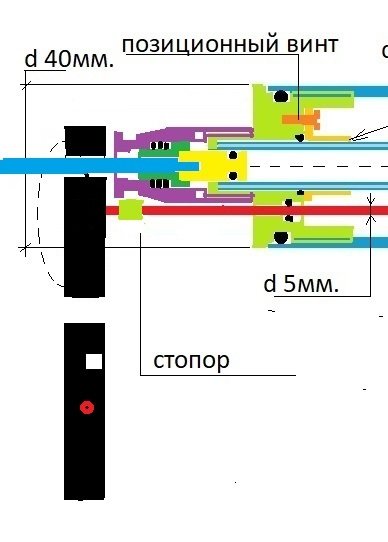
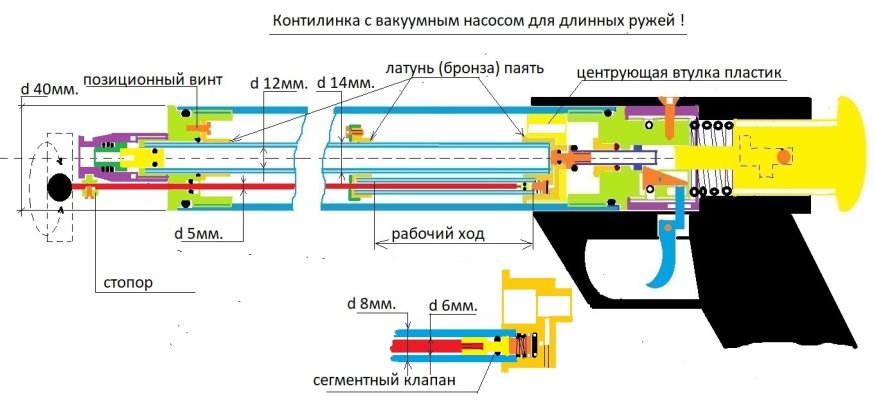
The very concept of increasing pressure during hunting is wrong! The pressure in the receiver is set on land! It is necessary to direct the efforts of your brain to easy loading of the gun with a harpoon! This can be done with the help of valves and a vacuum pump to pump air from the barrel into the receiver!
 

Attachments

  • Континент с вакуумным насосом! — копия.jpg
    Континент с вакуумным насосом! — копия.jpg
    31.9 KB · Views: 23
  • Континент с вакуумным насосом!.jpg
    Континент с вакуумным насосом!.jpg
    145.1 KB · Views: 23
The very concept of increasing pressure during hunting is wrong! The pressure in the receiver is set on land! It is necessary to direct the efforts of your brain to easy loading of the gun with a harpoon! This can be done with the help of valves and a vacuum pump to pump air from the barrel into the receiver!

I am honestly not sure what you are saying. I think the translation is bad. Or that the translation you use when reading these posts is messing things up.

Yes, the pressure is of course set on land. I don't "increase pressure during hunting".

This whole, very long build log is about a design that allows pressures higher than can normally be loaded. By moving air from the rear chamber to the front chamber by using the shaft as a pump in a secondary barrel with a smaller diameter. Very much like your drawing except, in the Mirage system you use the shaft - which of course limits how small the pumping barrel can be.
 
Last edited:
No Diagnosis...
I took the gun apart to fix the internal leak, but nothing was obviously wrong. So, I did the "un-engineer" thing of changing more than one thing at a time. So, if the fixes work, I wont have any idea which one did the trick...;(

On that same note, I now remember why I loved having a working high pressure pump - with one, there's much less of a barrier to checking out one thing at a time as the pumping aspect becomes a non-issue. I will have to sort that out sooner rather than later.

On to the leak: My main suspect was a bulkhead that would move forward when I pushed the power regulator bushing into it , so I made a spacer to lock the bulkhead in place - like what all guns already have;):
EVO_MIRAGE_2025_3664_800pix.JPG
EVO_MIRAGE_2025_3668_800pix.JPG


Now, it can't really move forward much, maybe 0.25mm or so.

I also changed the o-ring on the power regulator bushing to a slightly smaller one. Nominally the same size as before, but it's a tad thinner in cross section so it slides in a bit easier - hopefully still enough compression on it that it doesn't leak. Judging from feel, it should be alright:
EVO_MIRAGE_2025_3659_800pix.JPG


There was evidence of some debris (small black spots on the bulkhead). Some where tiny bits of chewed up o-ring but also some harder bits of plastic:
EVO_MIRAGE_2025_3651_800pix.JPG


The plastic is most likely from the front of the pumping barrel piston - you can actually see its front edge is a bit jagged in this pic:
EVO_MIRAGE_2025_3653_800pix.JPG


The piston stops against a custom made washer at the front of the pumping barrel but the flange that holds it in place is only 0.4mm wide all around since the ID of the barrel is 10.00mm and the opening of washer is 9.2mm. So, obviously, the Delrin piston doesn't like that. I thought of turning a new piston in titanium, steel or alu, but instead, I made a washer with a smaller bore of ~8.25mm which more than doubles the width of the flange.

The downside is the smaller washer ID restricts the max size of shaft to 7mm as the UBL tail end for those are 8.0mm.

One more thing to notice in the above picture is that when the piston is fully pushed down against the peg in the bulkhead, the rear o-ring has actually passed the first row of vent holes in the pumping barrel. And even though they are deburred, I think that the reason for the rubber debris in the oil - the holes cut the rear piston o-ring. But I cut a new o-ring groove a bit more forward on the piston so this shouldn't happen again.

Whether the plastic or rubber "chunks" was the reason for the Mirage leak, I don't know. Nothing seemed stuck in the check valve when I took that apart.

However, I did put a stronger spring in it (measured the opening force to be about ~200g):
EVO_MIRAGE_2025_3656_800pix.JPG

(There's a pin pushing on the scale and the ball in the valve)
From my quick math and assuming a bore of 3mm (the ID of the o-ring in the valve), it would take 7 bar of pressure to crack that valve open. Meaning, there needs to be 7 bar more pressure rear of the bulkhead than in the pumping barrel for the the valve to open and fill the pumping barrel up for the next stroke.

Which leads me to one other place the Mirage effect can be messed with is if the rubber sleeve valve at the rear of the pumping barrel is leaking. If it is, then there will be too much pressure inside the pumping barrel for the check valve to be able to open at all. And while you can pump it and move air, you are only moving air that leaked from the front compartment into the barrel back into the front compartment...
The rubber sleeve is tight, "seems" OK, but I noticed it also was a bit too long for the undercut made for it. So, I extended the cut a bit on the lathe (no pics). But this is not my main suspect anyways.

Finally, I ground a slot going upwards for the power regulator knob to rest in in the open position. As an aside, I really like this grinder, it has a 50K rpm max but it's brushless and still has OK torque down to 4-6K rpm. Also, it's super well balanced and has a quick release chuch so overall just a joy to work with:
EVO_MIRAGE_2025_3674_800pix.JPG


The reason I even had to do this is because I have lifted the grip on this handle so much that there wasn't enough room for my thumb anylonger;). Now there is.

I think we will go spearing tomorrow. I haven't trained freediving for a long while now and this place is overfished, so not sure how many shots I will even get off. But it if it works, then cool. If not, I will drop the pressure (we will be boat diving) to 20-22bar and load it like a classic airgun - or grab my trusty two-banded Pathos instead.

At least working on guns again has my mind tickled. While I do think a Mirage in this length with a 7.5mm shaft would be a very capable and versatile beast, I am also thinking of revisting the idea of making one that fits inside a fin bag. And if I keep that as a 7mm shaft gun, I could drop the pumping barrel ID to 9mm and get an even easier time loading it. And it could be a perfect gun for my girlfriend:)
 
Last edited:
When you have a finished speargun in front of you where everything works as it should, you don't even think about the fact that someone went to great lengths to make it that way.
I had to look up this sketch to remind myself how it works...
1741855649653.png
 
Last edited:
  • Like
Reactions: Diving Gecko
At A Loss
Filled the gun up to 28 bar today after yesterday's fixes - or rather attempted fixes. Then tried the prepumping sequence on land again and it worked perfectly so we went spearing. I dropped in the water and the pumping mechanism was broken again. So, the last two times it has only worked once. Right now, I have no idea what's going on.
The only thing that comes to mind is that when you open the power regulator after the prepumping, it does open with a big smack to the rear. Maybe something gets jolted, but can't see what it could be.

I will take it apart again and see if I can see anything obvious this time. But will need to fix my compressor pump, too.

I know I can make this system work, I have done so before - I just have to keep chipping away at it.

At least we came home to a nice sunset:
EVO_MIRAGE_2025_3720.JPG
 
Last edited:
  • Sad
Reactions: Zahar
I completely understand you. I've been through similar problems myself. Almost always something needs to be modified, tweaked. The hardest part is pinpointing the problem. Sometimes more than one thing needs to be corrected. I don't know if you copied key parts from an existing Mirage rifle. I'm thinking of valve diameters, O-ring sizes, valve spring lengths, diameters, and strengths... Someone must have taken the trouble to bring it all into proper harmony. Small deviations are enough to cause unexpected problems.
 
  • Like
Reactions: Diving Gecko
DeeperBlue.com - The Worlds Largest Community Dedicated To Freediving, Scuba Diving and Spearfishing

ABOUT US

ISSN 1469-865X | Copyright © 1996 - 2024 deeperblue.net limited.

DeeperBlue.com is the World's Largest Community dedicated to Freediving, Scuba Diving, Ocean Advocacy and Diving Travel.

We've been dedicated to bringing you the freshest news, features and discussions from around the underwater world since 1996.

ADVERT