
I asked on Russian forum. It is something like this: Тема: "Бегунки" (4/4) - ПОДВОХ.NET - Форум о подводной охоте - ПОДВОХ.NET - Портал Подводного Охотника!
-
Welcome to the DeeperBlue.com Forums, the largest online community dedicated to Freediving, Scuba Diving and Spearfishing. To gain full access to the DeeperBlue.com Forums you must register for a free account. As a registered member you will be able to:
- Join over 44,280+ fellow diving enthusiasts from around the world on this forum
- Participate in and browse from over 516,210+ posts.
- Communicate privately with other divers from around the world.
- Post your own photos or view from 7,441+ user submitted images.
- All this and much more...
You can gain access to all this absolutely free when you register for an account, so sign up today!
Taimen - Russian pneumovacuum speargun
- Thread starterfabio70
- Start date
You are using an out of date browser. It may not display this or other websites correctly.
You should upgrade or use an alternative browser.
You should upgrade or use an alternative browser.
Thread Status: Hello
, There was no answer in this thread for more than 60 days.
It can take a long time to get an up-to-date response or contact with relevant users.
It can take a long time to get an up-to-date response or contact with relevant users.
I asked on Russian forum. It is something like this: Тема: "Бегунки" (4/4) - ПОДВОХ.NET - Форум о подводной охоте - ПОДВОХ.NET - Портал Подводного Охотника!
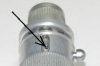
Thanks for the reference! Yes, that is how it must be fitted. Neman shows photos of the "Taimen" spear tail and line slide in his post on that thread. The absence of a parting line on the bush surface indicates that the bush is moulded in a cavity mould, same method as is used on vehicle suspension isolation bushes made from polyurethane. Taper points to the bottom and bush is pulled out from the top after some process to cause the material to set. The base diameter of the groove must be large enough for strength to resist tail bending, but the groove deep enough for the bush to key into it and not be squeezed up and out when hit at high velocity by the line slide.
Apparently some "Taimen" owners have been requesting a means to change over the vacuum seal in the muzzle without having to dismantle their entire gun. The reason that you now have to do this is that the "Taimen" has been designed to have all its muzzle components inserted from the inner rear end of the front hub (which is the combined muzzle and nose cone) in order to eliminate any externally exposed joins in that front hub with the gun fully assembled. When you do unscrew the front hub the inner barrel turns with it and separates from the rear housing, after which you can pull the outer tank off and then unscrew the inner barrel from the front hub. The internally and externally threaded annular nut (part 10) is the key to this unique design as it both confines and pre-compresses all the components installed inside the front hub from the hub's rear end in order to create a seal inside it while providing the threaded connection to the inner barrel that in turn screws into it. As the thick rubber section "O" ring (part 51; 21 mm x 11 mm and RW = 5 mm) has to be physically tucked into the cupped rear flange of the front hub with the inner barrel already screwed into position you have to disassemble and reassemble the gun in this particular order. Note that this fat "O" ring simultaneously seals off both the annular nut's inner and outer screw threads, that is why it has such a thick rubber section and just removing and replacing the front hub on its own would not guarantee that "O" ring moving into the correct position, it needs to be pressed into place (check it out on the "Taimen" gun maintenance video).
If the "Taimen" gun's vacuum seal lasts for at least a season then it can simply be replaced during the gun's annual strip down and oil change; I guess that was the rationale behind the original "end cap at either end" gun design as the front hub and rear trigger mechanism housing are both caps where the internal parts insert from their inwards facing openings (except for the cylindrical sear). However gritty underwater conditions with current swept and suspended sand/silt particles can damage the vacuum seal prematurely and owners wanted the option of cleaning particles out of the muzzle entrance and installing a new vacuum seal while still "in the field" (e.g. riverbank, lakeshore), so a new, two-part front hub is being evaluated with a detachable front end which allows the vacuum seal to be replaced by simply removing the front section after depressurizing the gun as the vacuum seal is also part of the shock absorption system. One of these new, two-part front hubs is being sent to me for evaluation to see how it stands up to saltwater, it should arrive here by the time our season starts. Saltwater wicking into tiny gaps between components and crawling along screw threads to slowly gnaw at the alloy parts will be a concern, so I will be greasing all the connecting threads while I have the gun apart to hopefully keep any saltwater out of them (the gun was originally assembled using drops of oil). Corrosion is not such a problem in freshwater as the water creates less of an electrical conductive path than it does in saltwater, so there is less concern about it penetrating small gaps in the gun and the corrosion resistance of the alloys being used. I expect the "Taimen" gun's alloys to be OK as they have been used in saltwater before, but some places are more salty than others, so better to take some precautions, just in case.
If the "Taimen" gun's vacuum seal lasts for at least a season then it can simply be replaced during the gun's annual strip down and oil change; I guess that was the rationale behind the original "end cap at either end" gun design as the front hub and rear trigger mechanism housing are both caps where the internal parts insert from their inwards facing openings (except for the cylindrical sear). However gritty underwater conditions with current swept and suspended sand/silt particles can damage the vacuum seal prematurely and owners wanted the option of cleaning particles out of the muzzle entrance and installing a new vacuum seal while still "in the field" (e.g. riverbank, lakeshore), so a new, two-part front hub is being evaluated with a detachable front end which allows the vacuum seal to be replaced by simply removing the front section after depressurizing the gun as the vacuum seal is also part of the shock absorption system. One of these new, two-part front hubs is being sent to me for evaluation to see how it stands up to saltwater, it should arrive here by the time our season starts. Saltwater wicking into tiny gaps between components and crawling along screw threads to slowly gnaw at the alloy parts will be a concern, so I will be greasing all the connecting threads while I have the gun apart to hopefully keep any saltwater out of them (the gun was originally assembled using drops of oil). Corrosion is not such a problem in freshwater as the water creates less of an electrical conductive path than it does in saltwater, so there is less concern about it penetrating small gaps in the gun and the corrosion resistance of the alloys being used. I expect the "Taimen" gun's alloys to be OK as they have been used in saltwater before, but some places are more salty than others, so better to take some precautions, just in case.
Last edited:
I wish you get your new parst for testing before the end of season.
Thanks! The parcel had finally progressed to "export" on 27th July, according to the tracking number, so the transit time will depend on the next mode of transport selected by whoever is handling the package. Could be a couple of months by ship, or more, which is how the other two parcels arrived. It will certainly be here before the next season ends as it has yet to start! I will be interested to see how the new hub has been engineered as the gun will still retain its buoyancy with it fitted.
Still winter here, so I have not tried it, diving for me is still a month or more away. We recently had a few sunny days, but the wind chill factor made for freezing conditions even with the clouds gone and the weather can deteriorate very quickly here within the one day, so you can set off on a trip and have a total wipeout by the time you arrive, plus daylight hours each day are still short. I am prepared to wait and I expect to use the gun before the new front hub arrives.
The new front hub is basically about maintenance access rather than performance, in some ways it goes against the "Taimen" design concept which was to eliminate exposed joins in the gun by having any body joins facing into and thus covered up by the outer tank. That makes leaks less likely in the vacuum system assembly. With a front opening hub that will change, which makes me wonder why they don't get rid of the annular nut and just insert everything from the front rather than the rear of this new hub. That would allow the fat "O" ring to be replaced with a thinner one (therefore no need to tuck it in) as then there would be only one thread to seal off, i.e. the inner barrel to hub screw thread in the rear of the new hub.
It is interesting to note that the "Taimen" inner barrel does not run through the full length of the gun, as it does on most rear handle pneumatic spearguns. Instead the "caps" at either end complete the inner barrel and the trigger mechanism is part of the rear housing, not the inner barrel. That means it would be possible to swap out the front hub and inner barrel as a complete assembly without involving the trigger mechanism. Unfortunately changing inner barrel diameters (10 mm to 11 mm) is prevented by the different diameter screw threads used in the front end of the rear housings, the rear housings are different for each model. So if you want to shoot 8 mm diameter shafts as well as 7 mm diameter shafts then you need a second "Taimen" gun.
Last edited:
Thanks for your reply. Always a pleasure to read you posts and replies.
I'm asking as I'm still considering to get my hands on a 5 or 600 model with 7 mm spear.
I follow your logic regarding the new front hub and that is maybe what you can conclude when you have evaluated it.
I can understand that the Taimen only is made with a slider system now - is your gun a slider version and is the slider system similar to the Tomba system?
I guess that the integrated handle and trigger design is something that we will see more in new and future gun designs.
Best regards,
Jégwan
Last edited:
Remember that the "Taimen" guns are measured to the rear of the grip handle, not the inlet valve cover or cap, so a "500" is really a "450" as the 45 degree angled handle adds that "extra" 50 mm. My gun is the slider, or line slide, "M" version. The special vacuum cuff shaft sealing/polyurethane shaft tail stop diameter combination is an integrated system that is currently synonymous with the "Taimen", so my guess is that the company decided to concentrate on that aspect and therefore discontinue the other model. If you think about it that special vacuum cuff is only necessary if you want to fire a shaft tail stop diameter through the cuff without damaging either component because the cuff can expand slightly more than 1 mm in diameter and let the tail stop pass through it, otherwise an "O" ring would do, provided that it was the right size for the job. In a way the "Taimen" vacuum cuff is a hybrid of a short rubber sleeve with an inner sealing lip positioned at its front end. How that short sleeve would respond to a big pressure differential I don't know, as in diving deep, where the rubber sleeve gets increasingly crushed, but I guess that it would then just start to press on the shaft rearwards of that sealing lip.
The "Taimen" line slide sits in a holder screwed into the front of the muzzle, so it is in a sense outside the muzzle, whereas the vacuum sealing lip is located some distance behind it and is inside the muzzle and does not depend on the line slide's presence at all, except as an aligning element for the spear tail's guided entrance to the vacuum cuff. There are four tiny port holes that drain the cylindrical space between the rear of the line slide holder and the entrance to the sealing lip, they are located inside the larger muzzle weight reduction bore holes and are drilled inwards through the carabineer side access slots.
In the "Tomba" system the line slide has to push the "O" ring back into the muzzle, then it keeps the shaft and the "O" ring in a centralized position until the developing vacuum as you load the shaft sucks the "O" ring hard up against its rear seat inside the muzzle. The basic difference is in the "Taimen" the vacuum sealing element stays inside the gun, whereas in the "Tomba" the sealing element flies off with the spear. In the former you cannot easily inspect the vacuum sealing element, whereas with the "Tomba" you can. Essentially the "Tomba" transformed the "Mamba" slider into an "O" ring, but very early on the "Tomba" vacuum sealing element was a piece of rubber tubing.
Generally rear handle pneumatic spearguns have the sear tooth located just above the trigger, or slightly forwards of it. The latest Omer/Sporasub pneumatic guns have the sear tooth located well in front of the trigger because the handle is a non-pressurized rear section added onto the guns. In the "Taimen" the trigger transmission pin is the transmission pin, sear lever and sear tooth all combined into one larger cylindrical element, but with a small diameter pin integrated at the bottom which protrudes out of the gun's pressurized rear housing for the trigger to act upon (there is an adjusting grub screw in the plastic trigger which I don't intend to touch as the guns are all test fired before shipping and it should be set up correctly).
Attachments
Just to add few words more about Mamba vs Tomba. At first glance seems Tomba to be the most minimalist version of Mamba. Instead of sealing plug with two O-rings (Mamba) there is only one O-ring (Tomba). But the most significant difference is that that O-ring in Tomba design has the smallest possible friction shaft to O-ring while in Mamba that friction is very high so that the sealing O-ring could leave the plug thus making friction (smaller O-ring to shaft) after shoot to be virtually no friction. The drawback of this design was high possibility of flooding the barrel during loading the spear gun and significantly higher drag in water of longer and thicker sealing plug+slider.
I guess that the integrated handle and trigger design is something that we will see more in new and future gun designs.
Best regards,
Jégwan
Only if there seems to be an advantage in doing so, like raising the height of the grip handle high up behind the air tank instead of sitting underneath it, or just slightly upwards from that alignment as is seen in most of today's pneumatic guns following the usual "Sten"/"Cyrano" 40 mm OD tank format. If you study the parts diagram (post #118, page 8) you will see that the "Taimen" is principally made up using turned metal components, the plastic injection moulded handle is basically a simple jacket that fits over the rear end of the all metal construction sitting inside it. That design lends itself to making a gun in this way, particularly as the smaller air passages in the rear housing all have to be drilled out. That is a clever way of making a speargun without having access to large section plastic mouldings that cost a fortune to tool up for, but the downside is you have to repetitively generate each part from solid metal stock. At least the machining requirements are simpler than the rear end of the "RPS-3" where milling machines must have been running flat out to fabricate the complex shapes found there. I mention the "RPS-3" as in a sense it is a contemporary of the "Taimen" and has a detachable high grip, rear handle section like the latest Omer/Sporasub guns, but the effort lavished on its machined metal construction was not rewarded by its performance.
Thanks for your replies and usefull information. I did nor realize that the length of the Taimen was measured this way.
I'm aware that the sealing "O" ring is located in the muzzle, but I had come to the faulty conclusion that the slider maybe had a function together with the muzzle - a kind of hybrid. Thanks for the clarification.
Yes Tromic; the Tomba slider system is a great simple design. I have just installed the new Tomba slider system on my Sten 11.
Beside the benefits mentioned, an integrated handle design (like Omer) makes it possible to replace handle and trigger as a unit and make the gun shorter for transport.
I will take a closer look at the "RPS-3"..
Jégwan
Info on the "RPS-3" can be found here at http://forums.deeperblue.com/pneumatic-spearguns/76715-hydro-pneumatic-gun.html and also at http://www.spearboard.com/showthread.php?t=154072 where a series of simplified diagrams show the action of the sear tooth latch. The pdf file of the English language translation of the 1978 CP 51 article is also now included there.
Info on the "RPS-3" can be found here at http://forums.deeperblue.com/pneumatic-spearguns/76715-hydro-pneumatic-gun.html and also at http://www.spearboard.com/showthread.php?t=154072 where a series of simplified diagrams show the action of the sear tooth latch. The pdf file of the English language translation of the 1978 CP 51 article is also now included there.
Thanks for that simplified diagrams Pete! Very interesting solution!
The "Taimen" pneumovacuum speargun now has a new handle moulding with a larger loop for the trigger finger guard so that thick gloves used in winter can more easily access the trigger area despite having "fat" fingers. The angled grip section is also a little smaller in volume so that gloved hands can wrap around it somewhat easier than before as although a gun with small proportions the "Taimen" always had a large handle (I can get my hand around the previous handle, but the grip section would not want to have been any larger). The ergonomic thumb support projection on the left hand side is retained for right handed users, but is omitted on a new "universal" model which is flat on both sides as the market for left handed users is considered too small to have a dedicated handle made just for them. This is welcome news for those users who previously had to grind the projection off if they wanted to shoot their "Taimen" left handed as apparently the original moulding had enough material in it to lose this projection without breaking through the side of the grip. I say "original", but the "Taimen" has had a series of small handle changes such as the textured finish on the grip. The new finger guard loses the curved back shape at the top where it blends into the upper section of the handle, now it is nearly vertical, otherwise the overall appearance of the handle remains unchanged. The attached photo shows the two new handles with a small image of the previous handle for comparison.
Changing the angle of the hand grip was the subject of some discussion, but it has been left as is. It is a distinctive styling feature of the gun and there is probably too much tradition behind it to change it. There was another handle being considered, but in my view it was an ugly looking thing despite having a less raked grip as its proportions did not look right. Maybe something for next time!
Changing the angle of the hand grip was the subject of some discussion, but it has been left as is. It is a distinctive styling feature of the gun and there is probably too much tradition behind it to change it. There was another handle being considered, but in my view it was an ugly looking thing despite having a less raked grip as its proportions did not look right. Maybe something for next time!
Attachments

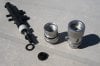
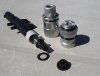
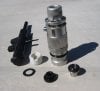
The two-part front hub (the muzzle/nose cone on a "Taimen") finally arrived on Monday, but I only got around to collecting it today from my post office box. It was supplied with some extra spare "O" rings that make up the additional sealing requirements of the new hub and a thin black plastic washer. I dunked the entire assembly in a glass of water for a few minutes to lubricate all of its seals and then dismantled it using the plastic tool/spanner developed especially for the "Taimen". If you purchase a "Taimen" then I recommend buying this tool as personally I think it is indispensable for working on the gun (a photo of it is attached, taken when I first received the gun) instead of using makeshift tools that may damage the surface finish on parts and lead to frustration if you break something. I have two of them, just in case.
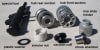
Once I dismantled the new hub I realized that I have to amend some statements that I made much earlier in this thread. You can now change the vacuum cuff without depressurizing the gun as the new two-part hub splits on a plane between the vacuum cuff (part 6) and the metal shock absorber body (part 8). Previously these were separated by a thrust washer (part 7) that was interposed between them so that they were all squeezed together like a sandwich when you tightened up the annular nut (part 10) working from the rear end of the single-piece hub, but that washer has now been eliminated as the threaded front boss on the rear section of the new hub that screws directly into the rear of the new front section of the hub acts as an immovable dividing wall between them. The new front hub section contains only the rubber vacuum cuff and a new plastic washer sitting underneath it which covers up a large slot cut across the front face of the threaded boss on the rear hub section behind it. The plastic washer is there so that the rear of the vacuum cuff does not squeeze down into the transverse slot when you tighten everything up. The transverse slot (functioning as a screwdriver slot, only much wider) is there to help assemble the gun without the front section of the hub in position as the ring of holes in the front outer face of the hub that are normally used for this task will not be available until you screw that front hub section onto the rear hub section. So the vacuum cuff no longer plays any part in shock absorption duty (maybe the periphery of it never contributed much before) as it is now fully isolated from the shock absorber body which impacts on the rear face of the fixed dividing wall instead of the thrust washer (part 7) used there previously. In a sense the new plastic washer and the dividing wall together replace the old thrust washer, the former are fixed in position, the latter was not. That means "O" ring 9 is the actual shock absorption damper, something which I had had my doubts about, but that was before I ever laid my hands on a gun and saw how large (or small) the "O" ring was compared to the outer flange on the vacuum cuff. The polyurethane bush on the piston nose takes care of the rest of the piston impact as before.
The new hub components are all well made and continue to make this speargun a "watch" in a world of pneumatic spearguns that are "clocks" by comparison with respect to their component sizes. Whether that matters to you personally is up to you, most of my other pneumatic guns are "clocks".
As the weather here is terrible and has been so for months (wind tossed seas, rain, grey overcast), then when (and if) we next have a sunny day I will take some photos of the new two-part hub before I install it in my gun.
Attachments

Last edited:
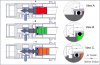
I recently found some of the company's drawings of the "Taimen" piston evolution over the years and have combined them to create one image. This shows how the vertical sliding sear column works in holding onto the "pointy mushroom" piston tail and how the air flows from the air reservoir onto the rear of the piston (N.B. single power version, so air does not have to flow through the hole that is the "sear tooth" as there is no regulator port to pass through which is otherwise located directly behind the sliding sear column, so that must be why you lose 10% of power in the power regulator version). The piston tail has been made longer to improve the air transfer pathway and has also been lightened by removing any metal where it is not actually required. Note that the "O" ring was initially moved onto the polyurethane bush to effectively lengthen the piston tail without changing the length of the actual piston, but concerns about the polyurethane bush taking off on its own and leaving the titanium tail behind motivated a change to placing the "O" ring back on the titanium tail or core. Nylon pistons often have their "O" rings on the nylon body and not on the metal tail or core, but polyurethane is a yielding material and will not necessarily stay fixed on the metal core as nylon does on those pistons, but a lot depends on the actual size and shape of the metal part buried inside the polyurethane which is moulded around the metal core. Latest piston is "C", but colour of the bush can change as it has in the past.
Attachments
I recently found some of the company's drawings of the "Taimen" piston evolution over the years and have combined them to create one image. This shows how the vertical sliding sear column works in holding onto the "pointy mushroom" piston tail and how the air flows from the air reservoir onto the rear of the piston (N.B. single power version, so air does not have to flow through the hole that is the "sear tooth" as there is no regulator port to pass through which is otherwise located directly behind the sliding sear column, so that must be why you lose 10% of power in the power regulator version). The piston tail has been made longer to improve the air transfer pathway and has also been lightened by removing any metal where it is not actually required. Note that the "O" ring was initially moved onto the polyurethane bush to effectively lengthen the piston tail without changing the length of the actual piston, but concerns about the polyurethane bush taking off on its own and leaving the titanium tail behind motivated a change to placing the "O" ring back on the titanium tail or core. Nylon pistons often have their "O" rings on the nylon body and not on the metal tail or core, but polyurethane is a yielding material and will not necessarily stay fixed on the metal core as nylon does on those pistons, but a lot depends on the actual size and shape of the metal part buried inside the polyurethane which is moulded around the metal core. Latest piston is "C", but colour of the bush can change as it has in the past.
This vertical sliding sear on Taimen is something new to me. Has your gun this type of trigger or the rotating design?
This vertical sliding sear on Taimen is something new to me. Has your gun this type of trigger or the rotating design?
All the "Taimen" guns use this vertical sliding column as the sear "lever", it is a novel feature in a design where many aspects have been changed to create a very different construction from most other pneumatic spearguns. Air pressure in the gun always biases the column downwards, hence no need for a spring to do it. In fact there are no coil springs used anywhere inside or outside the "Taimen" gun. When you pull the plastic trigger the grub screw incorporated in the top of the plastic trigger pushes on the exposed small diameter pin (it is actually a "D" shape) projecting from the bottom of the metal column and moves the column upwards. That upwards movement allows the spear tail to escape from the edge of the stepped hole that passes transversely through the column, similar idea to the "RPS-3", but in the "Taimen" the step is 90 degrees. The "RPS-3" uses a 60 degree step in a passive "sear disk", not a column, which is trapped by other moving elements that require very careful adjusting, whereas nothing requires adjusting in the "Taimen" (grub screw, set at the factory, just provides a hard surface for pressing on the exposed metal pin).