
-
Welcome to the DeeperBlue.com Forums, the largest online community dedicated to Freediving, Scuba Diving and Spearfishing. To gain full access to the DeeperBlue.com Forums you must register for a free account. As a registered member you will be able to:
- Join over 44,280+ fellow diving enthusiasts from around the world on this forum
- Participate in and browse from over 516,210+ posts.
- Communicate privately with other divers from around the world.
- Post your own photos or view from 7,441+ user submitted images.
- All this and much more...
You can gain access to all this absolutely free when you register for an account, so sign up today!
The DeeperBlue.net Gun Building Extravaganza - The Build
- Thread starterTHE GITS
- Start date
You are using an out of date browser. It may not display this or other websites correctly.
You should upgrade or use an alternative browser.
You should upgrade or use an alternative browser.
Thread Status: Hello
, There was no answer in this thread for more than 60 days.
It can take a long time to get an up-to-date response or contact with relevant users.
It can take a long time to get an up-to-date response or contact with relevant users.
Yes the project is still on going - we had to wait for some components to arrive but it will be all systems go very soon. In fact there will be another poll later today!
You Tease Sir!!!rofl
Yes, How is it going? When will it be on my doorstep?
")
I've been working on a Hawaiian sling for a while now. Im trying to get the perfect materials for the sling. My biggest problem now is the shaft. I have been experimenting with different materials for the shaft, all 1/4". This is my first custom Hawaiian sling so all these tests have been dry tests. I know the most popular seems to be stainless steel. But it seems to have the slowest release. I am thinking of trying aluminum due to its weight, I would imagine it would have a quicker release and close to the same impact. If anyone has experience with this, please let me know your opinion.
Thanks.
Thanks.
Hello spearos
Things have been a bit slow in the workshop, changeable weather isn't a good time to play around with pieces that need to be a straight as we need this to be. Maybe I have been a bit too careful but I can not apologise for that. But now let's move forward to the next stage.
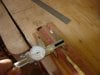
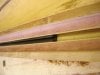
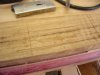
Last time we had glued a thin strip of Mahogany to the side of our blank to act as a datum edge. Due to the length of time this had been left I ran the bench plane over the top surface of the barrel to clean off any surplus glue and any protruding Mahogany. This is also a useful way we may sheck the straightness of the blank. Good news, the top edge had remained perfectly straight since we last left it. Now we must think about making the outside edge of the Mahogany strip parallel to the centre line of the tapered gun blank. Firstly the centre line of the middle tapered laminate was found and marked. then using a calliper the position of the outside edge was marked with extreme care at both the front and the back of the gun. Then with almost as much care the position at the centre of the gun was marked. Now using a straight edge a line was marked using a marking knife. The purpose of this line in not one that we will plane to but only as a rough visual guide.
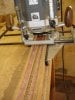
Now we will plane away the exess wood away to give us a precision surface from which to work from. Fix the blank held on the bench on its side with the Mahogany strip uppermost and the muzzle end towords the back of the bench so we plane down through the grain. It helps when we plane long flat surfaces to use the longest plane we have. In my case this is a Record No7 22" long & 2 3/8" wide, a huge tool but this has been my plane of choice for many years even on pieces smaller than itself. At first we can remove thick shavings so to reduce the time involved removing waste. Starting at the butt of the gun and slowly moving the start point of the cut towards the muzzle plane away the waste until we are very close to the marked line. At this stage we reduce the thickness of our shaving to give us a little more precision. Now the only two points that are of concern are the original two marks we made with precision. plane away the wood carefully until these two marks until they are split by the plane. We now have the front and back exactly right but the middle of the blank is still an unknown. To flaten between our two points we must further reduce the thickness of our shaving until the plane removes only a gossemer thin wisp. Because the bench plane is perfectly flat, I flatten mine every 6 months and the cut is so thin we can plane between the front and back points until no more shavings can be removed. This will leave a near perfect flat surface, simple. One thing we must do throughout the whole of the above procedure is to regularly check the surface's squareness to the top datum surface. We are now ready for the next step.
Things have been a bit slow in the workshop, changeable weather isn't a good time to play around with pieces that need to be a straight as we need this to be. Maybe I have been a bit too careful but I can not apologise for that. But now let's move forward to the next stage.
Last time we had glued a thin strip of Mahogany to the side of our blank to act as a datum edge. Due to the length of time this had been left I ran the bench plane over the top surface of the barrel to clean off any surplus glue and any protruding Mahogany. This is also a useful way we may sheck the straightness of the blank. Good news, the top edge had remained perfectly straight since we last left it. Now we must think about making the outside edge of the Mahogany strip parallel to the centre line of the tapered gun blank. Firstly the centre line of the middle tapered laminate was found and marked. then using a calliper the position of the outside edge was marked with extreme care at both the front and the back of the gun. Then with almost as much care the position at the centre of the gun was marked. Now using a straight edge a line was marked using a marking knife. The purpose of this line in not one that we will plane to but only as a rough visual guide.
Now we will plane away the exess wood away to give us a precision surface from which to work from. Fix the blank held on the bench on its side with the Mahogany strip uppermost and the muzzle end towords the back of the bench so we plane down through the grain. It helps when we plane long flat surfaces to use the longest plane we have. In my case this is a Record No7 22" long & 2 3/8" wide, a huge tool but this has been my plane of choice for many years even on pieces smaller than itself. At first we can remove thick shavings so to reduce the time involved removing waste. Starting at the butt of the gun and slowly moving the start point of the cut towards the muzzle plane away the waste until we are very close to the marked line. At this stage we reduce the thickness of our shaving to give us a little more precision. Now the only two points that are of concern are the original two marks we made with precision. plane away the wood carefully until these two marks until they are split by the plane. We now have the front and back exactly right but the middle of the blank is still an unknown. To flaten between our two points we must further reduce the thickness of our shaving until the plane removes only a gossemer thin wisp. Because the bench plane is perfectly flat, I flatten mine every 6 months and the cut is so thin we can plane between the front and back points until no more shavings can be removed. This will leave a near perfect flat surface, simple. One thing we must do throughout the whole of the above procedure is to regularly check the surface's squareness to the top datum surface. We are now ready for the next step.
Attachments

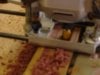
Now we can cut the recess that has been discussed by yourselves. An interesting concept, we shall see how it works as the gun nears completion.
This procedure requires the use of a router. This is a simple enough tool to use but I recommend that you have a little training before playing with one of these. With the cutter whirring around at 22,000 RPM accidents can happen very very quickly. Of course if the tool was dangerous no one would use them, they are safe when used correctly. Eye, ear and respiratory protection is mandatory at all times. For those who have not met these tools before I shall present a quick description. They are very basically a high speed motor with a chuck/collet to hold a cutter held in a vertically adjustable cradle. There is also an adjustable side guide of fence to allow us to cut parallel to an outside edge.
I have taken the liberty of assuming that the maximum sided bands that will be used on this gun will be 20mm. So using a 16mm half round cutter cutting 8mm deep and with a distance across the recess of 40mm will give us a snug groove. I will be happy to widen this if need be, please discuss. First from the previously marked centre line mark from the datum edge with a marking guage two lines 20mm either side of the line. Now carefully fit the cutter into the collet with as much of the shank inside the collet to reduce vibration. Place the router on the bench surfave and lower the cutter until it just makes contact with the bench surface, lock it right there. Using the depth adjustment guage on the side, set the depth of cut to 8mm, lock the gauge. Place the router on top of the gun blank with the guide fence fitted. Align the edge of the cutter with one of the marked lines and lock the guide fence. Starting at the end of the blank lower the cutter about 2mm and switch the router on, slowly guide it up the blank until you reach the far end, switch off and do the same again untill you reach the 8mm depth. Move the guide fence so that we can cut to the other line. Repeat the above procedure, you should now have two half round grooves running along the blank. I recomend that you you use pre machined scraps of wood to support the router at each end of the cut to prevent it falling off the end and damaging your masterpiece.
Now it is a simple matter of using a flat bottomed cutter to remove the hill along the centre line of the gun. If you have used sharp cutters and done all this with care you should be left with a surface that needs very little further attention.
Attachments
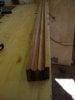

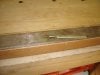
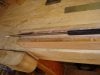
Time now to fit the track. Here due to using the recessed track the use of a small ball end cutter will be avoided. The use of such a small cutter extended out of the router collet would most likely result in a broken cutter and a ruined gun. As this project is aimed at being repeatable by an average woodworker we must avoid this and use a ready built derlin track.
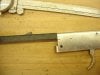
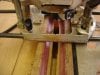
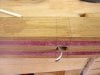
We must first find where we shall place out trigger, assemble the track, shaft and trigger and place it on the blank. Allow room for a handle and a loading pad at the butt end and make sure there is plenty of room for the muzzle at the other. Mark the position of the trigger mechanism accurately with a marking knife. The top of the dovetail shaped track measured 11mm so I chose a 10mm cutter to remove as much waste from the track slot before we cut the dovetail.
Earlier I mentioned using pre machined pieces to stop the router falling off the end of the blank. Because our blank is much longer than we need I did not bother with these and put up with the inevitable messy fall off as can be seen in one of the photographs. Having extra length gives us space to set up the cutter/guide fence to the exact centre line of the gun. Using the track itself set the depth gauge of the router. Now using 2mm cuts remove the wast from the front of the blank all the way back to the trigger position of the gun. We are left with a square sided groove running down the centre of the gun. It is at this stage were there is so little teak between the track and the purple heart that we see how good our previous work has been. In this case it was perfect and I was very proud.
Attachments
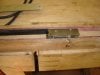
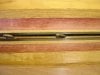
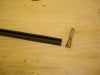
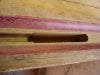
Many years ago I had the misfortune to have to use a Leigh dovetail jig for a batch of unseen corner joints of a large job our workshop was under taking. This jig uses dovetail cutters that employ an extended shank, the one in the photograph was one such cutter that illustrates the likelihood of such extended cutters to snap on the shank, this was a near brand new one that I broke. As it happened I put it in my back pocket so I would not loose it while I was fitting a new one to the router. Of course I forgot about it and it ended up at home and eventually made its way into my own small workshop. While looking for a cutter to match the angle of the track I came across this cutter. Its angle was a perfect match as was its bottom width. Do not count of that sort of luck but you never know.
The router has already been set at the exact centre line of the gun, so don't change this. Just release the cutter and lock in the dovetail cutter. Set the cutter depth by setting it down on the bottom of your previous cut. How? Turn the cutter 90 degrees so it fits into the square cut. Bring the cutter to the front of the blank, and start the cut. It is vital that the base of the router stays in intimate contact with the top of the blank. Failure to do this will result in a very messy cut that while repairable will always look messy. At the end of the cut, switch the router off and hold it tight until the cutter stops. slide the router back along the blank to remove it.
Clean all the dust from the slot and test your track. If it is too tight, adjust it by fine adjustment of the guide fence.
Attachments
Last edited:
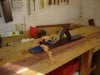
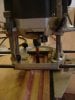
Time to fit the trigger.
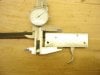
We know this must obviously be on the centre line of the gun, simple so far. What we need to know is how deep do we need to fit it. Time again to re assemble our bits. WE can now measure the difference in height between the top of the trigger and the top of the track or the surface of the recess. In this case they were equal so no awful math.
The trigger is 11mm wide, so to allow for a little varnish I have decided that a 12mm cutter will be perfect. With the guide fence still set at exact centre of the gun, fit the 12mm cutter. Ones used for fitting kitchen worktops are ideal being 60mm long. Sit the router back on top of the gun, now carefully lower the cutter onto the track surface. Now we can set the depth of cut to that of the trigger mechanism. This can be done using either a measuring device or the trigger itself.
Unless the cutter has a bottom cut, plunging the cutter into wood is a difficult thing to do. It may help if you drill a 10mm hole at each end of the trigger recess that we marked with the marking knife earlier. Again using 2mm cuts, remove all the wood from the trigger recess.
Attachments
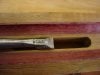
Out trigger mechanism has a square back so we must square off the back of our recess. To do this use a 12mm bevelled edge chisel, mine is getting impossibly short but still works like a dream. Make sure the chisel is very sharp then very carefully starting at the wide end pare down the waste using the back of the chisel as a rest to support the cut. Eventually you will be left with a remnant of the router cut running as a thin line for the whole height of the recess, stop here.
We must now turn our attention to the trigger itself. We need to cut a hole on the underside of the gun to allow it to fit into the recess. Fit the shaft into the mechanism, place the mechanism on the gun in exact alignment of the recess. Now with a pencil mark the front most position of the trigger and a little more. Now pull the trigger until the sear releases, mark the rearmost position of the trigger and a little bit more. Using a square, mark these positions on the underside of the gun. Turn the blank over and using the 12mm cutter remove the wood between these marks.
Now reassemble the parts into the gun and test them.
Attachments


Finally for today we can drill the holes for the securing bolts for the trigger. Mark the depth of the recess on the side of the gun along with its longitudinal position. Either place the trigger on top of these marks and mark the holes, manually measure and mark the position of the holes or make a card marking jig. Finally, datum surface down drill the holes using a drill press for accuracy.
Now we must discuss the handle and the final shape of the gun.
See you next time spearos
Now we must discuss the handle and the final shape of the gun.
See you next time spearos
Attachments
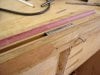
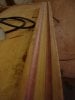
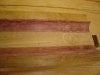
The more I study the work done, the more I appreciate the standard & care taken.
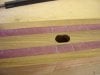
Note how the tiny detail of teak running alongside the track shows up as neat pin stripes. What a great project this is - next poll must be based around the handle shape - so if you have any ideas please tell us about them.
Note how the tiny detail of teak running alongside the track shows up as neat pin stripes. What a great project this is - next poll must be based around the handle shape - so if you have any ideas please tell us about them.
well then im changing my name to 0.......yes thats the number zero....uh huh thats right it comes before all the numbers a letters....how does it feel to lose?rofl:martial
Umm ok , on a slightly more serious note is the handle being made from scratch or using a stock item ? If being made I have X/L hands , shoot R/H and would like a resting notch for my trigger finger so I don't fire it by accident , thanks very much .