
Guest viewing is limited
- You have a limited number of page views remaining
- 2 guest views remaining
- Register now to remove this limitation
-
Welcome to the DeeperBlue.com Forums, the largest online community dedicated to Freediving, Scuba Diving and Spearfishing. To gain full access to the DeeperBlue.com Forums you must register for a free account. As a registered member you will be able to:
- Join over 44,280+ fellow diving enthusiasts from around the world on this forum
- Participate in and browse from over 516,210+ posts.
- Communicate privately with other divers from around the world.
- Post your own photos or view from 7,441+ user submitted images.
- All this and much more...
You can gain access to all this absolutely free when you register for an account, so sign up today!
Custom spearguns pictures
- Thread starterOregonSpearo
- Start date
Thread Status: Hello
, There was no answer in this thread for more than 60 days.
It can take a long time to get an up-to-date response or contact with relevant users.
It can take a long time to get an up-to-date response or contact with relevant users.
Safety mechanism
- Is there a regulation or law which requires speargun manufacturers to install a trigger lock on spearguns?
- In the US are there mandatory safety certification tests for spearguns before they can make it on the market?
- Is there a regulation or law which requires speargun manufacturers to install a trigger lock on spearguns?
- In the US are there mandatory safety certification tests for spearguns before they can make it on the market?
Hi guys,
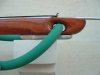
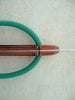
I changed the bands on my gun from 16mm to 19 mm and what a difference they make!!!
I struggle a little bit with the loading, but once loaded the gun is deadly")
I even hit my first fish with it. It is a small 0.5 kg mullet, but it's a good start considered the fact that the season is just starting here.
Here is a picture with the new bands.
I changed the bands on my gun from 16mm to 19 mm and what a difference they make!!!
I struggle a little bit with the loading, but once loaded the gun is deadly
I even hit my first fish with it. It is a small 0.5 kg mullet, but it's a good start considered the fact that the season is just starting here.
Here is a picture with the new bands.
Last edited:
Question for Daryl & other Experts at this stuff:
I want to try your "T" lamination on my present gun project. My question has to do with cross-grain lamination. I cut the two vertical pieces from a single plank of teak. In laminating these 2 pieces I'm thinking that it would make sense to epoxy the opposing sides, so the slight bend of each piece would be countered by the other. But, if I do this the grains are not crossed. Only if I turn one of the pieces 180 degrees does it show the cross graining. My intuition tells me that cross grain lamination can be applied to three or more laminates, but not in two. Am I missing the boat here?
Also, should I laminate the two vertical pieces first, straighten them, and then laminate the horizontal piece? Or, all three at one time?
Thanks in advanced.
Dobs, very nice gun dude. I advise you 6.25mm shaft rather than 6.5 if you already did not tried this. I think you are hunting in black sea, if this is the case 0.5kg mullet is not bad all if what i heard about the black sea is correct :hmm But a nice gun anyway
Thanks Murat,
I do spearfish in the Black Sea and my shaft is 6.25 Demka. Some more experienced guys here told me to go with the 6 mm, but I think that with 19mm bands 6.25 is a better idea.
As for the 0.5 kg mullet is actually the average size here. There are also bigger mullets and very decent sea basses, but not on my stringer yet :hmm
Cheers!
Hello,
I'm new to this forum, but have been making my own guns for about 7 years now. This is a great site with lots of info consolidated in one place! In someways, I wish I had learned about it sooner so I wouldn't have had to "reinvent the wheel" It is amazing how many ideas that I have had over the years at making a speargun better (that I thought were original) only to find out that they had already been tried by others. However, knowing as stubborn as I am, I probably would have had to learn from my own mistakes anyway<g>.
I have had a chance now to read many of the posts on this forum, and I agree with most of the advice 100%, where I differ usually is only based on personal preference. Still considering myself a "beginner" I doubt I can add any new advice that the experts on this fourum haven't done already, but I can certainly "second" their advice from some of my own personal experiences.
I certainly have had some learning experiences over the years. Like many of the other newcomers building thier first gun, I had to do it all "my way" ...make every part myself and try to find a "bigger, better and cheaper way"... I of course built my own stocks, carved my own handles, made my own trigger mechanisms, spear-tips, and yes ...even made my own back yard funace to heat, quench and then temper my own steel spear shafts. And not knowing any better, test fired my guns on land (story for another time)
Attached are pictures of my latest gun. Its not 100% because I didn't put the teak handle insets on. They really give the gun a classic look. Also, the finish lost its luster cause I took it out the last couple weeks for testing.
The gun is my ~10th fully assembled and tested gun it is virtually identical to the 9th gun I made except for minor improvements (im almost there!) The 9th worked great, but it was lost at sea! I'm still hurting over that one!
Sorry I dont have pictures as work in process, but I will describe some basic attributes.
The gun has 6 laminations of teak. I've worked with many woods (mohogany,oak,poplar,walnut,cherry), but once I tried teak, I have never gone back! Teak works, carves, and even smells great.
I laminated with resourcinal sp? I'e never had anything delaminate ...including mixed species of wood (I can't say the same for all epoxies). I have great confidence in this stuff. Also, drying to a dark brown color, I like the "pronounced" sandwich effect it gives to the layers. Also, I think its a bit better at filling voids between laminations without "leaking out" like epoxy.
Instead of making my own trigger mech on this one, I made life simple and just bought a riffe trigger mech....no real preference here between the other touted mechs, just the most reasonable in terms of price/availability.
I inset a 3/8 nylon tube as a track. I am a strong believer in an enclosed track and probably will continue using this method in all my guns. Delrin is too expensive, and I don't think there is any science showing its low friction has any effect under water in terms of speed or distance. I can only tell you the difference between my enclosed track guns and my open track guns is the difference between shooting a shotgun and a rifle! I can fire this gun on its side, or upside down and it still shoots perfect every time. I also like the nylon track cause it take the wear and tear better. My guns without the nylon track are worn, scratched, chipped etc. maybe not from the actual firing of the gun, but probably from the way I load the gun and let it bang in the reef when Im atteding to other things. The track is pinned and set in a bed of silicone. The tube was inset in the gun and the top was cut off revealing the channel for the fins. The tube is flexible enought to expand and contract witht the wood around it since it is not a ridgid bar.
The finish is several layers of epoxy with a final coat of varnish. A few thoughts on the finish. First, it is almost a crime to put anything over teak. If I was doing this peice as "decoration" for my mantle, I would simply leave the wood bare and burnish it with ultrafine steel wool bringing out the natural oil in the wood. Fortunately, I'm not ready to hang the gun over the mantle ;and therefore, I wanted something more durable. I tried leaving it bare and wiping with tung oil and the like, but since teak is relaively soft, it gouges very easy. I would come back from dives only to find I had banged the gun into the reef. There were always deep scraps, gouges and the like. So this brought me to epoxy. I put a "piano" finish on this gun. The trick here, which I haven't seen others mentioning on other post, is to 'scrap' the wood and the epoxy finish level and flat in between each coat. You must use a "cabinet scrapper" or similar tool. Teak and epoxy scrap like a dream leaving the final finish filled, perfeclty level. No sanding required, A little rubbing compound and your have a surface as flat and shinny as glass....and certainly no air bubbles!
On the handle I used marineboard becuase there can be lots of strees on the handle (especially with quick moves on a heavy gun, or when fighting a fish)...Ive used wood for handles before but, worried that some of the fine carving might crack or split where attached to the stock.
Sorry for the long post, but I look forward to hearing your feedback and helping where I can,
Gator
Attachments
Hey Gator,
Beautiful gun! Regarding "scrapping" the wood and the "Cabinet scrapper," could you please explain your process a little more. I'm unfamiliar with the terms/technique. I am just beginning to construct my own gun, and would like a finish similar to yours.
Thanks,
Lou
Beautiful gun! Regarding "scrapping" the wood and the "Cabinet scrapper," could you please explain your process a little more. I'm unfamiliar with the terms/technique. I am just beginning to construct my own gun, and would like a finish similar to yours.
Thanks,
Lou
Lou,
I found this link for you which describes scraping...
http://www.taunton.com/finewoodworking/pages/w00007.asp
When you get good at it, the wood itself can be scraped to a super fine finish. With epoxy, scraping is a must. Sand paper tends to gum up when sanding epoxy also you can "burn" the finish with friction. With scraping, the high points are quicky shaved away.
Unlike sanding, scraping makes/keeps the surface perfectly flat. Generally, most people desiring a glass like finish don't properly "fill the grain" A liquid grain filler matched (or contrasted) to the wood is best for this purpose because it won't shrink. If the grain is filled it will require fewer layers of finish and therfore save time in the end. Most people skip this step trying to save time. Instead they rely on mutiple layers of , varnish, poly, or epoxy to "fill the grain". All these finishes will shrink (epoxy to a much lesser extent) forming ridges around the pores of the grain as it dries (leaving dimpled effect). These ridges need to be scraped flat in between successive coats. Most people sand which tends follow the contor of the surface instead of shearing off the tops of these high ridges. The result is often a very thick, wavy, dimpled, "plastic-like", cheap finish on an otherwise expensive gun.
In between coats of epoxy, I scrap flat, then "lightly sand" to scratch the surface for better adhesion to the next coat. When you do sand you should only use sandpaper that is attached to a stiff/flat sanding block with a layer of cork under the paper. This method maitians a flat surface.
If you want a satin finish (like the one in the pic) rub your final finish with 0000 steel wool. For a high gloss finish use finer and finer 'automotive' rubbing compound. Also, if you use varnish as your final coat for U/V resistance, wait 30 days before "rubbing out" the finish. For my personal guns when I want a mirror finish without the heavy amber color, I usually don't put a final varnish coat. Instead I polish the epoxy with several coats of high quality automotive type carnuba wax (with U/V inhibitor) and always take care to put the guns in a case out of the sun when not in use)
Hope this helps,
Gator
Lou,
Here is a better site which describes the benefits and process much better.
http://woodworking.about.com/gi/dyn...w.brendlers.net/oldtools/scraping/scraper.htm
I guess from reading the first article its techinically called a "card scraper" . My cabinet maker showed me the process and being a "cabinet maker" he called it a 'cabinet scraper'. Whatever its correctly called, I'll never use a sand paper on my guns again.
gator
Gator,
You are a veritable wealth of information! Thanks for the two links. I have read them, and am going to try scraping my finished gun stock. I have a prototype that I'll experiment on first, but I'm excited to try this technique.
Lou
You are a veritable wealth of information! Thanks for the two links. I have read them, and am going to try scraping my finished gun stock. I have a prototype that I'll experiment on first, but I'm excited to try this technique.
Lou
Re: Plastic lumber for barrel
Colin
I don't know specifically if Trex floats but i'd be glad to check i work in a lumberyard so there is no problem with me getting a piece to to throw in the bay and give it the old witch test. The major problem i see with trex is that it is not in any way structural. given the forces acting from the bands i would very seriously doubt its ability to stay straight even with being laminated with fiberglass cloth. For instance they say to put 5/4" trex on 16 inch centers in order to combat flex and that is only with 200 lbs of pressure (men's weight) Assuming a 36" barrel at least the force required to flex it would'nt take much. Another thing to think about is that as i recall trex expands and contracts pretty significantly with temperature changes. it might make delaminating a problem.You might be able to stiffen it up by doweling it some how.OregonSpearo said:Does anyone know if plastic lumber floats? I'm talking about that recycled plastic substitute to cedar for decking: http://www.trex.com/
It will never rot, fairly cheap and can be worked with regular wood tools. It's also eco-friendly unlike teak and the likes. It may be a bit flexy but this could be improved by sandwiching epoxied fiberglass cloth. Anyone knows if it floats?
Colin
Hi Dobs, remember me?, pestering you about details on your speargun construction. You are free. Cause finally it is ready.
I have only one last question: I only a applied 3 coats of epoxy as a finish and sometimes when my speargun is trashed onto rocks, the epoxy layer gets slightly brushed and little parts even peel off. Does the varnish layer you applied stay integral with minor abuse?
I have only one last question: I only a applied 3 coats of epoxy as a finish and sometimes when my speargun is trashed onto rocks, the epoxy layer gets slightly brushed and little parts even peel off. Does the varnish layer you applied stay integral with minor abuse?
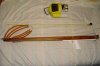
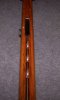
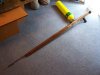
Hi Dobs, these are some pics of the resultant fishing tool. I also have accounted for all the contruction steps in the making of the gun on my website:
http://www.geocities.com/kb_griffin/
This site in the future will entail spearhunting,spearfishing in Malta Gozo and Comino. Custom Speargun construction and something about the mediterranean fish.
Thanks for your help.
GriffiN ---> <*))))>< People unaware of the sea lead plastic lives
http://www.geocities.com/kb_griffin/
This site in the future will entail spearhunting,spearfishing in Malta Gozo and Comino. Custom Speargun construction and something about the mediterranean fish.
Thanks for your help.
GriffiN
---> <*))))>< People unaware of the sea lead plastic livesHi Dobs,
The pics I forgot to attach.
GriffiN ---> <*))))>< People unaware of the sea lead plastic lives
The pics I forgot to attach.
GriffiN
---> <*))))>< People unaware of the sea lead plastic livesAttachments
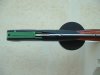
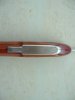
Green_Griffin,
Congrats to you, great work and great documentation of your project.
Few questions for you:
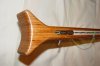
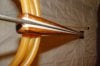
- why the 2 line holders on the top, as well as the groove on the muzzle?
- I assume the steel plate is for balance. How did you attach it?
- after you laminated, was the stock straight or did you have to rip it a little?
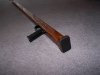
- how did you ensure that the distance between the handle's tenon and the groove was right, so that the shaft would be in-line with the trigger mech?
Again, thanks for the description, that is very valuable information.
Congrats to you, great work and great documentation of your project.
Few questions for you:
- why the 2 line holders on the top, as well as the groove on the muzzle?
- I assume the steel plate is for balance. How did you attach it?
- after you laminated, was the stock straight or did you have to rip it a little?
- how did you ensure that the distance between the handle's tenon and the groove was right, so that the shaft would be in-line with the trigger mech?
Again, thanks for the description, that is very valuable information.
Green_Griffin,
also the Esclapez handle has a plastic notch inside that prevents the barrel tenon to go all the way to the bottom. Did you cut the plastic notch or just insert the shaft until it hit the notch?
also the Esclapez handle has a plastic notch inside that prevents the barrel tenon to go all the way to the bottom. Did you cut the plastic notch or just insert the shaft until it hit the notch?
Hi OregonSpearo,
Thanks for the compliment.
The liners on top: found them to hold the spear shaft into place, the system is dead easy to implement in the sea. Does not obstruct aiming and it is really difficult for the line to get entangled.
Wish to attach it with stainless steel screws (It would look nicer) But silicon glue did the trick. I know it would look better with screws, but this is not an art contest.
The stock was straight enough. Did not give it much room to warp while gluing.
Shaft was inserted in immersion handle and then placed on stock groove so that I could outline where the tenon could be cut.
On figure 4 on the tenon you can see that I cut a groove to make sure that the trigger handle and stock are tight.